Have you ever flicked your double light switch only to find one or both lights not working? It’s frustrating, right?
But before you call an electrician, there’s good news—you can often fix it yourself. Understanding how your double light switch works and knowing the simple steps to troubleshoot can save you time and money. In this guide, you’ll learn easy, clear instructions to get your lights back on quickly and safely.
Ready to take control of your home’s lighting? Let’s dive in and fix that double light switch together.
Tools And Materials Needed
Fixing a double light switch needs the right tools and materials. Having them ready makes the job safer and faster. Each tool plays a key role in the repair process. Prepare everything before you start working.
Safety Gear
Protect yourself first. Use safety gloves to avoid shocks. Wear safety goggles to protect your eyes from dust or sparks.
Screwdrivers
You need both flathead and Phillips screwdrivers. They help remove and tighten screws on the switch and cover plate.
Voltage Tester
Check if the power is off. A voltage tester shows if wires carry electricity. It keeps you safe during work.
Wire Strippers
Strip wires carefully without damaging them. Wire strippers remove insulation from the wire ends for new connections.
Electrical Tape
Use electrical tape to cover wire connections. It prevents short circuits and protects exposed wires.
Replacement Switch
Get a new double switch that matches the old one. This ensures proper fit and function after installation.
Wire Nuts
Wire nuts join wires securely. They keep connections tight and safe inside the switch box.
Safety Precautions
Always turn off the power before starting any electrical work. Use a voltage tester to confirm no electricity flows. Wear insulated gloves to protect against shocks.
Turn Off The Power
Always switch off the power at the circuit breaker before starting. This stops electricity from flowing and keeps you safe. Double-check by flipping the light switch to confirm the power is off. Use a voltage tester on the wires to be sure no current is present.
Use Proper Tools
Use tools with insulated handles to avoid electric shocks. Avoid using metal tools without insulation. Make sure your tools are in good condition and fit for electrical work. This reduces the risk of accidents and damage to the switch.
Wear Safety Gear
Wear rubber-soled shoes to reduce the risk of electric shock. Use safety glasses to protect your eyes from debris. Gloves can also help protect your hands from sharp edges and electrical hazards. Safety gear adds an extra layer of protection during repairs.
Work In A Dry Area
Never work on electrical switches in wet or damp conditions. Water conducts electricity and increases the chance of shock. Ensure the room is dry and your hands are not wet before starting. Proper conditions keep you safer while fixing the switch.
Know Your Limits
Only attempt repairs if you feel confident and understand the task. Mistakes can cause serious injury or damage. Call a professional electrician if unsure about any step. Safety is more important than rushing to fix the switch.
Identifying The Problem
Identifying the problem is the first step in fixing a double light switch. It helps you know what is wrong and how to solve it. Some issues are easy to spot. Others need simple tests. Understanding the problem saves time and effort.
Common Issues With Double Switches
Double light switches often face a few typical problems. One switch may not work at all. Sometimes both switches work, but the lights flicker. Loose wiring can cause the switch to feel loose or make a buzzing sound. Dirt or wear inside the switch can stop it from working properly. These issues are common and can often be fixed without replacing the whole switch.
Testing The Switch
Testing helps find the exact problem with a double switch. First, turn off the power at the breaker to stay safe. Use a voltage tester to check if power reaches the switch. Press each switch and listen for any sound or check if the light turns on. If the switch feels stuck or does not click, it may be broken. Testing each part helps you decide if you need to repair or replace the switch.
Turning Off Power
Turning off the power is the first and most important step before fixing a double light switch. This step keeps you safe from electric shocks. Always double-check that no electricity flows to the switch before you start any work.
Electricity can be dangerous. Even a small mistake can cause injury. So, never skip this part. Take your time and do it right.
Locate The Main Circuit Breaker
Find your home’s main circuit breaker box. It is usually in the basement, garage, or a utility room. Open the box carefully. Look for the switch that controls the power to the area where the double light switch is located.
Turn Off The Correct Breaker
Flip the breaker switch to the “off” position. This will stop electricity from flowing to the switch. If you are unsure which breaker controls the switch, turn off the main breaker to cut power to the whole house. This is safer but will turn off all your electricity temporarily.
Test The Power Is Off
Use a voltage tester or a non-contact voltage detector. Hold it near the double light switch wires. If the tester does not light up or beep, the power is off. This step confirms your safety before handling any wires.
Removing The Switch Cover
Start by turning off the power to the switch for safety. Unscrew the cover plate carefully to reveal the switch inside. Gently pull the cover away from the wall without damaging the wires.
Gather The Necessary Tools
Start by collecting tools needed for removing the switch cover. A flathead screwdriver or a small Phillips screwdriver usually works. Ensure the tools fit the screws well to avoid damage.
Turn Off The Power
Safety first. Switch off the power at the circuit breaker. This prevents electric shock while working on the switch. Double-check by trying to turn on the light.
Unscrew The Switch Cover
Locate the screws on the double switch cover. Use your screwdriver to carefully remove them. Keep the screws safe for reinstallation later.
Remove The Cover Plate
Gently pull the cover plate away from the wall. Avoid forcing it to prevent cracking the plastic or damaging the wall. Set the cover plate aside on a flat surface.
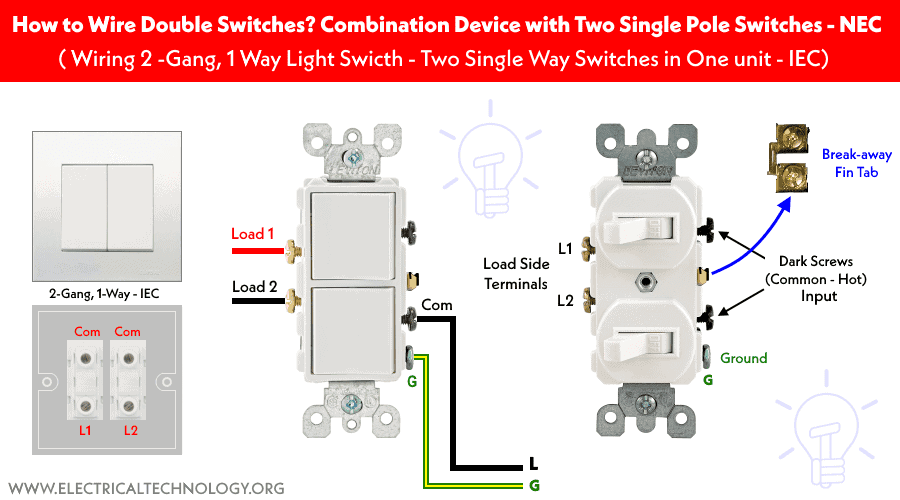
Credit: www.electricaltechnology.org
Inspecting Wiring Connections
Inspecting wiring connections is the first step to fix a double light switch. Proper wiring ensures the switch works safely and correctly. Check all wires carefully before doing any repairs. Look for signs of damage or loose connections. A small mistake can cause the switch to fail or create a safety hazard.
Loose Or Disconnected Wires
Loose or disconnected wires cause many switch problems. Wires can loosen over time due to use or vibration. Pull the wires gently to see if they are secure. Tighten any screws holding the wires in place. Reconnect any wires that have come off the terminals. Make sure wires are attached firmly to prevent flickering or no power.
Damaged Wiring
Damaged wiring can stop your switch from working. Look for frayed or broken wire insulation. Exposed wires can cause short circuits or shocks. Cut out damaged sections and replace them with new wire. Use electrical tape or wire nuts to protect wire ends. Always handle wires carefully to avoid more damage.
Fixing Wiring Issues
Fixing wiring issues is a key step in repairing a double light switch. Loose or damaged wires cause switches to malfunction. Checking and fixing these problems can restore proper function. It also prevents electrical hazards in your home.
Follow these simple steps to handle wiring issues safely and effectively.
Tightening Connections
Loose wire connections often cause flickering or no power. Turn off the power at the breaker before working. Use a screwdriver to tighten all terminal screws. Make sure wires are firmly wrapped around screws. Do not overtighten, or you might damage the wire. Check the wires’ position and secure them well.
Replacing Damaged Wires
Damaged wires can cause shorts or no power at all. Look for cracks, breaks, or burnt spots on wires. Cut out the damaged section using wire cutters. Strip off about half an inch of insulation from each end. Connect new wire pieces with wire nuts or terminal screws. Ensure all connections are tight and safe. Replace the switch cover and restore power to test.

Credit: www.youtube.com
Replacing The Switch
Replacing a double light switch can restore proper function and improve safety. This task requires careful steps to ensure the new switch works well. Follow the instructions below to replace your switch confidently and safely.
Choosing The Right Switch
Pick a switch that matches your current setup. Check the switch type: single-pole or three-way. Make sure it fits the electrical box size. Choose a switch with the correct voltage and amperage rating. Look for switches with clear labeling. This helps avoid wiring mistakes. Select a style and color that fits your room’s look.
Installing The New Switch
Turn off the power at the breaker before starting work. Use a voltage tester to confirm no power is present. Remove the old switch by unscrewing it from the wall box. Carefully disconnect the wires from the old switch. Connect the wires to the new switch terminals. Tighten the terminal screws firmly. Push the switch back into the box. Secure it with mounting screws. Attach the switch cover plate. Turn the power back on and test the switch operation. Ensure both switches control their lights correctly.
Testing The Repair
Testing the repair is a key step after fixing a double light switch. It shows if the switch works right and if the lights respond as expected. Proper testing avoids future problems and keeps your home safe.
Take your time to check every detail. This ensures your repair lasts long and works smoothly. Let’s explore simple ways to test your double light switch repair.
Turn The Power Back On
First, turn the circuit breaker back on. This restores power to the switch and lights. Never skip this step before testing.
Test Each Switch Separately
Flip each switch on and off. Check if each light turns on and off properly. This confirms the wiring is correct.
Look For Flickering Or Delays
Watch the lights carefully. Flickering or slow responses mean a weak connection. Fix any issues before finishing.
Check For Heat Or Smell
Feel the switch plate for heat. A warm switch can signal a problem. Also, notice any strange smells. Stop testing if you detect these signs.
Use A Voltage Tester
Use a voltage tester to confirm power flow. Test at the switch terminals to ensure proper current. This tool adds safety to your check.
Tips For Preventing Future Problems
Preventing problems with a double light switch saves time and money. Simple care and good habits keep switches working well. Follow these tips to avoid future issues and keep your lights on without trouble.
Keep Switches Dry And Clean
Moisture and dust cause switches to fail over time. Wipe switches gently with a dry cloth. Avoid spraying water or cleaners directly on switches. Keep the area around switches dry to stop rust and damage.
Use The Correct Wattage Bulbs
Using bulbs with the right wattage prevents overheating. Check the switch and fixture labels for the maximum wattage allowed. High wattage bulbs can cause switches to wear out fast. Stick to the recommended bulb type and power.
Turn Off Power Before Repairs
Always switch off the power at the breaker before fixing switches. This avoids electric shocks and protects the switch parts. Double-check with a voltage tester to ensure power is off. Safe repairs help keep switches in good shape.
Avoid Overloading Circuits
Too many devices on one circuit strain switches and wiring. Spread out electrical loads among different circuits. Overloading causes switches to heat and fail quickly. Proper circuit use extends switch life and improves safety.
Inspect Switches Regularly
Look at switches often for signs of wear or damage. Loose parts, flickering lights, or strange sounds signal problems. Early checks help catch issues before they become serious. Replace or repair switches as soon as trouble appears.

Credit: www.youtube.com
Frequently Asked Questions
How Do I Safely Fix A Double Light Switch?
Turn off the power at the breaker first. Use a voltage tester to confirm no electricity flows. Follow wiring diagrams carefully. Replace or tighten connections. Always use insulated tools and wear safety gear.
What Tools Are Needed To Repair A Double Switch?
You need a screwdriver, voltage tester, wire stripper, electrical tape, and a replacement switch. These tools help you safely remove and install the switch while ensuring proper wiring.
Can I Replace A Double Switch Without An Electrician?
Yes, if you follow safety steps and understand wiring. Turn off power, test wires, and replace the switch carefully. If unsure, consult a professional to avoid risks.
Why Is My Double Light Switch Not Working?
It could be a loose wire, faulty switch, or tripped breaker. Check connections, test the switch, and reset the breaker. Replace the switch if it remains unresponsive.
Conclusion
Fixing a double light switch is easier than it seems. Start by turning off the power to stay safe. Check each wire and connection carefully. Tighten loose screws and replace any damaged parts. Test the switch after fixing it to ensure it works well.
Taking your time helps avoid mistakes. With patience, anyone can handle this simple home repair. Keep these steps handy for future use. A well-functioning switch brightens your space and saves energy.