Are you planning to build a wall on an existing concrete slab but unsure how to make it strong and secure? Anchoring a wall properly is key to ensuring safety and durability.
If you get it wrong, your wall could wobble, crack, or even collapse over time. But don’t worry—this guide will walk you through simple, clear steps to anchor your wall firmly to your concrete slab. By the end, you’ll know exactly what tools and techniques to use, saving you time and costly mistakes.
Ready to make your project rock solid? Let’s dive in!
Credit: www.finehomebuilding.com
Choosing The Right Anchors
Choosing the right anchors is key to securing a wall to an existing concrete slab. The right anchor holds the wall firmly and prevents damage or movement. Different anchors serve different purposes. Understanding which anchor fits your project ensures safety and durability.
Types Of Anchors For Concrete
Concrete anchors come in many types. Sleeve anchors work well for medium loads. Wedge anchors provide strong holding power. Drop-in anchors are good for flush mounting. Tapcon screws are easy to install and ideal for lighter tasks. Each type suits different wall materials and loads.
Factors Influencing Anchor Selection
Consider the weight of the wall and load it will carry. The thickness and condition of the concrete matter. Moisture and temperature can affect anchor choice. Think about the installation location and access. The type of wall material also influences the anchor needed.
Tools Needed For Installation
Drill with a hammer function is essential for concrete. Use a masonry bit sized for the anchor. A wrench or socket set helps tighten anchors securely. A vacuum or brush cleans dust from drilled holes. Safety glasses and gloves protect during installation.
Credit: www.finehomebuilding.com
Preparing The Concrete Slab
Preparing the concrete slab is the first step to anchor a wall securely. The slab must be clean, strong, and ready to hold the anchors. Proper preparation helps the wall stay stable and last longer.
This section covers cleaning and inspecting the surface, marking anchor points, and drilling proper holes. Each step ensures the slab is ready for the next phase of the project.
Cleaning And Inspecting The Surface
Start by removing dirt, dust, and loose debris from the slab. Use a broom or brush to sweep the area well. A clean surface helps anchors stick better and prevents slipping.
Check the slab for cracks or damage. Small cracks can weaken the anchor hold. Repair any issues before moving forward. A solid surface is key to a strong connection.
Marking Anchor Points
Measure and mark where the anchors will go on the slab. Use a tape measure and pencil to place points evenly. Accurate marks ensure the wall aligns correctly and stays stable.
Double-check all measurements before drilling. Mistakes here can cause problems later. Clear, precise marks save time and effort during installation.
Drilling Proper Holes
Use a hammer drill with a masonry bit sized for your anchors. Drill straight holes at the marked points. Depth and diameter must match anchor specifications.
Clean dust from holes using a vacuum or brush. This helps anchors fit tightly. Proper drilling prevents loose anchors and strengthens the wall hold.
Installing The Anchors
Installing anchors is a crucial step in securing a wall to an existing concrete slab. The right anchors hold the wall firmly and prevent movement. This process requires careful drilling, cleaning, and setting to ensure strong support. Each type of anchor has a unique installation method.
Setting Expansion Anchors
Drill a hole slightly deeper than the anchor length. Use a brush or compressed air to clean dust from the hole. Insert the expansion anchor into the hole. Tap it gently with a hammer until flush with the surface. Tighten the bolt to expand the anchor inside the concrete. The anchor grips tightly as the bolt is turned.
Using Epoxy Anchors
Drill a hole matching the diameter of the anchor rod. Clean the hole thoroughly to remove all dust. Inject epoxy resin into the hole using a cartridge gun. Insert the threaded rod or rebar into the epoxy-filled hole. Hold the rod steady until the epoxy cures completely. This creates a strong bond between rod and concrete.
Securing Wedge Anchors
Drill a hole slightly larger than the wedge anchor diameter. Clean the hole with a brush and compressed air. Insert the wedge anchor through the wall base into the hole. Tap the anchor with a hammer until it seats fully. Tighten the nut on top to lock the wedge into the concrete. The wedge expands and grips firmly inside the hole.
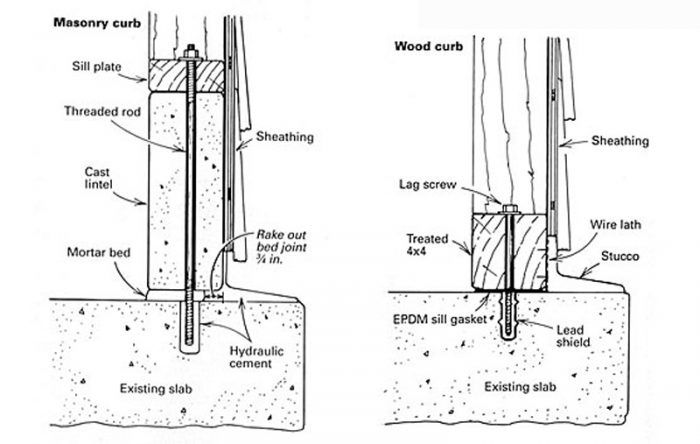
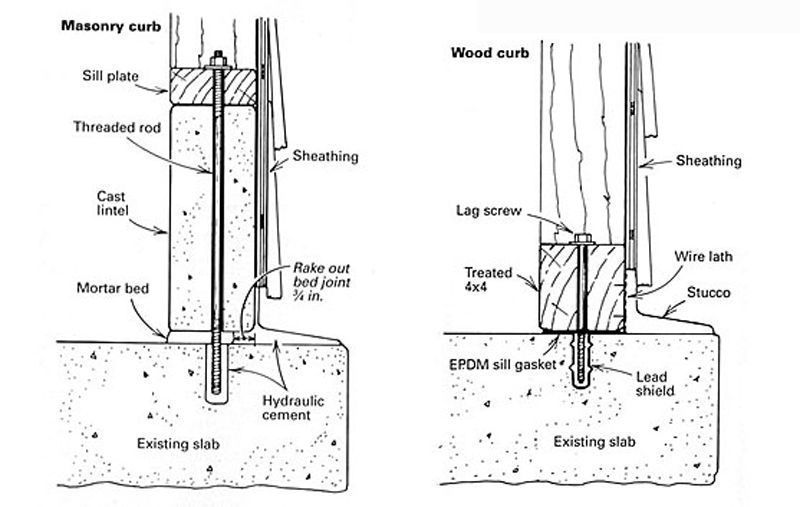
Attaching The Wall Frame
Attaching the wall frame to an existing concrete slab is a crucial step in building strong walls. This process ensures the wall stays in place and supports the structure. Proper attachment prevents shifting and damage over time. Focus on accuracy and secure fastening for the best results.
Aligning The Wall To The Slab
Start by placing the wall frame on the slab. Check that it sits flat without gaps. Use a chalk line or laser level to mark the exact position. Align the edges carefully to match your layout. Take your time to avoid mistakes later.
Fastening Techniques
Use anchor bolts or concrete screws to fix the frame. Drill holes through the frame base into the slab. Clean the holes to remove dust. Insert the anchors and tighten firmly. Avoid over-tightening, which can damage the slab or frame.
Ensuring Stability And Level
Check the wall frame for level using a spirit level. Adjust with shims if needed to make it perfectly straight. Stability is key to prevent wobbling or leaning. Secure all fasteners tightly after leveling. Recheck the frame before moving to the next step.
Safety Tips And Common Mistakes
Anchoring a wall to an existing concrete slab requires care and attention. Safety is important to avoid injury or damage. Knowing common mistakes helps save time and effort. Follow these tips for a safer and smoother project.
Protective Gear Recommendations
Wear safety glasses to protect your eyes from dust and debris. Use gloves to guard your hands against sharp tools and rough surfaces. Ear protection is necessary when drilling to prevent hearing damage. Wear a dust mask to avoid breathing in harmful particles. Choose sturdy shoes to protect your feet from falling objects.
Avoiding Over-drilling
Drill only as deep as the anchor requires. Over-drilling weakens the concrete and reduces anchor strength. Mark the drill bit to control the depth. Use a hammer drill for better precision and control. Stop drilling once you reach the marked depth to avoid mistakes.
Checking Anchor Strength
Test anchors before fully securing the wall. Pull gently to check if the anchor holds firm. Replace any anchor that feels loose or unstable. Use anchors rated for the wall’s weight and purpose. Follow manufacturer instructions to ensure proper installation and strength.

Credit: www.youtube.com
Frequently Asked Questions
How Do I Anchor A Wall To An Existing Concrete Slab?
To anchor a wall, first clean the slab surface. Use anchor bolts or epoxy anchors to secure the wall base. Drill holes accurately and ensure bolts are tight for strong attachment.
What Tools Are Needed To Anchor A Wall To Concrete?
You need a hammer drill, masonry bit, anchor bolts or epoxy, a wrench, and a level. Safety gear like gloves and goggles is essential for protection.
Can I Anchor A Wall Without Drilling Into Concrete?
Drilling is recommended for strong anchoring. Alternatives like adhesive anchors exist but may not hold heavy loads. For safety, drilling provides the best stability.
How Deep Should Anchor Bolts Go In Concrete?
Anchor bolts should penetrate at least 3 inches deep into the concrete. This depth ensures a firm hold and prevents wall movement over time.
Conclusion
Anchoring a wall to an existing concrete slab is simple with the right steps. Choose the correct anchor type for your project. Always measure carefully and drill straight holes. Tighten anchors firmly to secure the wall. Take your time to ensure safety and stability.
A well-anchored wall lasts longer and stays strong. Following these tips helps you complete the job with confidence. Now, you can build with a solid foundation beneath your wall.