Have you ever wanted to control two lights with just one switch but didn’t know how? Connecting one switch to two lights can simplify your home lighting and save you time and effort.
Whether you want to brighten up a room evenly or create the perfect ambiance, this setup is easier than you think. You’ll discover clear, step-by-step guidance to make this connection safely and effectively. Keep reading, and by the end, you’ll have the confidence to handle this handy electrical upgrade yourself.

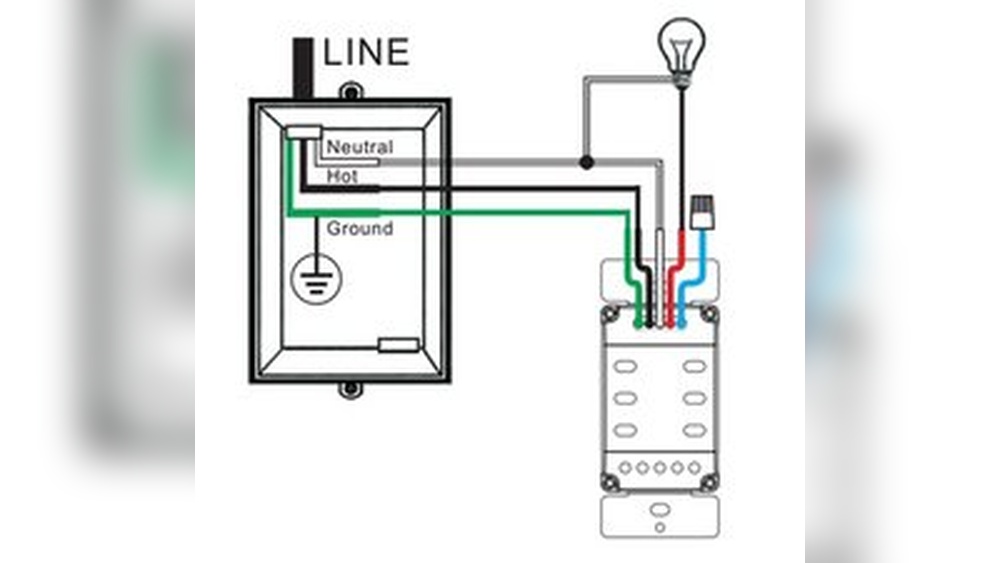
Credit: diy.stackexchange.com
Tools And Materials Needed
Before connecting one switch to two lights, gather all necessary tools and materials. Having the right items ensures a smooth and safe installation. This section lists everything needed to complete the job.
Basic Electrical Tools
You need a few basic tools for the wiring task. A screwdriver is essential to open switch plates and secure wires. Wire strippers help remove insulation from electrical wires. A voltage tester checks if wires carry current. Pliers help twist wires together.
Materials For Wiring
Use proper wiring materials for safety and efficiency. Electrical wires with the right gauge are crucial. Typically, 14 or 12 gauge wires work for home lighting. Wire connectors or wire nuts join wires safely. Electrical tape secures and insulates connections.
Switch And Light Fixtures
Choose a compatible switch for controlling two lights. A standard single-pole switch works well for most setups. Make sure the lights are suitable for your wiring and room size. LED or incandescent bulbs require different power loads, so plan accordingly.
Safety Gear
Safety is key. Wear insulated gloves to protect your hands. Safety glasses shield your eyes from sparks or debris. A sturdy ladder helps reach ceiling fixtures safely. Always turn off power at the breaker before starting work.
Safety Precautions
Safety is the top priority when connecting one switch to two lights. Electrical work can be risky without the right care. Take steps to protect yourself and your home before starting any wiring.
Always prepare your work area and tools. Be ready to handle wires carefully. Follow simple rules to avoid shocks and damage.
Turn Off The Power
Locate the circuit breaker for the lights you will work on. Switch it off to cut power completely. Test the switch or lights to confirm no electricity flows.
Use Proper Tools
Choose insulated screwdrivers and wire strippers. Avoid using damaged or cheap tools. Good tools make wiring safer and easier.
Wear Safety Gear
Put on rubber gloves and safety glasses. They protect your hands and eyes from injury. Keep a first aid kit nearby just in case.
Follow Wiring Codes
Check local electrical codes and rules. Use the right wire gauge and connectors. Proper wiring prevents fires and ensures long-lasting results.
Double-check Connections
Inspect all wire connections before turning power back on. Loose wires cause sparks and malfunctions. Tighten screws and secure wires firmly.
Types Of Switches For Two Lights
Choosing the right switch for controlling two lights is important. Different switches offer different ways to manage lighting. Some switches control both lights together, while others allow separate control. Understanding the types of switches helps in making the best choice for your space.
Single-pole Switch
A single-pole switch controls one or more lights from one location. It is the simplest type of switch. You can connect two lights to one single-pole switch to turn them on or off at the same time. This switch is common in many homes.
Double Switch (two-gang Switch)
A double switch has two separate switches in one unit. Each switch can control one light independently. This allows you to turn on one light or both lights separately. It is useful when you want more control over your lighting.
Three-way Switch
A three-way switch lets you control lights from two different locations. It is helpful for long hallways or large rooms. You can use two three-way switches to control two lights from different spots. This setup offers flexibility and convenience.
Smart Switch
Smart switches connect to your Wi-Fi and allow remote control. You can control two lights using a single smart switch with an app. Some models also support voice commands. This type is good for modern homes with smart devices.
Planning Your Wiring Layout
Planning your wiring layout is an important first step. It helps avoid mistakes and saves time during installation. A clear plan makes the process smooth and safe.
Start by understanding how your switch and lights connect. Think about the path the wires will take. Sketching a simple diagram can help visualize the setup.
Consider the distance between the switch and each light. Longer wires may need thicker cables to handle the current safely. Planning the wire length prevents shortages and reduces waste.
Identify Power Source Location
Find where the power source enters the circuit. This is usually from the breaker box or main line. Knowing this spot helps decide where to place the switch and lights.
The power source must be accessible for maintenance. It should also be safe from water or heat damage.
Choose Wire Types And Sizes
Pick wires suitable for your home’s electrical code. Typically, 14 or 12 gauge wires are used for lighting circuits. Use copper wire for better conductivity.
Insulation type matters too. Use wires rated for indoor use and the environment they will be in.
Plan Switch And Light Placement
Place the switch in a convenient spot near the room entrance. Lights should be located to provide even illumination.
Think about the wiring path between the switch and lights. Avoid running wires through areas with moisture or heavy traffic.
Map Out Wiring Connections
Decide how wires will connect at junctions. Use wire nuts or terminal blocks for secure joins. Label each wire to avoid confusion during installation.
Plan for a common neutral wire and separate traveler wires if needed. Proper mapping reduces troubleshooting later.
Turn Off Power Supply
Before starting any electrical work, always turn off the power supply. This step keeps you safe from electric shocks. Working with electricity can be dangerous without cutting power first.
Turning off the power also protects your tools and devices. It prevents short circuits and sparks that can cause damage. Safety should be the top priority in any wiring project.
Locate The Circuit Breaker
Find the circuit breaker panel in your home. This box controls the power to different areas. Look for the switch that controls the lights you want to connect.
Switch Off The Correct Breaker
Flip the breaker switch to the off position. Make sure you turn off the exact circuit for the lights. Double-check by testing the light switch to confirm power is off.
Use A Voltage Tester
Use a voltage tester on the wires before touching them. This tool shows if electricity is still flowing. Never assume the power is off without testing first.

Credit: www.youtube.com
Wiring The Switch To The First Light
Wiring the switch to the first light is the first step in this project. This connection controls the power flow to the light. It allows you to turn the light on or off from the switch.
Before starting, make sure the power is off at the breaker. Safety is important. Use a voltage tester to check the wires.
Identify The Wires
Look at the wires coming from the switch and the light. Usually, you will see a black (hot) wire, a white (neutral) wire, and a ground wire. The black wire carries electricity to the light.
Connect The Hot Wire
Attach the black wire from the switch to the black wire going to the first light. Use a wire connector to secure them. This connection allows the switch to control the light.
Connect The Neutral Wire
Join the white wires from the power source and the first light together. The switch does not interrupt the neutral wire. It completes the circuit for the light to work.
Attach The Ground Wire
Connect the green or bare copper ground wires together. Also, connect the ground wire to the metal switch box if it is metal. Grounding helps protect from electrical shocks.
Secure All Connections
Use wire nuts or connectors for all wire joints. Wrap electrical tape around the connectors for extra safety. Push the wires neatly into the switch box.
Extending Wiring To The Second Light
Extending wiring to the second light is a key step in connecting two lights to one switch. It lets you control both lights with one switch. This saves space and wiring effort. The process involves adding wires from the first light to the second light.
Proper wiring ensures both lights work safely and correctly. Use the right tools and materials for the job. Always turn off power before starting any electrical work. Safety first.
Planning The Wiring Route
Find the best path to run wires from the first light to the second light. Avoid obstacles like pipes or ducts. Keep wires neat and secure. Measure the distance carefully to get enough wire length.
Choosing The Right Wire
Select wires that match your home’s electrical standards. Use wires with proper insulation and thickness. This helps prevent overheating and electrical hazards. Copper wires are common for lighting circuits.
Connecting Wires At The First Light
Open the first light fixture to access wires. Identify the live, neutral, and ground wires. Connect new wires to match each type correctly. Use wire nuts to secure connections tightly. Double-check all connections before closing the fixture.
Wiring The Second Light Fixture
At the second light, connect wires to the corresponding terminals. Match live to live, neutral to neutral, and ground to ground. Secure all wire connections firmly. Install the light fixture properly to avoid loose contacts.
Testing The Connection
Turn on the power at the circuit breaker. Switch on the light to test both fixtures. Both lights should turn on and off together. If not, check all wire connections again. Fix any loose or wrong connections for safety.
Connecting Wires Inside The Switch Box
Connecting wires inside the switch box is a key step to control two lights with one switch. It requires careful handling to ensure safety and proper function. This guide explains the basic wiring process clearly and simply.
Before starting, turn off the power at the breaker. Use a voltage tester to confirm no electricity flows. Safety first. Gather tools like wire strippers, screwdrivers, and wire nuts. Keep the workspace organized and well-lit.
Identify The Wires Inside The Switch Box
Look for three main types of wires: live (hot), neutral, and ground. The live wire usually carries current to the switch. Neutral wires complete the circuit, and ground wires protect against shocks. Identifying these correctly avoids mistakes.
Connect The Live Wire To The Switch
Attach the live wire to the switch’s input terminal. This wire brings power to the switch. Tighten the screw firmly to hold the wire in place. Loose connections cause flickering or failure.
Join The Wires Leading To Both Lights
Connect the switch’s output terminal to the wires going to both lights. Use a wire nut to join these wires together. This setup allows the switch to control both lights at once. Make sure the connection is tight and secure.
Handle Neutral And Ground Wires Properly
Neutral wires usually connect together inside the box, not to the switch. Twist them with a wire nut. Ground wires also join together and connect to the switch’s ground terminal. Proper grounding prevents electric shocks.
Check All Connections Before Closing The Box
Double-check every wire connection for tightness and correct placement. Tug gently on wires to ensure they stay secure. Replace the switch cover only after confirming all wires are properly connected.
Testing The Lights And Switch
Testing the lights and switch is a key step after wiring. This step ensures everything works safely and correctly. It helps catch any wiring mistakes early. Testing also confirms both lights respond to the single switch.
Take your time during testing. Work carefully and check each connection. This avoids damage and keeps your home safe.
Turn On The Power
Start by turning the circuit breaker back on. This gives power to the switch and lights. Use caution when handling live wires. Never touch wires with wet hands or metal tools.
Check The Switch Operation
Flip the switch up and down slowly. Watch both lights carefully. They should turn on and off together. If one light does not work, check the wiring connections again.
Test Each Light Separately
Inspect each light bulb. Make sure both bulbs are working and fit properly. Replace any burnt-out bulbs. This ensures both lights shine brightly when switched on.
Look For Flickering Or Dim Lights
Flickering or dim lights show possible wiring issues. Turn off power and tighten wire connections. Replace any damaged wires. Repeat the test after fixing problems.
Use A Voltage Tester
A voltage tester checks if electricity flows properly. Test the switch terminals and light sockets. This confirms correct voltage levels. No voltage means a wiring fault or breaker issue.

Credit: www.electrical-online.com
Troubleshooting Common Issues
Troubleshooting common issues helps fix problems quickly. Connecting one switch to two lights is simple but can have small errors. Checking these issues saves time and ensures safety.
Check The Wiring Connections
Loose or wrong wiring causes lights not to work. Turn off the power before checking wires. Make sure all wires are tight and connected to the right terminals. Use a screwdriver to secure connections if needed.
Test The Switch Function
The switch can be faulty or damaged. Try using a different switch to see if the lights work. If the new switch works, replace the old one. If not, the problem is in the wiring or lights.
Inspect The Light Bulbs
Burned-out bulbs stop lights from turning on. Remove bulbs and check for broken filaments. Replace any bad bulbs with new ones. Make sure the bulbs fit the socket correctly.
Verify The Power Supply
No power means no light. Check the circuit breaker and fuse box. Reset any tripped breakers or replace blown fuses. Use a voltage tester to confirm power reaches the switch.
Look For Short Circuits
A short circuit can cause the switch to fail. Check for exposed or damaged wires. Replace any wires with visible damage. Avoid touching wires with power on to prevent shocks.
Tips For Neat And Safe Wiring
Keeping wiring neat and safe is key when connecting one switch to two lights. Proper wiring avoids hazards and makes future repairs easier.
Clear wiring reduces the risk of shorts or loose connections. It also helps you follow electrical codes and standards.
Use Color-coded Wires
Choose wires with clear color codes for live, neutral, and ground. This helps you identify each wire quickly.
Color coding prevents mistakes during installation and future maintenance. Stick to common colors like black for live and white for neutral.
Secure Wires With Cable Clips
Fasten wires neatly along walls or inside conduits using cable clips. This prevents wires from hanging loose or tangling.
Proper support protects wires from damage and keeps the installation tidy. Use clips that fit the wire size well.
Strip Wire Ends Properly
Remove only enough insulation to fit wires into terminals. Avoid stripping too much to prevent exposed wire.
Clean wire ends make good electrical contact and reduce risk of shorts. Use a wire stripper for best results.
Use Junction Boxes
Connect wires inside a junction box to contain all connections safely. This protects connections from dust and moisture.
Junction boxes also keep wiring organized and easier to inspect. Choose the right size box for your wiring setup.
Test Connections Before Closing
Check all connections with a voltage tester before finishing the job. Make sure each light works as expected.
Testing early helps catch wiring errors and prevents future problems. Always turn off power before adjusting connections.
Frequently Asked Questions
How Do I Wire One Switch To Control Two Lights?
To wire one switch for two lights, connect the switch’s live wire to the first light’s live. Then, link the first light’s live to the second light’s live. Finally, connect the neutral wires together and to both lights.
Can One Switch Control Two Lights Independently?
No, one switch can only control both lights simultaneously. To control two lights independently, you need separate switches or a double switch.
What Tools Are Needed To Connect One Switch To Two Lights?
You need a screwdriver, wire stripper, voltage tester, electrical tape, and wire connectors. Always turn off power before starting any electrical work.
Is It Safe To Connect Two Lights To One Switch?
Yes, it is safe if done correctly. Ensure wires are properly connected, and the switch and wiring can handle the combined electrical load.
Conclusion
Connecting one switch to two lights is simple with the right steps. Always turn off power before starting any work. Use the proper wires and tools for safety. Double-check your connections to avoid mistakes. This setup saves space and adds convenience to your home.
Take your time and follow each step carefully. Soon, you will control two lights with one switch. Enjoy the bright, easy lighting you created yourself.