Are you tired of harsh, bright lights that ruin the mood in your room? Installing a dimmer light switch is a simple way to take control of your lighting and create the perfect atmosphere anytime you want.
But how do you install a dimmer light switch yourself without calling an electrician? In this guide, you’ll discover easy, step-by-step instructions that anyone can follow. By the end, you’ll have the confidence to upgrade your lighting and enjoy a cozy, adjustable glow in your home.
Keep reading to unlock the secret to better lighting today!
Tools And Materials Needed
Installing a dimmer light switch is a simple project. The right tools and materials make the job easier and safer. Preparing before starting helps avoid mistakes and saves time.
Gather all items before you begin. This ensures a smooth and quick installation. Each tool has a specific role in the process.
Essential Tools
- Flathead screwdriver – for removing switch plate covers
- Phillips screwdriver – for securing the switch in place
- Voltage tester – to check if the power is off
- Wire stripper – to strip insulation from wires
- Needle-nose pliers – for bending and holding wires
- Electrical tape – for extra wire insulation and safety
Required Materials
- Dimmer switch – choose the right type for your light fixture
- Wire nuts – to connect wires securely
- Switch plate cover – matches your dimmer switch style
Safety Gear
- Insulated gloves – protect your hands from electric shocks
- Safety glasses – guard your eyes from debris or sparks
Having these tools and materials ready helps the installation go smoothly. It also keeps you safe during the process. Check everything twice before starting work on your dimmer switch.
Turn Off Power Safely
Turning off power safely is the first step to install a dimmer light switch. It protects you from electric shock and prevents damage to your home wiring. Always handle electricity with care. Never skip this safety step.
Locate The Circuit Breaker
Find the main electrical panel in your home. It usually is in the basement or garage. Open the panel door and look for the circuit breaker that controls the light switch.
Switch Off The Correct Breaker
Flip the breaker to the “off” position. This stops electricity from flowing to the switch. Double-check by turning the light on and off. The light should not turn on.
Use A Voltage Tester
Test the wires with a voltage tester. Touch the tester to the wires in the switch box. If no light or sound comes from the tester, power is off. This step confirms safety before you start work.
Double-check Surrounding Switches
Switches close by might share the same circuit. Turn them off too. This ensures no power flows unexpectedly. Safety first, always.
Remove Existing Switch
Removing the existing switch is the first step in installing a dimmer light switch. This step needs care and attention. Safety is the top priority before doing any electrical work. Always turn off the power at the circuit breaker. Use a voltage tester to confirm that no electricity flows to the switch.
Next, unscrew the switch plate cover. Keep the screws safe for later use. The cover might stick a little but gently pull it off. This reveals the switch and wires inside the wall box.
Turn Off Power At Circuit Breaker
Find the correct circuit breaker for the room. Flip the switch to off. Double-check by trying the light switch. It should not work. Use a voltage tester on the switch wires. No voltage means it is safe to continue.
Remove Switch Plate Cover
Use a screwdriver to remove the two screws. Pull the cover away from the wall. Set the cover and screws aside. Be gentle to avoid damaging the wall.
Unscrew And Pull Out Existing Switch
Remove the screws holding the switch to the wall box. Pull the switch slowly out of the box. Do not pull too hard. Wires are still attached and can be damaged.
Note Wire Placement And Connections
Look carefully at the wires connected to the switch. Take a picture or write notes. This helps when connecting the new dimmer switch. Identify the hot wire, neutral wire, and ground wire.
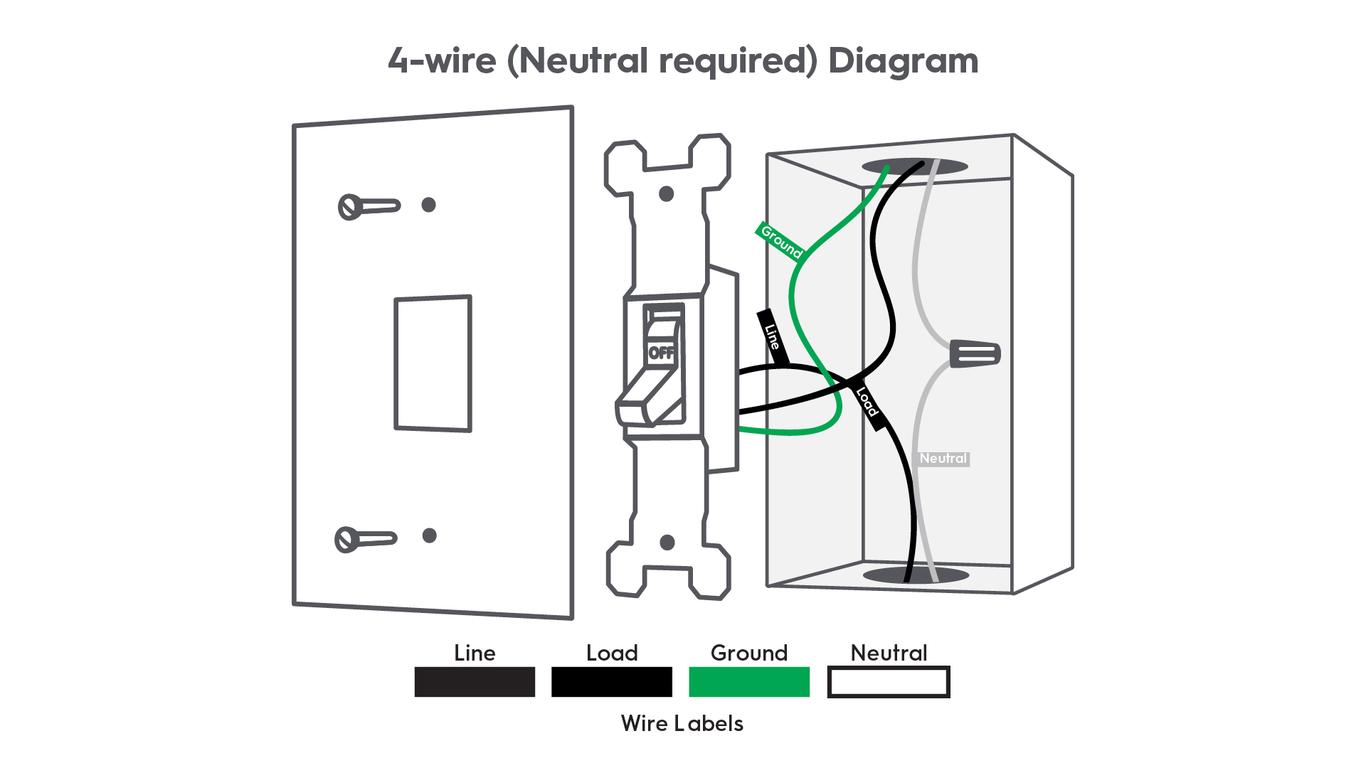
Identify Wiring Types
Identifying wiring types is a crucial step before installing a dimmer light switch. It ensures safety and proper function of the switch. Different homes have different wiring setups. Knowing the wire type helps match the dimmer switch with your electrical system.
Wiring types vary by age and design of the home. Some wires carry electricity to the switch. Others connect the switch to the light fixture. Recognizing these wires prevents mistakes during installation. It also avoids damage to the dimmer switch or your home’s electrical system.
Identify The Live Wire
The live wire carries electricity from the power source. It is often black or red in color. This wire connects to the dimmer switch’s input terminal. Use a voltage tester to confirm the live wire safely.
Find The Neutral Wire
The neutral wire completes the electrical circuit. It usually appears white or gray. Some dimmer switches need a neutral wire to work properly. Check your dimmer switch instructions for neutral wire requirements.
Locate The Ground Wire
The ground wire protects against electrical shocks. It is typically green or bare copper. Connect the ground wire to the dimmer switch’s ground terminal. This step enhances safety during use.
Check For Traveler Wires
Traveler wires are used in three-way switch setups. They allow control of one light from two locations. Traveler wires are often red or black. Identify these if replacing a three-way switch with a dimmer.
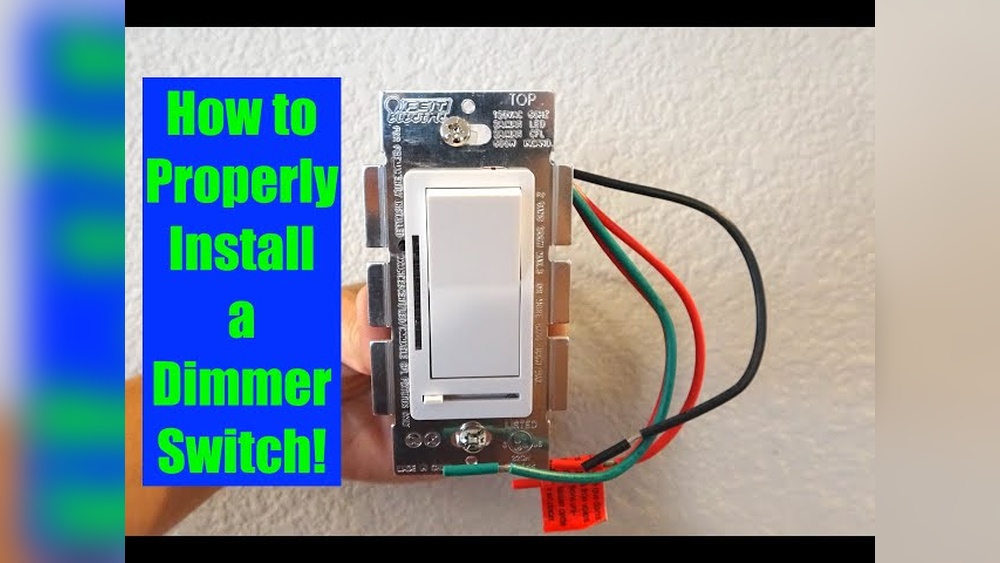
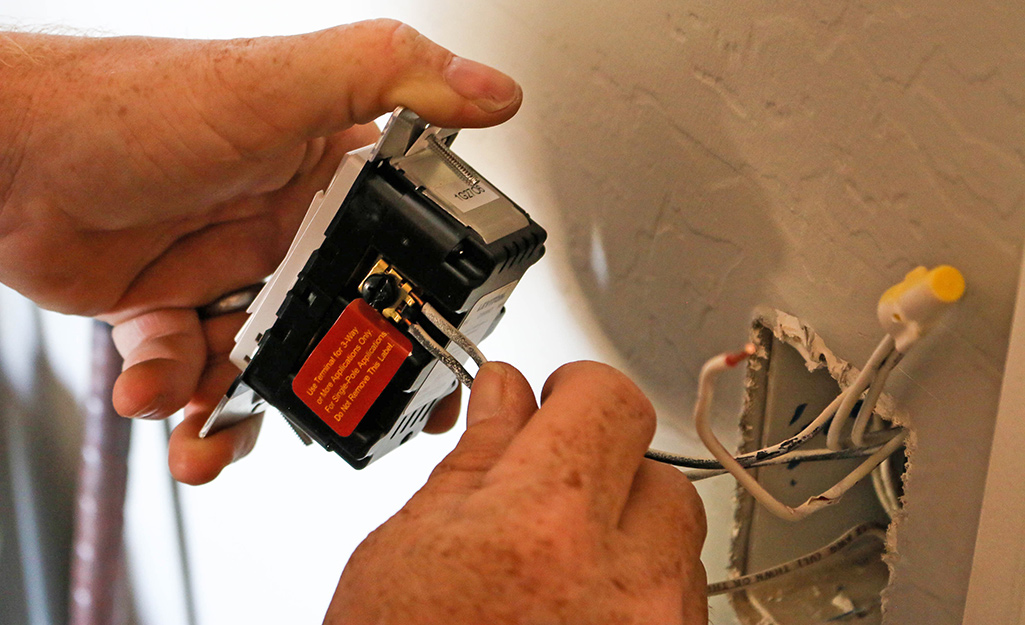
Connect Dimmer Switch Wires
Connecting the dimmer switch wires is a key step in installing a dimmer light switch. Proper wiring ensures the switch works safely and smoothly. This process involves matching wires and securing them carefully.
Before starting, turn off the power at the circuit breaker. This keeps you safe from electric shock. Use a voltage tester to confirm the power is off.
Identify The Wires
Look at the wires coming from the wall. Typically, you will find a black (hot) wire, a white (neutral) wire, and a green or bare copper ground wire. The dimmer switch may have similar wires or wires with different colors. Check the instructions that come with your dimmer switch.
Connect The Ground Wires
Connect the green or bare copper wire from the dimmer to the ground wire in the wall. Twist the wires together clockwise. Secure them with a wire nut. This step prevents electrical shocks.
Connect The Hot Wires
Find the black wire from the dimmer and connect it to the black wire in the wall. Twist them together tightly. Use a wire nut to secure the connection. This wire carries power to the switch.
Connect The Load Wire
The load wire connects to the light fixture. This is often a black or red wire. Connect it to the other black or red wire on the dimmer switch. Secure with a wire nut. This allows the dimmer to control the light.
Connect The Neutral Wires
Some dimmer switches need a neutral wire connection. Connect the white wire from the dimmer to the white wire in the wall. Twist them together and secure with a wire nut. Not all dimmers require this step, so check the instructions.
Secure All Connections
After connecting all wires, gently push them into the electrical box. Make sure wire nuts are tight and no bare wire shows. Loose connections can cause sparks or failure.

Credit: www.gelighting.com
Secure The Dimmer Switch
Securing the dimmer switch correctly is a key step in the installation process. It ensures the switch stays firmly in place and works safely. A loose switch can cause flickering lights or electrical problems. Take your time to attach it properly.
Align The Dimmer Switch With The Wall Box
Start by placing the dimmer switch inside the wall box. Make sure it fits snugly without forcing it. Align the screw holes on the switch with those on the wall box. Proper alignment helps keep the switch steady and flush with the wall.
Use The Provided Screws To Fasten The Switch
Use the screws that came with the dimmer switch. Insert them carefully into the holes. Tighten the screws just enough to hold the switch firmly. Avoid over-tightening, which can damage the switch or the wall box.
Check For Stability Before Finalizing
After tightening, gently wiggle the switch. It should not move or feel loose. If it moves, adjust the screws and try again. A stable switch ensures safe operation and a clean look.
Restore Power And Test
Restoring power and testing your new dimmer switch is a key step. It ensures the installation works safely and correctly. Take your time to follow these steps carefully.
Restore Power To The Circuit
Go to your home’s main electrical panel. Flip the circuit breaker back to the ON position. This restores power to the switch and the light fixture. Make sure the breaker stays in place to avoid any power loss.
Test The Dimmer Switch
Turn the dimmer switch knob or slide slowly. Check if the light turns on and off smoothly. Adjust the dimmer to see if it changes the light brightness. The light should not flicker or buzz.
Check For Safety And Proper Function
Look for any unusual sounds or smells near the switch. Ensure the switch plate is secure and not warm to the touch. If anything feels wrong, turn off the breaker and recheck wiring.
Credit: www.gelighting.com
Troubleshooting Common Issues
Troubleshooting common issues with dimmer light switches helps keep your lights working well. Problems may arise after installation. Fixing these issues saves time and avoids extra costs.
Understanding typical problems makes troubleshooting easier. Some issues are simple and fast to solve. Others need careful checking of wiring and parts.
Checking For Loose Or Incorrect Wiring
Loose wires cause flickering or no light at all. Turn off the power before touching wires. Tighten all wire connections securely. Match wires by color: black to black, white to white.
Ensuring Compatibility With Light Bulbs
Not all bulbs work with dimmer switches. Use dimmable LED or incandescent bulbs. Non-dimmable bulbs may flicker or not dim properly. Replace bulbs with compatible types for smooth dimming.
Testing The Dimmer Switch Functionality
The dimmer switch itself might be faulty. Test by swapping it with a regular switch. If the problem stops, replace the dimmer. Use a multimeter to check switch continuity for added accuracy.
Dealing With Overheating Issues
Dimmer switches can overheat if overloaded. Check the total wattage of your bulbs. Stay within the dimmer’s maximum wattage limit. Overheating can cause the switch to fail or trip breakers.
Resolving Flickering Or Buzzing Sounds
Flickering or buzzing often means bad connections or incompatible bulbs. Tighten all wires again. Try different bulbs designed for dimmers. Using a higher-quality dimmer switch may reduce noise.
Safety Tips For Installation
Installing a dimmer light switch can improve your home’s lighting control and ambiance. Safety is important during installation. Following safety tips prevents accidents and protects your home. Always take precautions before starting electrical work.
Turn Off Power At The Circuit Breaker
Switch off the power to the room where you will work. Do not rely on the light switch alone. Use the circuit breaker to cut electricity. Confirm the power is off with a voltage tester. This step stops electrical shocks and injuries.
Use The Right Tools And Equipment
Use insulated tools made for electrical jobs. Avoid metal tools without insulation. Have a voltage tester, wire strippers, and screwdrivers ready. Proper tools make installation safer and easier. Do not use damaged or worn-out equipment.
Read The Dimmer Switch Instructions Carefully
Follow the manufacturer’s guide step-by-step. Different dimmer switches may have varied wiring needs. Understanding instructions avoids mistakes and damage. Keep the manual nearby during installation.
Wear Safety Gear
Wear rubber-soled shoes to reduce shock risk. Use safety glasses to protect your eyes. Gloves help prevent cuts and electrical shocks. Dress properly to stay safe throughout the process.
Check Wiring And Connections Twice
Double-check all wire connections before turning power back on. Ensure wires are tight and correctly placed. Loose wires can cause shorts or fires. Secure wires with wire nuts or connectors as needed.
Credit: www.homedepot.com
Frequently Asked Questions
What Tools Are Needed To Install A Dimmer Light Switch?
You need a screwdriver, voltage tester, wire stripper, and electrical tape. These tools ensure safe and proper installation. Always turn off the power before starting the work.
How Do You Safely Turn Off Power For Installation?
Switch off the circuit breaker connected to the light switch. Use a voltage tester to confirm no electricity is flowing. Safety first to avoid electrical shock.
Can A Dimmer Switch Work With All Light Bulbs?
No, dimmers work best with compatible bulbs like LEDs, halogens, or incandescent. Check the dimmer’s specifications to ensure bulb compatibility for smooth dimming.
How Do You Connect Wires To A Dimmer Switch?
Match the dimmer’s wires to the existing switch wires by color: black to black, white to white. Secure connections with wire nuts and electrical tape for safety.
Conclusion
Installing a dimmer light switch can change your room’s mood quickly. It saves energy and makes lighting more flexible. Always turn off the power before starting the work. Follow the steps carefully for safety and success. With the right tools, the job is simple.
Enjoy the soft light and cozy feel after installation. Dimmer switches add comfort and style to any space. Try it yourself and see the difference today.