Have you noticed your brake lights aren’t working right? This small problem can lead to big safety risks and even traffic tickets.
Fixing your brake light switch might seem tricky, but you can do it yourself with the right steps. In this guide, you’ll learn exactly how to find the issue and fix it quickly. Keep reading to save money, stay safe, and get your brake lights shining like new again.

Credit: www.wikihow.com
Signs Of A Faulty Brake Light Switch
Recognizing the signs of a faulty brake light switch helps keep your car safe. This small part controls the brake lights. Problems with it can cause serious driving issues. Knowing what to watch for can prevent accidents and costly repairs.
Brake Lights Not Illuminating
The most common sign is brake lights that do not turn on. Press the brake pedal, but the lights stay off. Other drivers cannot see when you stop. This increases the risk of a rear-end collision.
A faulty switch often causes this problem. The electrical connection inside the switch can fail. Dirt, wear, or damage may stop the switch from working.
Brake Lights Staying On
Brake lights staying on even when you release the pedal is another warning. This drains the car battery over time. It also confuses other drivers on the road.
The switch might be stuck or damaged. This keeps the circuit closed and the lights lit. Checking the switch can fix this issue quickly.
Abs Warning Light Activation
The ABS warning light may turn on due to a bad brake light switch. The car’s computer uses signals from this switch. If it detects a problem, it triggers the ABS light.
Ignoring this warning can affect braking performance. It is important to inspect and replace the switch if needed. This keeps the ABS system working properly.
Tools Needed For The Repair
Fixing the brake light switch is a task you can do yourself. Having the right tools makes the job easier and safer. This section lists the essential tools needed for the repair. Prepare these items before starting to avoid delays and frustration.
Basic Hand Tools
Start with simple hand tools like screwdrivers and pliers. A flathead and Phillips screwdriver help remove panels and screws. Needle-nose pliers are good for gripping small parts and connectors. A socket wrench set is useful to loosen bolts holding the switch. These tools are common and easy to find.
Multimeter For Testing
A multimeter checks electrical connections and switch function. It measures voltage and continuity. This tool helps find if the brake light switch works correctly. Testing saves time by identifying problems before replacing parts. Use the multimeter to avoid guesswork and ensure accuracy.
Replacement Parts
Have the correct replacement brake light switch ready. Match the part number with your vehicle’s model. Buying the right switch prevents fitting problems. Keep extra fuses in case of electrical issues. Quality parts ensure the brake lights work safely after repair.
Locating The Brake Light Switch
Locating the brake light switch is the first step to fixing it. This small part controls the brake lights. If it breaks, the brake lights won’t work. Finding it can be simple if you know where to look. The switch is usually near the brake pedal inside the car. Understanding its position helps in easy access and replacement.
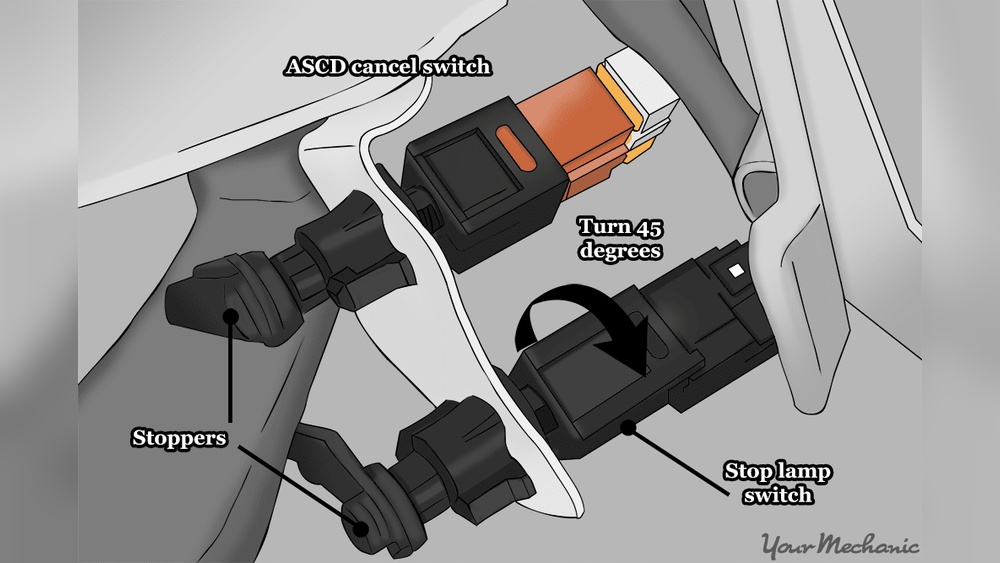
Common Switch Locations
The brake light switch is often mounted on the brake pedal arm. It sits where the pedal moves. Some cars have it attached to the brake pedal bracket. Others place it near the top of the pedal assembly. Look for a small rectangular or cylindrical part with a wire connector. It may be black, white, or gray in color.
Accessing The Switch Area
Access usually requires sitting in the driver’s seat. Reach under the dashboard near the brake pedal. Use a flashlight to see clearly in tight spaces. Sometimes, you must remove a panel or cover. Be gentle to avoid breaking clips or screws. Clear space around the pedal for easy movement and inspection.

Credit: www.yourmechanic.com
Testing The Brake Light Switch
Testing the brake light switch is a key step to fix brake light issues. It helps find out if the switch works or needs replacement. Two simple tests can check its condition quickly and accurately.
Using A Multimeter
First, set the multimeter to measure continuity or resistance. Remove the brake light switch from the brake pedal arm. Connect the multimeter leads to the switch terminals. Press the switch button manually.
If the switch is good, the multimeter shows continuity when pressed. No continuity means the switch is faulty. This test is quick and does not need special skills.
Manual Activation Test
This test uses the brake pedal and the switch without tools. Press the brake pedal slowly. Watch the brake lights at the rear of the vehicle. If the lights turn on and off as you press and release the pedal, the switch works well.
Brake lights that stay off or on could mean a broken switch. This simple test helps confirm if the switch activates the brake lights properly.
Removing The Faulty Switch
Removing the faulty brake light switch is the first step to fix brake light issues. This part controls the brake lights, so it needs careful handling. Follow these steps to remove it safely and correctly.
Start by preparing your workspace and tools. Safety is important, so take your time and do each step right. This will help you avoid damage or injury during the repair.
Disconnecting The Battery
Always disconnect the car battery before starting any electrical work. This stops any power from flowing and keeps you safe. Use a wrench to loosen the negative terminal and remove the cable. Keep the cable away from the battery to avoid accidents.
Unplugging The Switch Connector
Locate the brake light switch under the dashboard near the brake pedal. Find the connector attached to the switch. Press the tab on the connector and pull it gently to unplug. Avoid pulling on the wires to prevent damage.
Detaching The Switch
The brake light switch is usually held by a clip or a screw. Check how it is attached before removing. Use a screwdriver or your fingers to release the clip or unscrew the switch. Carefully pull the switch out from its position without forcing it.
Installing A New Brake Light Switch
Installing a new brake light switch is a key step to restore your vehicle’s safety. This small part controls the brake lights, alerting drivers behind you. Replacing it yourself saves time and money. Follow these clear steps to install the switch correctly.
Aligning The New Switch
Start by positioning the new switch near the brake pedal arm. Ensure the switch’s plunger lines up with the pedal’s movement path. Proper alignment allows the switch to activate when you press the brake. Check that the switch fits snugly without forcing it.
Securing And Connecting
Once aligned, secure the switch using the mounting bracket or clip. Tighten any screws or fasteners to hold the switch firmly. Next, connect the electrical plug to the switch terminals. Make sure the connection is tight to avoid loose wiring.
Adjusting The Switch Position
Press the brake pedal slowly and watch the switch plunger. Adjust the switch position so the plunger moves fully when the pedal is pressed. The brake lights must turn on immediately when the pedal is pushed. Test several times to confirm the switch works well.
Testing After Installation
Testing after installing the brake light switch is very important. It confirms the switch works correctly. Proper testing keeps you safe on the road. It also prevents future problems with your brake lights. Follow simple steps to check the switch’s function and warning signals.
Verifying Brake Light Function
Press the brake pedal gently. Ask a friend to watch the brake lights at the rear. The lights should turn on immediately. If they do, the switch works well. If not, check the switch connection or adjustment. Make sure the lights turn off when releasing the pedal. This test ensures the brake lights respond properly.
Checking For Warning Lights
Start the car and look at the dashboard. See if any brake warning lights appear. A warning light may mean a faulty switch or other brake issues. Clear any warning lights after testing. If a light stays on, inspect the brake system. This step helps find electrical or mechanical problems early.

Credit: www.youtube.com
Preventive Tips To Avoid Future Issues
Preventing brake light switch problems helps keep your car safe and avoids costly repairs. Small steps can stop issues before they start. Follow these simple tips to protect your brake light switch and extend its life.
Regular Inspection Routine
Check the brake light switch at least once a month. Look for signs of wear or damage. Test your brake lights to ensure they work every time you press the pedal. Early detection helps fix problems quickly and saves money.
Avoiding Excessive Pressure
Press the brake pedal gently, not with too much force. Hard pressing can damage the switch over time. Train yourself to apply steady pressure. This protects the switch and improves brake light response.
Keeping Switch Area Clean
Clean around the brake light switch regularly. Dust and dirt can cause the switch to stick or fail. Use a soft cloth to wipe the area and remove debris. A clean switch works smoothly and lasts longer.
Frequently Asked Questions
How Do I Know If My Brake Light Switch Is Faulty?
A faulty brake light switch causes brake lights to stay off or stay on. It may also affect cruise control or ABS systems. Check for unresponsive brake lights when pressing the pedal to confirm the issue.
What Tools Are Needed To Fix A Brake Light Switch?
You typically need a screwdriver, pliers, and a multimeter to test the switch. Some vehicles may require socket wrenches or specialty tools. Always consult your vehicle’s manual before starting repairs.
Can I Replace A Brake Light Switch Myself?
Yes, replacing a brake light switch is usually a simple DIY task. It involves disconnecting the old switch, installing the new one, and testing brake lights. However, follow safety precautions and your vehicle’s specific instructions.
How Much Does It Cost To Fix A Brake Light Switch?
The cost ranges from $15 to $50 for parts, plus labor if done by a mechanic. DIY replacement can significantly reduce expenses. Prices vary by vehicle make and model.
Conclusion
Fixing the brake light switch improves safety and saves money. Check the switch carefully and replace it if needed. Test the brake lights after the repair to ensure they work. Regular car checks help avoid future problems. Simple steps make the process easier for everyone.
Stay safe on the road by keeping your brake lights functional. Taking time to fix this small part makes a big difference. Don’t ignore brake light issues; they protect you and others.