Are you tired of fumbling for the right switch to control your lights? Connecting a three-way light switch might sound tricky, but with the right steps, you can easily control your lights from two different spots.
Imagine turning your hallway or room lights on and off without having to walk back and forth. In this guide, you’ll discover simple, clear instructions that anyone can follow. By the end, you’ll have the confidence to install a three-way switch yourself, saving time and money.
Ready to make your lighting smarter and more convenient? Let’s get started!
Tools And Materials Needed
Connecting a three-way light switch requires specific tools and materials. Having the right items makes the job easier and safer. Prepare everything before starting the work.
This helps avoid interruptions and ensures a smooth installation. Below is a list of essential tools and materials needed for this task.
Basic Hand Tools
You need a screwdriver set with flathead and Phillips tips. A pair of wire strippers is necessary to remove insulation from wires. Needle-nose pliers help bend and twist wires securely. A voltage tester ensures the power is off before working.
Electrical Materials
Use three-way switches designed for this wiring type. Electrical wire with the right gauge is important for safety. Wire connectors secure wire connections and prevent shorts. Electrical tape insulates wires and keeps connections tight.
Safety Gear
Wear insulated gloves to protect from electrical shocks. Safety glasses shield your eyes from dust and debris. A flashlight or headlamp helps see inside dark boxes or spaces.
Additional Supplies
A voltage tester or multimeter verifies power status and wiring. A circuit breaker finder helps identify which breaker controls the circuit. A wire fish tape may be needed to pull wires through walls.

Credit: mepacademy.com
How Three Way Switches Work
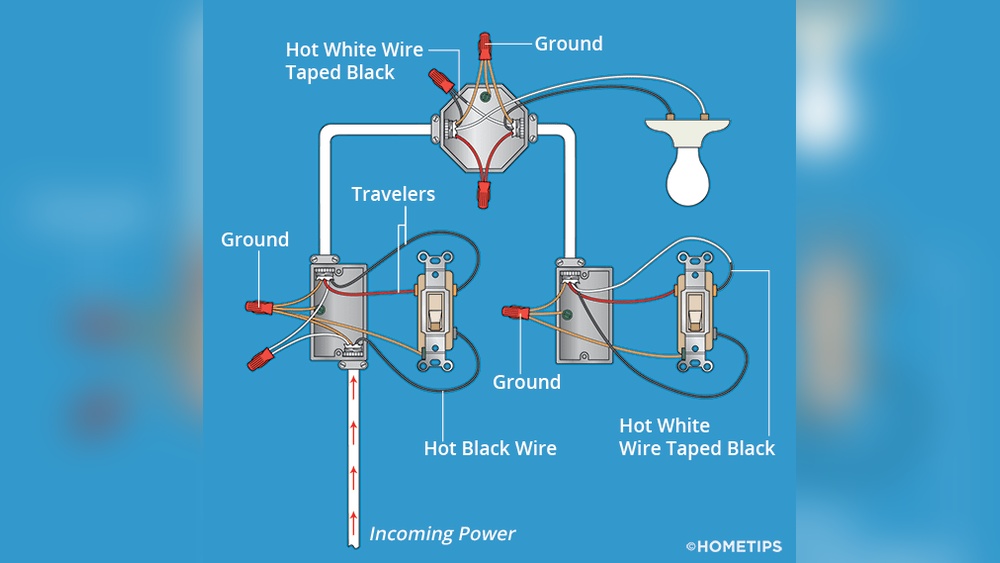
Connecting a three-way switch lets you control one light from two places. Two switches work together by sending power back and forth through traveler wires. This setup is common in hallways and large rooms for easy light control.
Three way switches control one light from two different places. This setup is helpful in long hallways or big rooms with two entrances. You can turn the light on or off from either switch.
The switches work by changing the path of electricity. Each switch has three terminals. One is the common terminal, and the other two are traveler terminals. Electricity flows through these terminals to the light.
The Role Of The Common Terminal
The common terminal connects to the power source or the light. It acts as the main point for the electric current. The switch moves the current between the traveler terminals to control the light.
Traveler Terminals And Their Function
The two traveler terminals send electricity between the switches. They carry current back and forth. The position of the switches decides which traveler terminal is active.
Switch Positions And Light Control
Each switch can be in one of two positions. These positions change the electrical path. When both switches connect the same traveler, the light turns on. If they connect different travelers, the light turns off.
Safety Precautions Before Starting
Working with electrical wiring can be risky. Safety must come first before starting any project. Taking proper safety steps helps avoid accidents and injuries. This section explains key safety precautions to follow before connecting a three way light switch.
Turn Off Power At The Circuit Breaker
Always switch off the power at the main circuit breaker. This stops electricity from flowing to the switches. Use a tester to confirm no current is present before touching wires. Never rely on the wall switch alone to cut power.
Use Proper Tools And Equipment
Wear insulated gloves and safety glasses for protection. Use tools with insulated handles to avoid electric shock. Prepare all needed tools before starting. Good equipment makes the job safer and easier.
Understand The Wiring Diagram
Study the wiring diagram thoroughly. Know which wires connect to which terminals. Miswiring can cause short circuits or damage. Clear understanding reduces risks and errors.
Work In A Dry Environment
Keep the work area dry. Water and electricity do not mix. Avoid working in wet or damp conditions. Dry surroundings lower the risk of electric shock.
Keep Children And Pets Away
Ensure children and pets stay clear of the work zone. Distractions can lead to mistakes or accidents. A safe space helps maintain focus and control.
Identify Wiring Components
Start by spotting the main wiring parts: traveler wires, common wire, and ground wire. Each has a clear role in a three-way switch setup. Knowing these parts helps connect switches correctly and safely.
Understanding The Traveler Wires
Traveler wires carry electricity between two switches. They allow control of one light from two locations. Usually, these wires are red and black. Identifying traveler wires helps avoid confusion during installation. Use a voltage tester to check if these wires are live.
Recognizing The Common Terminal
The common terminal is the main connection point on the switch. It connects to the power source or the light fixture. This terminal often has a darker screw than the others. Knowing the common terminal location ensures proper wiring and switch function.
Locating The Ground Wire
The ground wire protects against electrical shocks. It is typically bare copper or green. Ground wires connect to the switch’s grounding screw. Always attach the ground wire for safety and code compliance.
Identifying The Load Wire
The load wire carries power from the switch to the light bulb. It is often black and connects to the common terminal on one switch. Correctly identifying the load wire is key for proper light control.
Turn Off Power Supply
Turning off the power supply is the first and most important step before starting any electrical work. It protects you from electric shocks and prevents damage to the electrical system.
Always treat electricity with care. Even a small mistake can cause serious injury. Make sure the power is completely off before touching any wires or switches.
Locate The Main Circuit Breaker
Find the main circuit breaker panel in your home. It is usually near the electric meter or in the basement. The panel controls all the power in your house.
Switch Off The Correct Breaker
Identify the breaker that controls the light switch you want to work on. Turn it off by flipping the switch to the “off” position. This stops electricity from flowing to that circuit.
Double Check The Power Is Off
Use a voltage tester or a multimeter to check the wires. Make sure there is no electricity running through them. This step confirms your safety before starting work.
Remove Existing Switches
Start by turning off the power at the circuit breaker. Carefully remove the switch cover and unscrew the old switches from the wall. Gently pull them out to access the wiring for the new setup.
Turn Off The Power
Always start by turning off the power to the switches. Find the correct breaker in your electrical panel. Switch it off to avoid any risk of electric shock. Use a voltage tester to confirm no power is running to the switch. Safety first.
Remove The Switch Cover Plates
Use a screwdriver to remove the cover plates from the switches. Unscrew the small screws holding the plate in place. Carefully pull the plate away from the wall. This exposes the switch and wiring behind it.
Unscrew And Pull Out The Switches
Next, unscrew the switches from the electrical boxes. Use a screwdriver to remove the mounting screws. Gently pull the switch out without touching the wires. Keep the wires intact and visible for the next steps.
Note Wire Positions And Connections
Look closely at how the wires connect to the switch terminals. Take a photo or label each wire for reference. This step helps avoid confusion during installation. Knowing wire placement saves time and prevents mistakes.
Connect The Common Wire
Connecting the common wire is a key step in wiring a three way light switch. The common wire carries the main power or the light fixture connection. Properly attaching this wire ensures the switches work together to control the light from two locations.
This step needs care to avoid confusion. The common wire is different from traveler wires, which carry current between switches. Identifying and connecting the common wire correctly is important for safety and function.
Identify The Common Wire
Look for the wire connected to the black or dark-colored screw on the switch. This is usually the common wire. It might be black or another color, but it connects to the unique screw, not the two traveler screws.
Turn Off The Power
Before touching any wires, switch off the power at the circuit breaker. Use a voltage tester to confirm no electricity flows through the wires. Safety first.
Connect The Common Wire To The Switch
Attach the common wire to the common terminal on the switch. Tighten the screw firmly to hold the wire in place. Loose connections can cause flickering or failure.
Check Wire Connections
Double-check that the common wire is secure and on the correct terminal. Make sure traveler wires connect to traveler terminals only. Proper wiring prevents shorts and ensures the switch works correctly.

Credit: nassaunationalcable.com
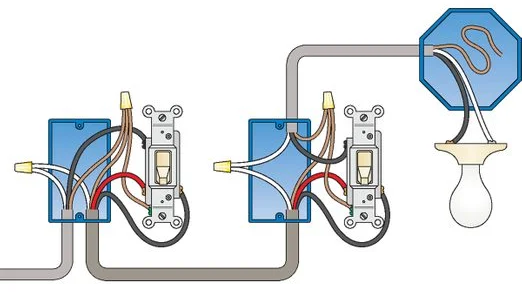
Attach Traveler Wires
Attaching traveler wires is a key step in wiring a three-way light switch. These wires connect the two switches, allowing you to control the light from two locations. Proper connection ensures the switches work smoothly together.
Traveler wires usually come in two colors, often red and black. These colors help identify each wire’s role in the circuit. Using the right wires in the right places avoids confusion and electrical problems.
Identify Traveler Wire Terminals
Each three-way switch has two traveler terminals. These terminals are often brass or dark-colored screws. Connect the traveler wires to these terminals for proper switch operation.
Connect Traveler Wires To First Switch
Attach one traveler wire to the first terminal on the first switch. Attach the second traveler wire to the second terminal. Tighten the screws firmly to secure the wires.
Connect Traveler Wires To Second Switch
At the second switch, connect the traveler wires to the same traveler terminals. Match the wires to their original terminals to keep the circuit correct. Tighten screws to avoid loose connections.
Check Wire Insulation And Position
Ensure no wire insulation is under the screws. Only bare copper should touch the terminals. Arrange wires neatly to avoid crossing or shorts inside the box.
Secure Ground Wires
Secure ground wires are very important in connecting a three-way light switch. They protect you from electric shocks. They also help prevent electrical fires. Ground wires carry extra electricity safely into the ground.
Properly securing ground wires keeps your electrical system safe and stable. It also ensures the switches work well. This step cannot be skipped or done carelessly.
Identify The Ground Wires
Look for bare copper or green insulated wires. These are the ground wires in your switch box. Sometimes, they are bundled together with a wire nut. Make sure to find all ground wires before starting.
Twist Ground Wires Together
Use pliers to twist the ground wires tightly. Twist them in a clockwise direction. This creates a strong connection. It helps the electricity flow safely to the ground.
Attach Ground Wire To Switch
Locate the green screw on the three-way switch. Wrap the twisted ground wire around this screw. Tighten the screw firmly to hold the wire in place. This links the switch to the grounding system.
Use A Wire Connector For Extra Safety
Cover the twisted wires with a wire connector. This protects the wires from touching other wires or metal. Make sure the connector is tight and secure. It keeps the connection safe and stable.
Check The Ground Connection
After securing, gently tug the ground wire. It should not move or come loose. A solid ground connection is key to safe switch operation. Double-check before closing the switch box.
Credit: www.kennethballard.com
Install The Switches
Installing three-way switches lets you control a light from two places. This setup needs careful wiring and correct placement of switches. Follow each step to install the switches safely and correctly.
Turn Off The Power
Always start by turning off the power at the circuit breaker. Use a voltage tester to make sure the wires are not live. This step keeps you safe during installation.
Prepare The Switch Boxes
Remove old switches if needed. Check the switch boxes for enough space. Pull out the wires carefully and straighten them for easy connection.
Connect The Common Terminal
Find the common terminal on the three-way switch. Attach the black wire from the power source or the light fixture here. Tighten the screw firmly to hold the wire.
Attach The Traveler Wires
Connect the two traveler wires to the brass or lighter-colored screws. These wires link both switches. They allow the light to turn on or off from either switch.
Secure The Ground Wire
Connect the bare copper or green ground wire to the green screw on the switch. This connection protects you from electric shocks. Make sure it is tight and secure.
Mount The Switches
Push the wires gently back into the box. Screw the switch into place without forcing the wires. Check that the switch sits flush with the wall.
Test The Installation
Turn the power back on at the breaker. Flip both switches to check if the light works correctly. Make sure the light turns on and off from both switches.
Restore Power And Test
Restoring power and testing your three-way light switch is a crucial step. It confirms the wiring is correct and the switch functions well. Safety is key. Make sure all wires are secured and no tools remain in the box before restoring power.
Turn On The Circuit Breaker
Locate your home’s circuit breaker panel. Find the breaker that controls the light switch circuit. Flip the breaker to the “on” position. This restores power to the switch and light fixture.
Test Both Switches
Go to the first switch and flip it. The light should turn on or off. Move to the second switch and do the same. The light must respond correctly to both switches.
Check For Flickering Or Issues
Observe the light for any flickering or dimming. Flickering can indicate loose wires or poor connections. If problems appear, turn off the breaker and recheck wiring.
Ensure Safe Operation
Confirm the switches work smoothly without resistance. Listen for any buzzing sounds. Buzzing may signal electrical problems that need fixing.
Troubleshooting Common Issues
Troubleshooting common issues when connecting a three-way light switch can save time and frustration. These switches control lights from two locations, which makes wiring tricky. Small mistakes cause the switch not to work properly. Understanding common problems helps fix them quickly and safely.
Check wiring connections carefully. A loose wire can stop the switch from working. Make sure all wires are secure and connected to the correct terminals. Use a voltage tester to confirm power is off before touching wires.
Identifying Incorrect Wiring
Incorrect wiring is the most frequent problem with three-way switches. Each wire must go to the right terminal. The traveler wires connect between the two switches. The common terminal connects to the power source or light fixture. A wrong wire placement stops the switch from working.
Dealing With A Switch That Does Not Turn Off
If the light never turns off, the common wire might be on the wrong terminal. Another cause is reversed traveler wires. Swap the traveler wires or check the common terminal connection. This often fixes the issue.
Fixing Flickering Or Intermittent Light
Flickering lights often mean a loose wire or poor connection. Tighten all screws and check wire nuts. The problem could also be a faulty switch. Replace the switch if tightening wires does not help.
Using A Voltage Tester Safely
A voltage tester helps check if wires carry electricity. Test wires before working on them. This prevents electric shocks and damage. Always follow safety steps when handling electrical parts.
Frequently Asked Questions
What Tools Are Needed To Connect A Three-way Light Switch?
You need a screwdriver, wire stripper, voltage tester, and electrical tape. These tools help ensure safe and proper installation of the switch.
How Do I Identify The Traveler Wires In A Three-way Switch?
Traveler wires usually connect the two switches and carry current between them. Use a voltage tester to identify them safely before connecting.
Can I Replace A Single-pole Switch With A Three-way Switch?
Yes, but you must install the second three-way switch and connect traveler wires correctly for proper operation.
Is It Necessary To Turn Off Power Before Wiring Three-way Switches?
Absolutely, always turn off the power at the circuit breaker before working on electrical wiring to avoid shocks or injuries.
Conclusion
Connecting a three-way light switch is simpler than it seems. Follow each step carefully and double-check your work. Use the right tools and take safety seriously. With patience, you can control lights from two places easily. This skill saves money and adds convenience at home.
Keep practicing, and soon wiring switches will feel natural. Don’t rush; take your time to avoid mistakes. Enjoy the comfort of switching lights from different spots. A little effort brings great results.