Are you tired of dealing with a faulty light switch or simply want to upgrade your home’s look? Changing a Leviton light switch is easier than you might think, even if you’re not a DIY expert.
With just a few simple steps, you can take control of your lighting and improve your space instantly. Keep reading, and you’ll learn exactly how to make this quick fix safely and confidently—no electrician needed. Your home deserves this easy upgrade!

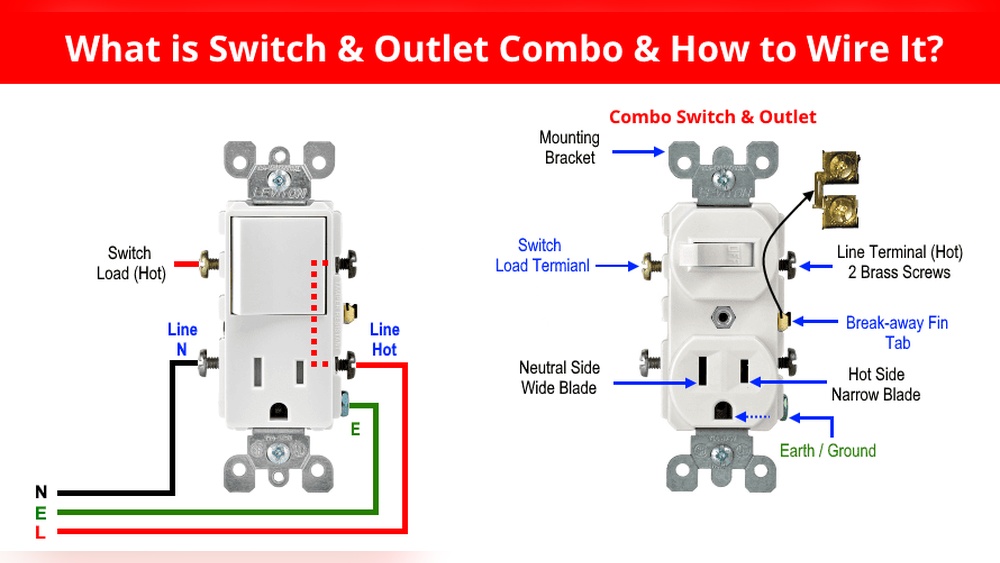
Credit: store.leviton.com
Tools And Materials Needed
Preparing for the switch replacement is an important step. It helps you work safely and avoid problems. Follow these simple actions to get ready before changing your Leviton light switch.
Turn Off Power Safely
Start by turning off the power to the switch. Go to your home’s breaker box. Find the correct breaker for the switch and flip it off. This stops electricity from flowing and keeps you safe.
Verify Power Is Off
Check if the power is really off. Use a voltage tester or a simple lamp. Turn on the lamp at the switch. If the lamp does not light up, the power is off. This step is very important for your safety.
Remove Switch Cover Plate
Use a screwdriver to remove the cover plate. Unscrew the screws holding the plate in place. Take the plate off carefully. This reveals the switch and wires behind it. Now you are ready to replace the switch.

Credit: www.amazon.com
Preparing For The Switch Replacement
Removing the old Leviton switch is the first step to installing a new one. You must be careful and follow each step to ensure safety. Turn off the power at the circuit breaker before starting. This prevents electric shock and damage to the wiring.
Take your time to remove the old switch. Keep track of all parts and wires. This makes the installation of the new switch easier and faster.
Unscrew The Switch
Use a screwdriver to remove the screws holding the switch cover plate. Set the plate aside safely. Next, unscrew the screws that fix the switch to the electrical box. Pull the switch gently out from the wall.
Identify And Label Wires
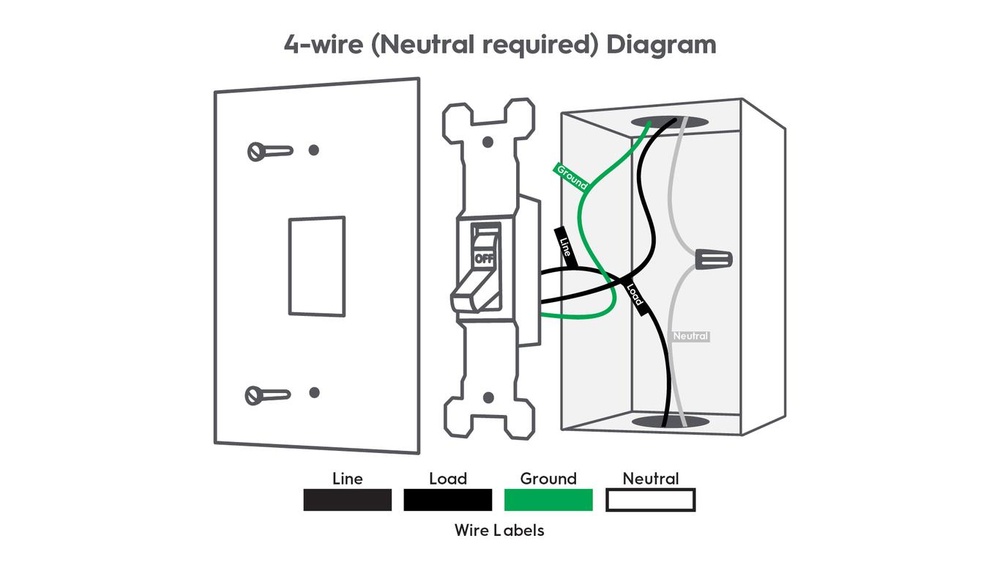
Look at the wires connected to the switch. Usually, there are black, white, and green or copper wires. Use masking tape or labels to mark each wire. Labeling helps you connect the new switch correctly.
Disconnect Wires Carefully
Loosen the screws holding the wires on the switch. Remove the wires one by one. Avoid touching the wire ends together. Place the wires safely to prevent damage or confusion.
Removing The Old Leviton Switch
Installing the new Leviton switch is the next step after removing the old one. This process involves connecting wires, securing the switch in the box, and attaching the cover plate. Each task is simple and requires only a few tools. Follow these steps carefully to ensure your new switch works safely and correctly.
Connect Wires To New Switch
Start by matching the wires from the wall to the switch terminals. Usually, black wires connect to brass screws. The white wires connect to silver screws, if present. The green or bare copper wire connects to the green ground screw. Tighten each screw firmly to hold the wire in place. Do not leave any wire exposed outside the terminal.
Secure The Switch In The Box
Push the wires back into the electrical box gently. Align the switch with the mounting holes in the box. Use the screws that came with the switch to secure it. Tighten the screws evenly until the switch feels stable. Avoid over-tightening to prevent damage to the switch or box.
Attach The Cover Plate
Place the cover plate over the switch. Align the screw holes on the plate with the switch. Insert the screws and tighten them until the plate fits snugly. Do not force the screws to avoid cracking the plate. Your new Leviton switch is now installed and ready to use.

Credit: www.youtube.com
Frequently Asked Questions
How Do I Turn Off Power Before Changing A Leviton Switch?
Always switch off the circuit breaker controlling the switch. Use a voltage tester to confirm no power is flowing. This ensures your safety while working on the Leviton light switch.
What Tools Are Needed To Replace A Leviton Switch?
You need a flathead screwdriver, Phillips screwdriver, voltage tester, and wire stripper. These tools help you safely remove and install the new Leviton light switch.
Can I Replace A Leviton Switch Without Electrical Experience?
Basic DIY skills and safety precautions are necessary. If unsure, hire a licensed electrician to avoid hazards and ensure proper installation.
How Do I Identify The Wiring On A Leviton Light Switch?
Look for black (hot), white (neutral), and green or bare copper (ground) wires. Properly matching wires ensures correct switch function and safety.
Conclusion
Changing a Leviton light switch is simple and safe. Turn off the power first. Follow the steps carefully and take your time. Double-check all connections before turning the power back on. A new switch can improve your home’s lighting control.
You can do this without calling a professional. Feel confident with your new skills. Keep this guide for future reference. Enjoy your updated light switch!