Have you ever pulled off a wall hook only to find sticky, stubborn adhesive left behind? It can be frustrating trying to get your walls clean without causing damage.
But don’t worry—you’re not alone, and there’s a simple way to fix this. You’ll discover easy, effective methods to remove wall hook adhesive quickly and safely. Keep reading to learn how to restore your walls to their smooth, clean state without any hassle.

Credit: www.youtube.com
Types Of Wall Hook Adhesives
Wall hooks are handy for hanging items without nails or screws. Different types of adhesives hold these hooks in place. Knowing the type helps remove them without damage. Three common adhesives are double-sided tape, Command strips, and glue or epoxy. Each has unique features and removal methods.
Double-sided Tape
Double-sided tape is thin and sticky on both sides. It holds lightweight hooks well. The tape can leave a sticky residue on walls. Removing it gently with heat or oil helps avoid damage. It is easy to tear but can be stubborn on some surfaces.
Command Strips
Command strips use a special adhesive that sticks strong but peels off cleanly. They are popular for heavy hooks and picture frames. Pulling the tab slowly stretches the adhesive and releases it. This method prevents wall damage and sticky residue. Command strips work best on smooth, painted walls.
Glue And Epoxy
Glue and epoxy create a very strong bond. They are used for heavy or permanent hooks. Removing these adhesives can be tricky. Softening with heat or using a solvent may help. Scraping carefully without harming the wall is important. This type requires patience and caution during removal.

Credit: www.youtube.com
Tools And Materials Needed
Removing wall hook adhesive requires the right tools and materials. Choosing proper items makes the task easier and safer for your walls. Gather everything before you start to avoid interruptions. Here are the common tools and products used for this job.
Household Items
Several household items work well to remove adhesive without special chemicals. A hairdryer helps soften the glue by heating it gently. Use a plastic scraper or old credit card to lift the softened adhesive. Rubbing alcohol or vinegar can break down sticky residue. A clean cloth or sponge helps wipe away loosened glue. Soap and warm water clean the surface after removing adhesive.
Specialized Adhesive Removers
Specialized adhesive removers target tough glue left behind by wall hooks. These products dissolve adhesive quickly and reduce scrubbing. Use them carefully following the product instructions. Common types include Goo Gone, WD-40, or citrus-based removers. Always test a small area first to avoid wall damage. Gloves protect your hands from chemicals during use.
Heat Method For Softening Adhesive
The heat method softens the sticky glue behind wall hooks. This makes removal easier and less damaging to walls. Heat changes the glue texture, so it peels away smoothly. Two simple ways to use heat are a hair dryer and warm towels. Both are safe and effective for most wall surfaces.
Using A Hair Dryer
Plug in the hair dryer and set it to medium heat. Hold it a few inches from the adhesive. Move the dryer side to side for about one to two minutes. The heat warms the glue, making it soft and sticky. After heating, gently pull the hook or adhesive off the wall. If it feels hard, heat it more before pulling. This method works well on plastic and metal hooks.
Applying Warm Towels
Wet a towel with hot water, then wring it out well. Place the warm towel on the adhesive area and press firmly. Leave it on the wall for five to ten minutes. The heat and moisture soften the glue under the adhesive. Remove the towel and try peeling off the hook gently. Repeat if the glue is still hard. This method is good for delicate paint or wallpaper.
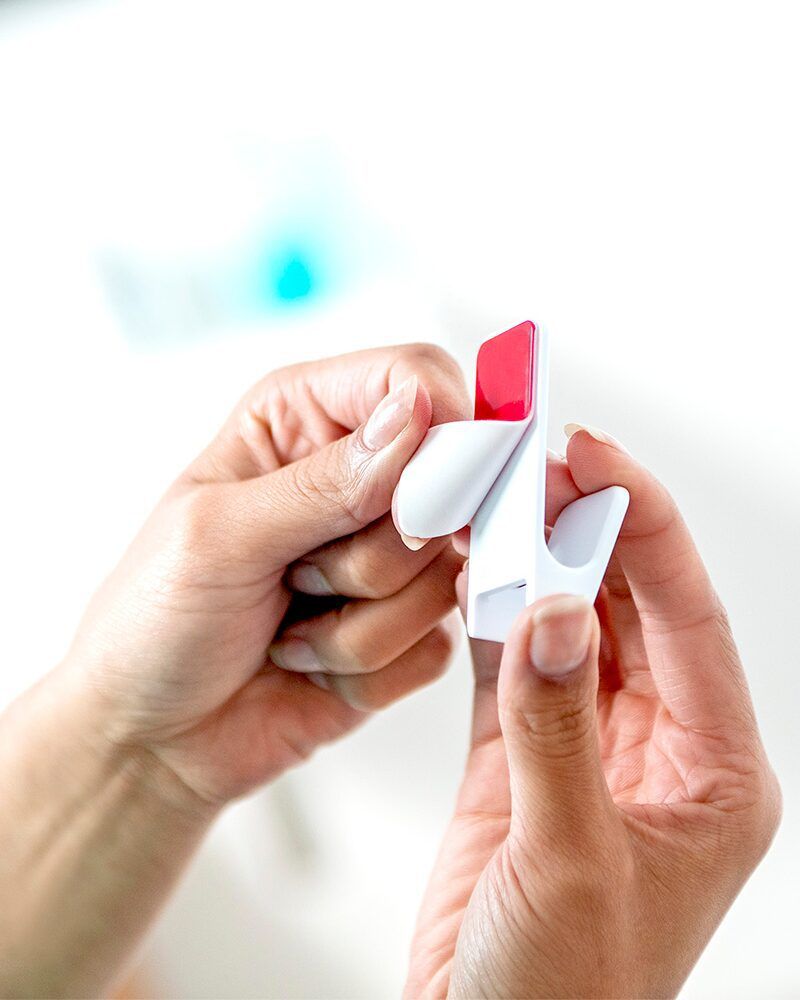
Credit: www.velcro.com
Peeling Off Adhesive Safely
Removing wall hook adhesive can be tricky. Peel it off too fast, and you may damage your wall paint or surface. Peeling off adhesive safely means taking your time and using gentle methods. This reduces the risk of marks or tears on your wall. Below are two effective ways to remove adhesive without harm.
Slow And Steady Removal
Start by gently lifting a corner of the adhesive strip. Pull it back slowly, keeping the strip close to the wall. Do not yank or pull straight out. Move the adhesive strip in a smooth, steady motion. This helps the adhesive release without pulling paint or wallpaper. If the strip feels stuck, pause and try a different angle. Patience is key for clean removal.
Using Dental Floss Or Fishing Line
Take a piece of dental floss or fishing line. Slide it behind the adhesive strip carefully. Use a gentle sawing motion to cut through the adhesive. This technique works well for stubborn strips. It minimizes damage by avoiding direct pulling. Keep the floss or line tight and move slowly. This method is quiet and effective for delicate walls.
Chemical Solutions For Residue
Removing wall hook adhesive can be tricky. The goal is to clear the sticky residue without harming the paint or wall surface. Taking care during removal helps keep walls smooth and looking fresh. Preventing damage is key for a clean finish and less repair work.
Testing Small Areas First
Always try your removal method on a small, hidden spot. This shows how the wall reacts to the cleaner or technique. A safe test avoids surprises like paint peeling or discoloration. If the small area stays fine, proceed with the rest of the wall.
Avoiding Scraping Tools
Scraping tools can scratch or gouge the wall surface. Using sharp objects risks more damage than good. Instead, use soft cloths or plastic scrapers made for delicate surfaces. Gentle removal keeps the wall intact and reduces the chance of marks or dents.
Preventing Wall Damage
After removing wall hook adhesive, the wall surface often needs cleaning and restoring. Sticky residue or slight damage can remain. Proper care helps keep walls looking fresh and smooth. This step is crucial for a neat finish and prepares the wall for painting or decoration.
Wiping Residue
Start by gently wiping the wall with a soft cloth. Use warm, soapy water to remove leftover adhesive. Avoid harsh scrubbing to protect paint. For stubborn spots, apply a small amount of rubbing alcohol or vinegar. Test on a hidden area first to ensure no damage. Wipe again with a clean, damp cloth to remove any cleaning solution.
Touch-up Painting Tips
Check the wall for scratches or discoloration. Use matching paint to cover small marks. Apply paint with a small brush for better control. Let the first coat dry fully before adding more. For larger damaged areas, use a light sanding before painting. This helps the paint stick better and creates a smooth finish.
Frequently Asked Questions
How Do I Safely Remove Wall Hook Adhesive?
To safely remove wall hook adhesive, gently peel the hook and use heat from a hairdryer. This softens the adhesive, making it easier to wipe off without damaging the wall.
What Household Items Remove Adhesive Residue Effectively?
Common household items like rubbing alcohol, white vinegar, or baking soda paste effectively remove adhesive residue. Apply, let sit briefly, then gently scrub for clean walls.
Can I Reuse Wall Hooks After Adhesive Removal?
Most wall hooks cannot be reused after adhesive removal as the adhesive loses its stickiness. Replace with new adhesive strips or hooks for secure mounting.
How To Prevent Wall Damage When Removing Hooks?
To prevent wall damage, always soften the adhesive with heat before peeling. Use gentle tools like plastic scrapers and avoid harsh chemicals.
Conclusion
Removing wall hook adhesive does not have to be hard. Use gentle methods like heat or oil to soften the glue. Peel it off slowly to avoid damage. Clean the wall with soap and water afterward. Taking your time helps keep your walls smooth and clean.
Try these simple steps for a neat finish. Your walls will look great again in no time.