Have you ever wished you could control the same light from different spots in your home? Maybe a hallway or a large room where flipping one switch just isn’t enough.
Connecting multiple light switches might sound tricky, but it’s simpler than you think—and it can make your daily routine much easier. In this guide, you’ll discover step-by-step how to set up multiple switches so you can turn your lights on or off from several locations.
Ready to take control of your lighting and add convenience to your space? Let’s dive in and make it happen together.
Credit: www.buildmyowncabin.com
Types Of Light Switches
Understanding different types of light switches helps in connecting multiple switches properly. Each switch type controls lights in a unique way. Knowing their functions makes installation easier and safer.
Single-pole Switch
A single-pole switch controls one light or a group of lights from one location. It has two terminals and a simple on/off function. This switch is common in most homes for basic lighting control.
Three-way Switch
A three-way switch allows control of a light from two different places. It has three terminals and works with another three-way switch. This setup is useful in hallways or large rooms with two entrances.
Four-way Switch
A four-way switch works between two three-way switches. It lets you control one light from three or more locations. This switch has four terminals and is used in bigger areas or long hallways.

Credit: www.do-it-yourself-help.com
Tools And Materials Needed
Connecting multiple light switches requires the right tools and materials. Having these ready makes the job safer and easier. It helps you avoid mistakes and saves time. Below is a list of what you need to get started.
Essential Tools
- Screwdriver set: flathead and Phillips
- Wire stripper and cutter
- Voltage tester or multimeter
- Needle-nose pliers
- Electrical tape
- Wire nuts or connectors
- Flashlight or headlamp for visibility
Required Materials
- Light switches (single-pole or three-way as needed)
- Electrical wires (14 or 12 gauge, depending on circuit)
- Electrical boxes for mounting switches
- Faceplates to cover the switches
- Wire labels or markers for easy identification
Safety Precautions
Working with electrical switches requires care and caution. Safety must be the top priority before starting any wiring project. Taking simple safety steps helps prevent accidents and injuries.
Power Shutoff
Always turn off the power at the main circuit breaker. This cuts electricity to the switches you will work on. Double-check that the power is off before touching any wires. Never rely on the wall switch to control power.
Using A Voltage Tester
Use a voltage tester to confirm no electricity flows in the wires. Test all wires in the switch box. A tester shows if a wire is live or safe to handle. This tool gives an extra layer of safety.
Proper Insulation
Cover all wire connections with electrical tape or wire nuts. Proper insulation stops wires from touching each other or metal parts. This prevents short circuits and electric shocks. Make sure no bare wire is exposed.
Planning The Wiring Layout
Planning the wiring layout is key to connect multiple light switches safely and correctly. A clear plan helps avoid confusion and mistakes. It saves time during installation and reduces risks of electrical problems. Taking time to plan makes the project smoother.
Identifying Switch Locations
Start by choosing where each switch will go. Place switches at convenient spots near doorways or room entrances. Think about how people use the space and where light control is needed. Mark these locations on a rough sketch of the room. Check that switches are easy to reach and do not block furniture or doors.
Mapping Wire Connections
Draw lines on your sketch to show how wires will run between switches and lights. Plan the path for each wire carefully to avoid crossing or tangled cables. Include the power source location and where the lights are. Label each wire type and connection point clearly. This map will guide your wiring work and keep everything organized.
Wiring Single-pole Switches
Wiring single-pole switches is a common task in home electrical projects. These switches control one light or a group of lights from a single location. Understanding the basic wiring process helps ensure safety and proper function. This guide breaks down the steps to connect single-pole switches easily.
Connecting The Power Source
Start by turning off the power at the circuit breaker. Use a voltage tester to confirm no electricity flows to the wires. Locate the power source cable, usually with black (hot), white (neutral), and ground wires.
Connect the black wire from the power source to the switch’s black or brass terminal. Twist the wires together securely with a wire nut or screw them tightly. The white neutral wire does not connect to the switch but continues to the light fixture.
Attach the ground wire to the green screw on the switch. This step is important for safety. Make sure all connections are firm before proceeding.
Linking The Load
The load refers to the light fixture or device controlled by the switch. Connect the black wire from the switch’s other terminal to the black wire leading to the light fixture. This wire carries power to the light when the switch is on.
Join the white neutral wire from the power source to the white wire of the light fixture. This completes the circuit for the electricity to flow properly.
Ensure the ground wire from the light fixture also connects to the house ground wire. Secure all wire connections and place them inside the electrical box carefully.
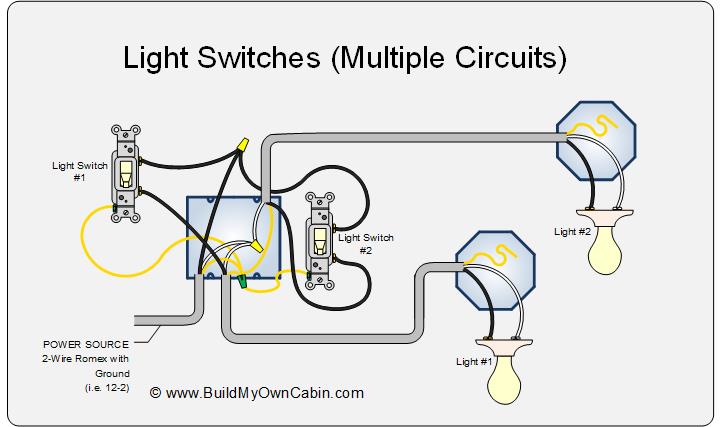
Connecting Three-way Switches
Three-way switches let you control one light from two different spots. This setup is common in hallways and large rooms. It uses two switches connected by special wiring.
Understanding how to connect these switches is key. Proper wiring ensures the light works smoothly from both switches. Safety and accuracy are important here.
Wiring Travelers
Two traveler wires run between the switches. These wires carry current back and forth. Typically, they use red and black wires. Each traveler connects to a screw on both switches.
The traveler wires allow the switches to change the light’s state. They are not the power source or the light wire. Always check the wire colors before connecting.
Ground Connections
Ground wires keep the system safe. They are usually bare copper or green. Connect each switch’s ground wire to the metal box or ground screw.
Proper grounding prevents electric shocks. It also helps the circuit work correctly. Never skip connecting ground wires in three-way switches.
Adding Four-way Switches
Adding four-way switches allows control of a light from three or more locations. This setup works well in long hallways or large rooms with multiple entrances. Four-way switches fit between two three-way switches to extend the control points.
The process requires careful wiring to ensure all switches work properly. Four-way switches do not directly connect to the light. Instead, they act as a middle point in the circuit.
Integrating With Three-way Switches
Start with two three-way switches at the ends of the circuit. The light fixture connects to one of these switches. Four-way switches install between these two three-way switches.
Each four-way switch has four terminals. The traveler wires from the first three-way switch connect to one set of terminals on the four-way switch. The traveler wires going to the next switch connect to the other set.
This setup allows the current to pass through multiple switches. You can turn the light on or off from any switch in the chain.
Wiring The Cross-connects
Four-way switches work by swapping the traveler wires inside. The cross-connects are the pairs of traveler wires that enter and leave the four-way switch.
Connect one pair of traveler wires to one side of the four-way switch. Connect the other pair to the opposite side. The switch flips the connections when toggled.
Ensure all wires are tight and properly secured. Loose connections can cause flickering or switch failure. Test the circuit after wiring to confirm all switches operate correctly.

Credit: diy.stackexchange.com
Testing The Switches
Testing the switches is a key step after wiring multiple light switches. This ensures everything works safely and correctly. Proper testing helps find wiring mistakes early. It also confirms the lights respond to each switch as planned.
Restoring Power
Turn the main breaker back on carefully. Avoid touching any wires or terminals. Make sure no tools or debris remain near the switches. Check that the area is dry and safe. Restoring power lets you test the switches with live current.
Checking Switch Functionality
Flip each switch one by one. Watch the connected light fixtures for response. Each switch should turn its light on and off smoothly. If a light does not respond, double-check the wiring connections. Listen for any unusual sounds like buzzing or clicking. These may indicate a loose connection or faulty switch. Fix any issues before finalizing the installation.
Troubleshooting Common Issues
Troubleshooting common issues helps keep your multiple light switches working well. Problems may arise even after careful installation. Knowing how to fix these can save time and frustration.
Understanding typical problems makes it easier to spot and solve them. Below are some common issues and simple ways to address them.
Switch Not Working
A switch may stop working due to wiring errors or a faulty switch. Check if the switch feels loose or stuck when pressed. Turn off power before inspecting the switch.
Test the switch with a voltage tester to see if it gets power. Replace the switch if it does not respond. Ensure wires connect tightly to the switch terminals.
Light Flickering
Flickering lights often mean a poor connection or a bad bulb. First, try changing the bulb to a new one. Check if the flicker stops.
Loose wiring can cause flickering. Turn off the power and inspect connections in the switch box and light fixture. Tighten any loose wires carefully.
Loose Connections
Loose connections are common in setups with multiple switches. They can cause switches to fail or lights to flicker. Always switch off the power before touching wires.
Look for wires that are not firmly attached to terminals. Use a screwdriver to secure them tightly. Make sure wire nuts are tight on wire joins.
Frequently Asked Questions
How Do I Wire Multiple Light Switches Together?
To wire multiple light switches, use a three-way or four-way switch setup. Connect travelers and common wires properly. Always turn off power before starting. Follow wiring diagrams to ensure correct connections and safety.
Can I Control One Light From Multiple Switches?
Yes, you can control one light from multiple switches using three-way and four-way switches. This setup allows turning the light on or off from different locations.
What Tools Are Needed To Connect Multiple Switches?
You need wire strippers, screwdrivers, voltage tester, electrical tape, and wire nuts. These tools help safely connect and secure switch wiring.
Is It Safe To Install Multiple Switches Myself?
It can be safe if you understand wiring and follow safety guidelines. Always turn off power and consult local codes. When unsure, hire a professional electrician.
Conclusion
Connecting multiple light switches can brighten any room with ease. Follow clear steps to wire switches safely and correctly. Always turn off power before starting any electrical work. Use the right tools and check connections twice. This simple project saves time and adds convenience at home.
You gain control over lighting from different spots. Practice patience and stay careful throughout the process. Soon, you will enjoy well-lit spaces and smart switch setups. Give it a try and see the difference yourself.


