Are you looking to brighten up your space by adding a new light and switch? It might seem tricky at first, but with the right steps, you can do it yourself and save money.
Imagine turning on a brand-new light you installed—all by yourself. In this guide, you’ll discover simple, clear instructions that anyone can follow, even if you’ve never handled electrical work before. Keep reading, and you’ll gain the confidence and know-how to make your home shine brighter.
Tools And Materials Needed
Adding a new light and switch requires the right tools and materials. Using proper items helps make the job safe and easier. Prepare everything before you start to avoid delays and mistakes.
Essential Tools
- Voltage tester to check power status
- Screwdrivers: flathead and Phillips
- Wire strippers for removing insulation
- Needle-nose pliers for bending wires
- Drill with bits for making holes
- Measuring tape to get accurate lengths
- Utility knife for cutting cables
Required Materials
- Electrical wire suited to your home’s circuit
- Light switch compatible with wiring
- Light fixture or lamp holder
- Wire connectors to join wires safely
- Electrical box for switch and fixture
- Outlet box covers for neat finish
- Mounting screws and anchors
Safety Gear
- Insulated gloves to prevent shocks
- Safety glasses to protect your eyes
- Dust mask for particles and debris
- Rubber-soled shoes for better grip
- Flashlight if working in dark spaces
Planning Your Installation
Planning your installation is the first step to adding a new light and switch. It helps avoid mistakes and ensures safety. Proper planning saves time and money during the project. Follow simple steps to prepare well for a smooth installation.
Choosing The Location
Pick a spot where the light is most needed. Think about areas that are dark or need better visibility. Make sure the switch is easy to reach and use. Avoid places near water or where the switch could get damaged. Good location choice improves comfort and safety.
Checking Electrical Load
Know the total power your circuit can handle. Lights and other devices use electricity, and too much load causes problems. Check your home’s main panel for the circuit rating. Add up the watts of all devices on that circuit. Keep the total below the safe limit to prevent overloads.
Understanding Circuit Layout
Learn how wires run in your walls. Find the circuit breaker that controls the area. Identify which wires are for power, switch, and light. Use this knowledge to plan connections correctly. Understanding the layout helps avoid cutting wrong wires or causing shorts.
Turning Off Power Safely
Turning off power safely is the first step before adding a new light or switch. It protects you from electric shocks and prevents damage to your electrical system. Always treat electricity with respect and caution. Taking the time to power down correctly ensures a smooth and safe installation process.
Locating The Circuit Breaker
Find the main circuit breaker box in your home. It is usually in the basement, garage, or utility room. Open the panel door carefully. Look for the breaker labeled for the area where you will work. If not labeled, turn off the main breaker to cut power to the entire house. Use a flashlight if needed to see clearly inside the panel.
Testing For Live Wires
Use a voltage tester to check if wires are live. Touch the tester’s probe to each wire you plan to work on. If the tester lights up or beeps, the wire still has power. Double-check your circuit breaker is off if you detect any current. Never assume wires are safe. Testing ensures no electricity flows through the wires before you start.

Credit: www.do-it-yourself-help.com
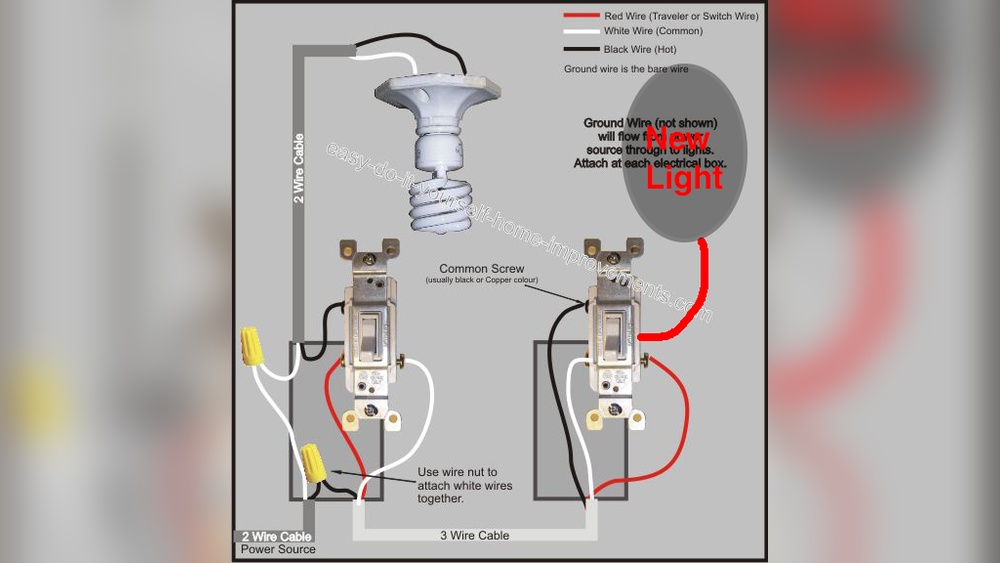
Wiring The New Light Fixture
Wiring the new light fixture is a key step in installing a light and switch. It ensures the light works safely and correctly. This process involves running cables, connecting wires, and mounting the fixture. Each step must be done carefully to avoid electrical problems.
Running Electrical Cables
Start by turning off the power at the circuit breaker. Use a voltage tester to confirm no current flows. Run the electrical cable from the switch box to the new light location. Secure cables with staples, keeping them neat and straight. Avoid sharp bends or damage to the wire insulation.
Connecting Wires Correctly
Strip about half an inch of insulation from each wire. Connect the black (hot) wires together with a wire nut. Join the white (neutral) wires in the same way. Twist the green or bare copper (ground) wires together. Attach the ground wire to the fixture’s grounding screw for safety.
Mounting The Light Fixture
Attach the mounting bracket to the electrical box using screws. Connect the fixture wires to the house wires securely. Carefully tuck the wires into the box to avoid pinching. Screw the light fixture into place on the bracket. Turn the power back on and test the light.
Installing The Switch
Installing the switch is a key step in adding new light and switch. It controls the power flow to the light fixture. Proper installation ensures safety and functionality. Follow simple steps to install the switch correctly. This guide covers choosing the switch, wiring it, and securing it in place.
Selecting The Switch Type
Choose a switch type that fits your needs. Common types include single-pole, three-way, and dimmer switches. Single-pole switches control one light from one location. Three-way switches control one light from two locations. Dimmer switches adjust the light brightness. Check the switch rating to match your electrical load.
Wiring The Switch
Turn off power at the breaker before wiring. Use a voltage tester to confirm no power flows. Connect the black (hot) wire to the switch’s common terminal. Attach the white (neutral) wires together with a wire connector. Connect the ground wire to the green screw on the switch. Tighten all connections securely for safety.
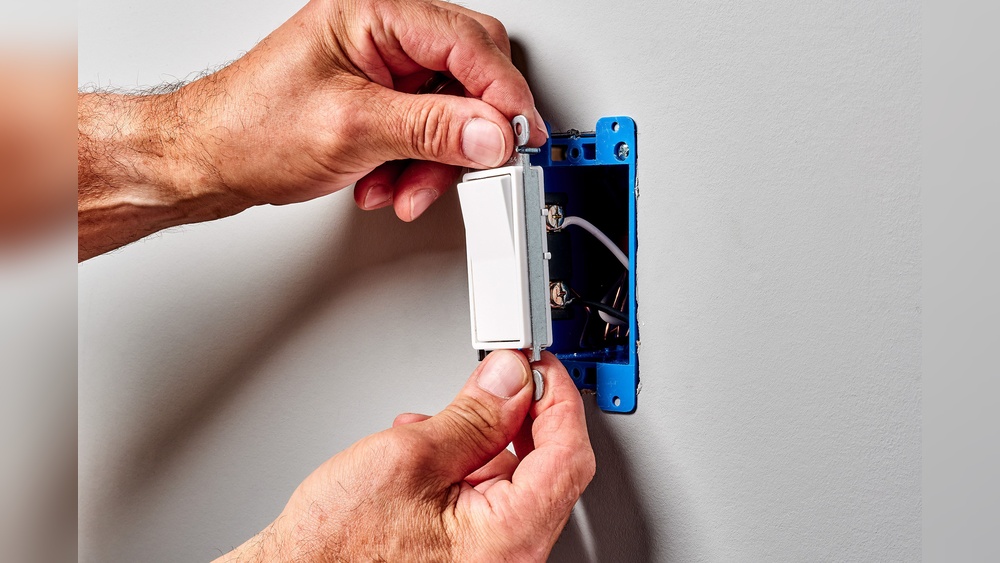
Securing The Switch In Place
Carefully push the wires into the electrical box. Align the switch with the mounting holes. Use screws to fix the switch firmly in the box. Avoid over-tightening to prevent damage. Attach the switch cover plate for a clean look. Restore power and test the switch operation.

Credit: diy.stackexchange.com
Testing Your Work
Testing your work is an important step after installing a new light and switch. It helps ensure everything works safely and correctly. Skipping this step can cause problems or even hazards.
Restoring Power
Start by turning the power back on at the circuit breaker. Make sure the main switch is in the ON position. This restores electricity to the new light and switch. Check that no breakers have tripped during installation.
Checking Light And Switch Function
Flip the switch to see if the light turns on. Try turning the light on and off several times. Ensure the light is bright and steady. Check the switch feels normal and clicks properly. Test any other functions if your switch has them.
Troubleshooting Common Issues
If the light does not turn on, first check the breaker again. Make sure all wires are connected tightly. Look for loose or damaged wires. Replace the bulb if it is faulty. If the switch feels loose, tighten its screws. For persistent problems, consult a professional electrician.
Safety Tips And Best Practices
Adding a new light and switch can brighten your home and improve convenience. Safety is very important during this task. Following safety tips and best practices helps prevent accidents and keeps your home safe.
Always prepare well before starting any electrical work. Turn off the power at the breaker box. Use tools with insulated handles. Wear safety gloves and goggles to protect yourself.
Avoiding Electrical Hazards
Never touch wires with wet hands. Check that wires are not damaged or frayed. Use a voltage tester to confirm the power is off. Keep your work area dry and clean. Avoid working near water or damp places. Follow the wiring instructions carefully to prevent short circuits. Use the right type of wire and switch for your project. Secure all connections tightly to avoid loose wires.
When To Call A Professional
Call an electrician if you see burnt wires or smells of burning. Seek help if you do not understand wiring or electrical codes. Hire a pro for complex jobs or adding multiple switches. Choose a licensed electrician to ensure the work meets safety standards. Professional help reduces the risk of electrical fires and shocks. Always prioritize your safety over saving money.

Credit: diy.stackexchange.com
Frequently Asked Questions
How Do I Safely Add A New Light Fixture?
Turn off power at the breaker before starting. Use a voltage tester to confirm no electricity. Follow wiring instructions carefully, and secure all connections with wire nuts. If unsure, consult a licensed electrician for safety.
What Tools Are Needed To Install A New Switch?
You will need a screwdriver, wire stripper, voltage tester, electrical tape, and wire nuts. These tools help safely remove the old switch and connect the new one.
Can I Add A Light Switch Without Rewiring?
Yes, if wiring is accessible and compatible. Use existing wires to connect the new switch. However, adding new wiring may be necessary for certain setups.
How Do I Connect Wires To A New Light Switch?
Match the wires by color: black (hot), white (neutral), and green or bare (ground). Attach each wire to the corresponding terminal on the switch and tighten screws securely.
Conclusion
Adding new lights and switches can brighten your home easily. Follow safety steps carefully to avoid risks. Turn off power before starting any electrical work. Use the right tools and materials for the job. Double-check connections to ensure everything works well.
Taking your time helps prevent mistakes and saves money. Small upgrades can make a big difference in your space. Try this simple project to improve your home lighting today.