Do you have two light switches side by side and wish you could control them both with just one? Combining two light switches into one can simplify your space and make your daily routine easier.
But how do you do it safely and effectively? In this guide, you’ll discover simple steps and tips that anyone can follow—even if you’re not an expert. Keep reading, and by the end, you’ll know exactly how to combine those switches and upgrade your home’s lighting with confidence.

Credit: diy.stackexchange.com
Tools And Materials Needed
Combining two light switches into one needs the right tools and materials. These help you work safely and finish the job well. Having everything ready saves time and avoids mistakes.
Gather all items before starting the project. This list covers basic tools and materials for most switch combinations.
Basic Hand Tools
You need a screwdriver set with flat and Phillips heads. A wire stripper is important to remove insulation from wires. A voltage tester ensures power is off. Needle-nose pliers help bend and hold wires.
Electrical Materials
Use a new single-pole switch to replace the two switches. Electrical tape helps secure wire connections. Wire nuts connect wires safely. Use electrical boxes if installing a new box for the combined switch.
Safety Gear
Wear insulated gloves to protect from electric shocks. Safety glasses protect your eyes from debris. Have a flashlight ready if the work area is dark.
Safety Precautions
Safety is very important when combining two light switches into one. Electrical work can be risky without the right steps. Taking safety precautions protects you from shocks and accidents. Follow the rules carefully to keep yourself and others safe.
Turn Off Power At The Circuit Breaker
Always switch off the power at the circuit breaker before starting work. Double-check that the switches are not live. Use a voltage tester to confirm no electricity flows through the wires. This step prevents electrical shock during the project.
Use Insulated Tools
Work only with tools that have insulated handles. These tools help avoid electric shocks. Avoid metal tools without insulation. Insulated tools add a layer of protection when handling wires and terminals.
Wear Safety Gear
Wear rubber gloves and safety glasses while working. Gloves protect your hands from electric shocks. Glasses shield your eyes from sparks or debris. Safety gear reduces the risk of injury during electrical tasks.
Check Local Electrical Codes
Follow local electrical codes and regulations for your area. Codes ensure safe and proper installation. They may require permits or inspections. Compliance helps avoid hazards and legal issues.
Label Wires Properly
Label each wire before disconnecting switches. Clear labels help avoid confusion during reconnection. Correct wiring prevents short circuits and damage. Use tape and markers to keep track of wires.
Identify Existing Wiring
Identifying the existing wiring is the first step in combining two light switches into one. You need to know which wires control each switch before making any changes. This helps avoid mistakes and keeps you safe.
Each switch usually has a few wires connected to it. These wires carry power or connect to the light fixture. Finding out which wire does what is important for a smooth installation.
Turn Off The Power
Start by turning off the power at the circuit breaker. This prevents any electric shock while you work. Use a voltage tester to confirm the power is off at the switches.
Remove The Switch Covers
Unscrew the switch covers carefully. This gives you access to the wiring behind the switches. Keep the screws safe for reinstallation.
Identify The Wires
Look for the common wire, usually black or red. This wire brings power to the switch. The other wires connect to the light or the other switch.
Label The Wires
Use small pieces of tape to label each wire. Mark which switch it belongs to and its function. This makes it easier to combine them later.
Check The Wiring Type
Note if the wiring is single-pole or three-way. Single-pole switches control one light. Three-way switches control a light from two locations.

Credit: www.reddit.com
Turn Off Power Supply
Turning off the power supply is the first and most important step before combining two light switches into one. It keeps you safe from electric shocks. Always treat electricity with respect. Never start work without cutting the power.
Before touching any wires, locate your home’s main electrical panel. This is where you can shut off the power to the switches you want to combine. This simple step can prevent accidents and injuries.
Locate The Circuit Breaker
Find the circuit breaker that controls the light switches. It is usually labeled for easy identification. If labels are missing, turn off the main breaker to cut power to the entire house.
Switch Off The Correct Breaker
Flip the breaker switch to the “off” position. This stops electricity from flowing to the switches. Make sure the breaker stays off during the entire process.
Double Check Power Is Off
Use a voltage tester to confirm there is no electricity. Test both switches to ensure safety. Do not skip this step.
Inform Others In The Home
Let everyone know the power is off. This prevents someone from turning it back on by mistake. Safety is a shared responsibility.
Remove Old Switches
Start by turning off the power to the switches. Carefully remove the old switches from the wall to prepare for combining them into one.
Turn Off Power At The Circuit Breaker
Start by turning off the power to the switches at the circuit breaker. This step is crucial for safety. Never work on electrical switches with the power on. Use a tester to confirm the power is off.
Remove The Switch Cover Plates
Unscrew the cover plates from the wall switches. Keep the screws safe to reuse later. Removing the plates exposes the switches and wiring behind them.
Unscrew And Pull Out Old Switches
Unscrew the mounting screws holding each switch in place. Gently pull the switches out from the wall box. Do not force them to avoid damaging wires.
Note The Wiring Setup
Look closely at how the wires connect to each switch. Take a photo or draw a simple diagram. This helps to connect the new combined switch correctly.
Disconnect The Wires
Loosen the terminal screws or remove wire nuts to disconnect wires. Separate the wires carefully to avoid mixing them up. Prepare the wires for the new switch installation.
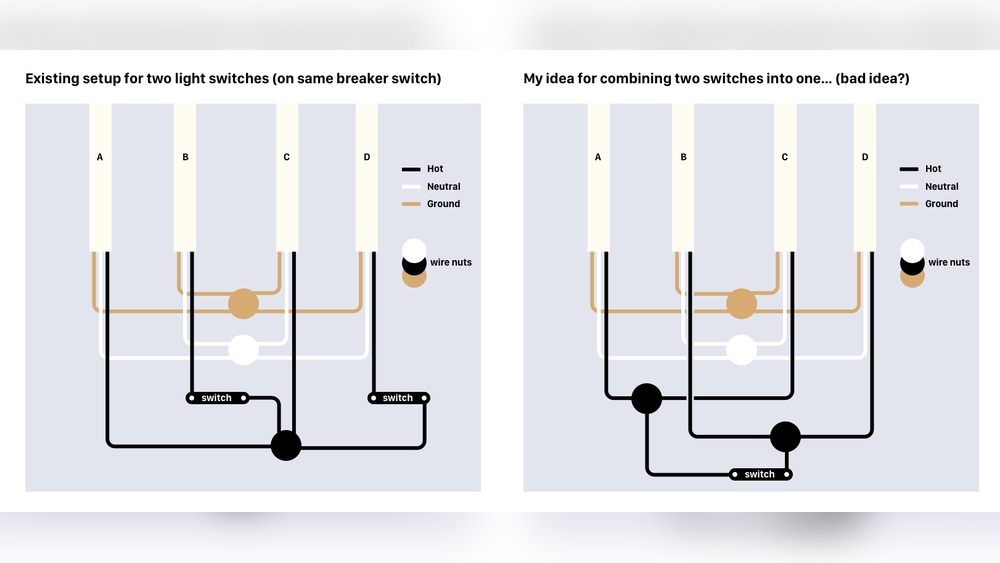
Combine Wiring For Single Switch
Combining two light switches into one saves space and simplifies control. Connect the wires carefully, matching colors and terminals. Always turn off power before starting to stay safe.
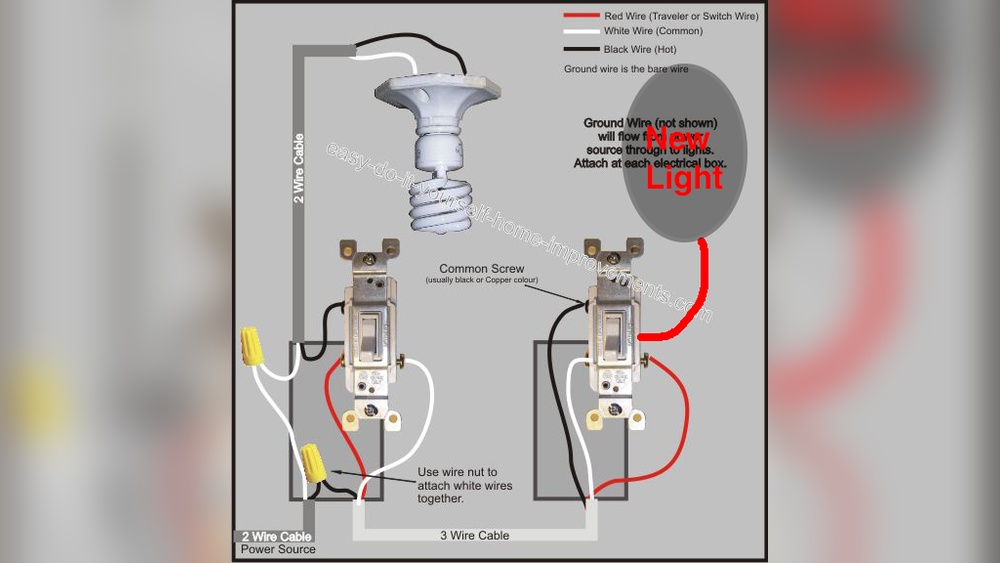
Understanding The Wiring Setup
Combining two light switches into one requires knowing the wiring layout. Each switch has its own wires for power and load. Identify which wires control each light. Check for live (hot), neutral, and ground wires. Use a voltage tester to ensure safety before starting.
Disconnecting Existing Switches
Turn off power at the breaker box to avoid shocks. Remove the switch cover plates carefully. Unscrew the switches and pull them out gently. Note the wire connections on each switch. Label the wires with tape for easy reattachment later.
Connecting Wires To A Single Switch
Join the live wires from both switches using a wire connector. Connect this combined live wire to the single switch’s input terminal. Twist the load wires together and connect them to the output terminal. Secure the ground wires with a wire nut. Make sure all connections are tight and insulated.
Testing The Combined Switch
Restore power from the breaker box. Flip the single switch to check if both lights work. If lights do not turn on, turn off the power and recheck connections. Use a voltage tester to confirm proper wiring. Once working, install the switch back into the box and attach the cover plate.
Install New Switch
Installing a new switch is a key step in combining two light switches into one. This process helps you control both lights with a single switch. It also cleans up your wall space and wiring. Follow simple steps to install the new switch safely and correctly.
Turn Off The Power
Switch off the power at the circuit breaker. Use a tester to check the wires. Make sure no electricity flows to the switches. Safety first.
Unscrew and pull out both old switches from the wall. Carefully disconnect the wires from each switch. Note which wire goes where. This helps during the new switch installation.
Prepare The Wires
Untangle and straighten the wires for easy handling. Strip about half an inch of insulation from each wire end. This ensures a good connection to the new switch.
Connect The New Switch
Attach the wires to the terminals on the new switch. Connect the live wires to the common terminal. Join the traveler wires to the other terminals. Tighten the screws securely to avoid loose connections.
Secure The Switch And Test
Push the new switch into the wall box. Screw it in place firmly. Turn the power back on at the breaker. Test the switch to check if both lights work together.
Test The Combined Switch
Testing the combined switch is an important step after wiring two switches into one. This ensures the new setup works properly and safely. Careful testing helps avoid electrical problems or damage to your lights.
Follow simple steps to check the switch function. This will confirm that both light circuits respond correctly to the combined switch.
Turn On The Power
Restore power at the circuit breaker before testing. Make sure the switch is in the off position first. Turning on the power is the first step to see if the wiring is correct.
Check Each Light
Flip the combined switch to the on position. Observe if both lights turn on. Then, turn the switch off and confirm both lights go off. This shows the switch controls both circuits properly.
Test For Flickering Or Issues
Watch the lights for flickering or dimming. Flickering may mean loose wiring or a bad connection. If you see any issues, turn off the power and review the wiring before testing again.
Use A Voltage Tester
A voltage tester confirms electricity flows through the switch correctly. Test each wire terminal on the switch. The tester should light up or beep to show power is present. This verifies safe and proper wiring.
Troubleshooting Tips
Troubleshooting is key when combining two light switches into one. Small mistakes can cause the switch to fail or create safety risks.
Check each step carefully and stay patient. Troubleshooting helps find and fix wiring or connection problems fast.
Check The Power Supply
Make sure the power is off before starting any work. Use a voltage tester on wires to confirm no electricity flows.
Power issues often cause switches not to work. Confirm the breaker is off and locked if possible.
Verify Wire Connections
Loose or wrong wire connections stop switches from working properly. Double-check each wire is in the right place.
Use wire nuts or terminal screws tightly. Look for damaged or frayed wires and replace them immediately.
Test The Switch Function
Test the switch after wiring but before closing the box. Flip the switch on and off to see if lights respond.
If the light does not turn on, recheck connections and the wiring diagram. A multimeter can help test continuity.
Inspect The Light Fixture
The problem may come from the light fixture, not the switch. Check bulbs, sockets, and wiring at the fixture.
Replace burned-out bulbs and clean sockets. Ensure fixture wiring matches the switch wiring instructions.
Use Correct Switch Type
Use a switch designed for controlling two circuits or a double switch if needed. A wrong switch type causes issues.
Read the switch label and product details to verify compatibility with your setup before installation.

Credit: www.reddit.com
Frequently Asked Questions
How Do I Combine Two Light Switches Into One?
To combine two switches, turn off power first. Then, connect the wires from both switches to a single switch, ensuring proper wiring and secure connections. Finally, test the switch for correct operation before restoring power.
Can I Merge Two Light Switches Without An Electrician?
Yes, if you have basic electrical knowledge and follow safety rules. Always turn off power before starting. Use appropriate tools and double-check wiring diagrams to avoid mistakes.
What Tools Are Needed To Combine Two Light Switches?
You need a screwdriver, wire stripper, voltage tester, electrical tape, and a single-pole switch. These tools help you safely remove old switches and connect wires properly.
Is It Safe To Combine Two Switches Into One?
It is safe if done correctly. Always turn off power at the breaker. Use the right switch and wire connections. If unsure, consult a professional electrician.
Conclusion
Combining two light switches into one can save space and simplify control. Follow safety steps carefully to avoid problems. Turn off power before starting any wiring work. Use the right tools and check connections twice. This small project can improve your home’s look and function.
Take your time and ask an expert if unsure. A neat, single switch adds convenience to any room. Simple changes often make a big difference. Try this project to update your lighting setup today.