Are you ready to give your cabinets a sleek, modern look with flushmount hardware? Installing flushmount cabinet hardware might sound tricky, but with the right steps, you can do it yourself and save money.
Imagine opening your cabinets smoothly, enjoying a clean and stylish finish that blends perfectly with your space. In this guide, you’ll discover simple, clear instructions that make the process easy—even if you’ve never done it before. Keep reading, and you’ll have your cabinets transformed before you know it.
Tools And Materials Needed
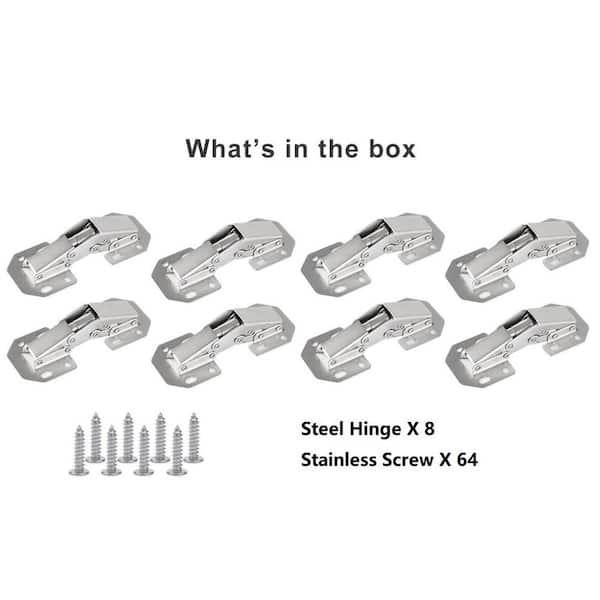
Installing flushmount cabinet hardware requires some basic tools and materials. Having the right items ready makes the process smooth and fast. This section covers what you need before starting your project.
Essential Tools
A power drill is a must for making holes quickly. Use a drill bit that matches your screws.
A screwdriver helps tighten screws firmly. A manual or electric one works well.
A measuring tape ensures precise placement of the hardware. Accuracy is key for a neat look.
Marking tools like a pencil or marker help mark drill points clearly.
A level keeps the hardware straight on the cabinet surface.
Safety glasses protect your eyes from dust and wood chips.
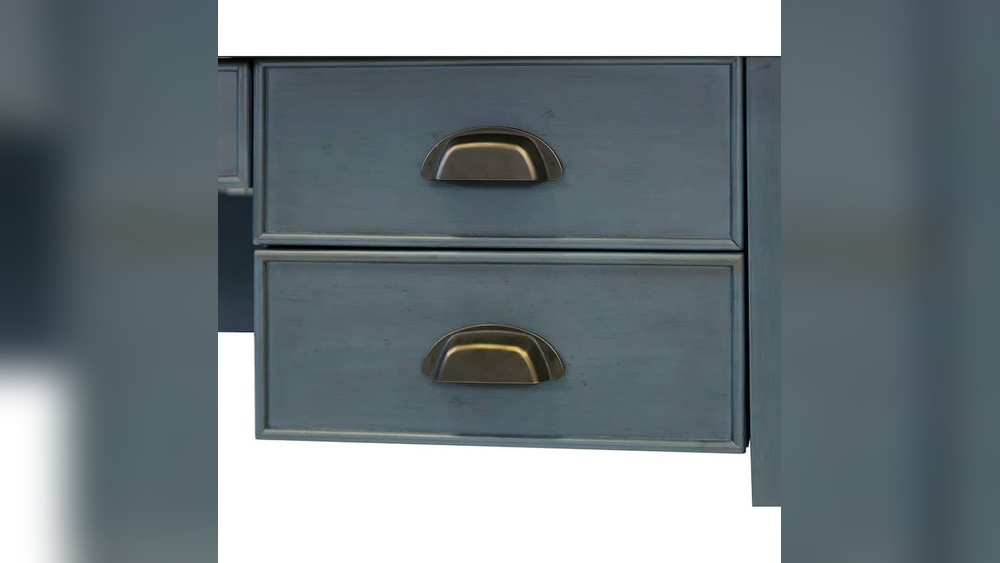
Choosing The Right Hardware
Select flushmount hardware that fits your cabinet style. Check dimensions carefully before buying.
Look for durable materials like metal or high-quality plastic. They last longer and feel sturdy.
Consider the finish that matches your cabinet color or design. It creates a polished look.
Make sure the hardware includes all necessary screws and parts for installation.

Credit: www.amazon.com
Preparing Your Cabinets
Preparing your cabinets is an important first step before installing flushmount cabinet hardware. It ensures the hardware fits well and stays in place. Taking time to prepare saves effort and prevents mistakes later.
Cleaning The Surface
Start by cleaning the cabinet surface thoroughly. Remove dirt, grease, and dust with a mild cleaner. Use a soft cloth to avoid scratches. A clean surface helps the hardware stick better and look neat.
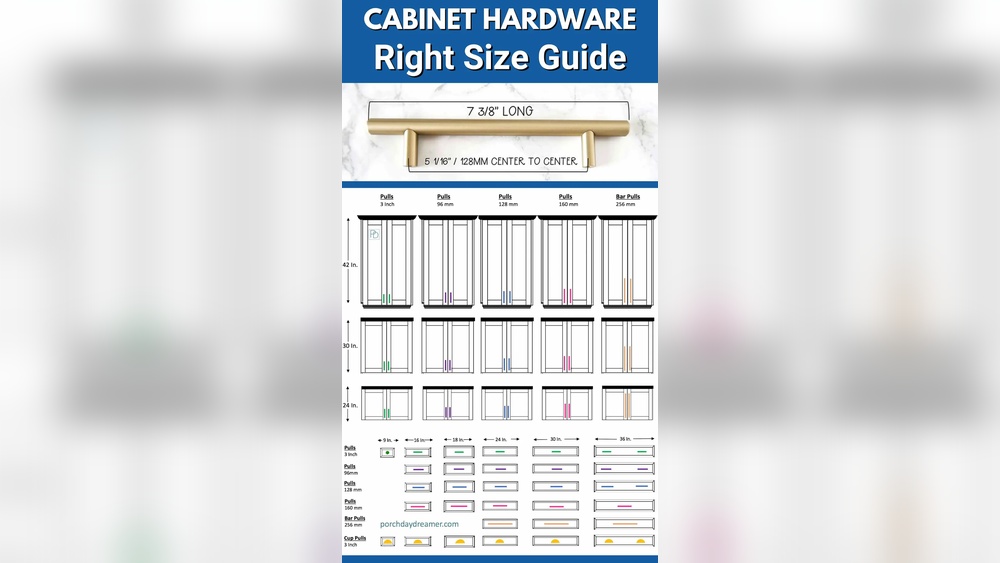
Measuring And Marking
Measure carefully where the hardware will go. Use a ruler or tape measure for accuracy. Mark spots lightly with a pencil. Double-check measurements before drilling or screwing. Precise marks make installation smooth and easy.
Aligning The Hardware
Aligning flushmount cabinet hardware is a key step in the installation process. Proper alignment ensures the handles look neat and work well. It makes your cabinets appear professional and clean. Incorrect placement can lead to handles that feel loose or uneven. Taking time to align hardware carefully will improve the cabinet’s function and style.
Positioning Flushmount Handles
Start by marking the exact spot for each handle. Use a pencil and ruler to measure from the cabinet edges. Place the handle so it fits inside the recessed area. Make sure the handle does not stick out or cover the edges. Double-check the marks before drilling holes. Accurate positioning helps the hardware fit perfectly and look balanced.
Ensuring Level Placement
Use a level tool to check the handle’s alignment. Hold the level against the handle to see if it is straight. Adjust the handle’s position if it tilts up or down. Mark the screw holes only when the handle is perfectly level. This step avoids crooked handles and uneven gaps. Proper leveling gives your cabinets a polished and tidy appearance.
Credit: www.homedepot.com
Drilling Pilot Holes
Drilling pilot holes is a key step when installing flushmount cabinet hardware. These small holes guide screws and prevent wood from splitting. Proper pilot holes make the installation stronger and neater. Precision is important to keep hardware straight and secure.
Selecting Drill Bits
Choose drill bits that match the screw size. The hole should be slightly smaller than the screw’s diameter. Use a high-quality bit for clean, accurate holes. A wood bit with a sharp point works best for cabinet surfaces. Avoid bits that are dull or too large.
Drilling Techniques
Mark the spot clearly before drilling. Use a pencil or a small punch to make a dent. Hold the drill steady and start slowly. Drill straight to avoid angled holes. Stop drilling when the pilot hole reaches the right depth. Clean out any dust before inserting screws.
Attaching The Hardware
Attaching flushmount cabinet hardware is a simple step. It makes your cabinets look neat and stylish. Proper attachment ensures the handles stay firm and last long. Follow these steps carefully for the best results.
Securing Handles With Screws
Start by aligning the handle with the pre-drilled holes. Insert the screws through the back of the cabinet door. Use a screwdriver to tighten the screws gently. Avoid over-tightening to prevent damage to the wood. Make sure the handle sits flush against the surface. Tighten screws until the handle feels secure and steady.
Checking Stability
After attaching, test the handle by pulling it gently. It should not wiggle or feel loose. Check both screws for tightness again. Loose screws can cause the handle to fall off. Adjust the screws if needed for a better fit. A stable handle improves cabinet use and safety.
Finishing Touches
Finishing touches make your flushmount cabinet hardware look perfect and work well. After installation, spend time on small details. These steps keep your cabinets clean and fully functional. Attention here ensures long-lasting beauty and ease of use.
Cleaning Residue
Remove dust, fingerprints, and any glue or paint spots. Use a soft cloth with mild soap and water. Avoid harsh chemicals that can damage the hardware finish. Clean gently around edges and screws. A clean surface highlights the hardware’s quality and style.
Testing Functionality
Open and close cabinet doors several times. Check for smooth movement and secure fitting. Tighten loose screws if needed. Make sure the hardware does not catch or stick. Proper function adds comfort and safety to your kitchen or bathroom.
Troubleshooting Common Issues
Installing flushmount cabinet hardware can be straightforward. Still, some common issues may arise during the process. These problems can affect the look and function of your cabinets. Knowing how to fix them saves time and frustration. Below are easy solutions to two frequent problems: misalignment and loose hardware.
Misalignment Fixes
Misalignment happens when hardware does not sit straight or level. This can make doors hard to close or look uneven. Start by loosening the screws slightly. Adjust the hardware until it is even and fits well against the cabinet surface. Use a level tool to check accuracy.
Mark the correct position with a pencil. Remove the hardware and drill new pilot holes if needed. Pilot holes help screws go in straight and prevent wood splitting. Reattach the hardware firmly in the new position. Check again for alignment before tightening fully.
Loose Hardware Solutions
Loose hardware can cause rattling or falling off. Tighten screws with a screwdriver first. If screws do not tighten, the holes might be stripped. Fill stripped holes with wood filler or toothpicks dipped in glue. Let it dry completely.
Once dry, reinsert the screws carefully. For metal or laminate surfaces, use wall anchors or special fasteners. These provide a stronger hold. Regularly check your hardware to keep it secure and functional.

Credit: www.walmart.com
Frequently Asked Questions
What Tools Are Needed To Install Flushmount Cabinet Hardware?
You need a drill, screwdriver, measuring tape, pencil, and flushmount hardware kit. These tools ensure precise and secure installation.
How Do I Measure For Flushmount Cabinet Hardware Placement?
Measure the cabinet door’s center height and mark it. Align the hardware properly to ensure a balanced look.
Can I Install Flushmount Hardware On Any Cabinet Type?
Yes, flushmount hardware fits most cabinet doors. Ensure the cabinet surface is flat and strong enough for mounting.
How Long Does It Take To Install Flushmount Cabinet Hardware?
Installation typically takes 20-30 minutes per cabinet. Time varies depending on skill level and number of cabinets.
Conclusion
Installing flushmount cabinet hardware is simple with the right steps. Take your time to measure and mark carefully. Use the right tools to avoid mistakes. Tighten screws just enough to hold the hardware firmly. Clean the area before and after installation.
This small update can improve your cabinets’ look and function. You can do this project yourself, even with little experience. Enjoy the fresh, neat appearance of your cabinets. Ready to try it out?