Are you struggling with those stubborn fastener clips that just won’t budge? Removing fastener clips might seem tricky, but with the right tips and tools, you can do it quickly and without damage.
Whether you’re fixing your car, working on home projects, or handling electronics, knowing how to remove these clips can save you time and frustration. Keep reading, and you’ll discover simple, effective methods to get the job done right—no stress, no hassle.
Your next repair starts here.

Credit: www.theengineeringchoice.com
Types Of Fastener Clips
Fastener clips hold many parts together in cars, furniture, and electronics. They come in different shapes and materials. Knowing the types helps you remove them safely and easily.
Each clip type needs a different way to take it out. Some are simple, while others require a tool. Understanding these clips will save time and prevent damage.
Plastic Clips
Plastic clips are common in cars and appliances. They are light and flexible. These clips snap into place and hold firmly.
To remove plastic clips, gently pry them with a flat tool. Avoid pulling hard to stop breaking the clip or the part.
Metal Clips
Metal clips are strong and durable. They often hold heavy parts together. These clips can be spring-loaded or bent to lock.
Use pliers or a screwdriver to open metal clips. Be careful not to bend the clip too much. It may lose its grip or break.
Push Rivets
Push rivets have a pin that pushes in to lock. They are easy to install and remove. Found in bumpers and panels, they hold parts tightly.
To remove push rivets, pull the center pin out first. Then, the outer part will come off easily. Use a trim tool or flat screwdriver for help.

Credit: www.youtube.com
Tools Needed For Removal
Removing fastener clips requires the right tools. Using proper tools makes the job easier and prevents damage. Each tool serves a specific purpose and fits different clip types. Understanding these tools helps you work safely and quickly.
Clip Removal Pliers
Clip removal pliers are made for grabbing and pulling clips. They have a special tip to fit under the clip head. These pliers reduce the risk of breaking clips or scratching surfaces. They work best for stubborn clips that are hard to reach.
Flathead Screwdrivers
Flathead screwdrivers are common and useful for clip removal. Use a small screwdriver to pry clips gently. They fit well under the clip edge to lift it up. Be careful not to force it too much, or the clip may break.
Trim Removal Tools
Trim removal tools are plastic and designed to protect surfaces. They slide under clips without scratching paint or plastic. These tools are light and easy to handle. Perfect for delicate areas and tight spots.
Preparation Before Removal
Preparing before removing fastener clips helps avoid damage and makes the job easier. Taking time to get ready protects your tools and the surface around the clips. Clear steps in preparation save time and reduce frustration during removal.
Cleaning The Area
Start by cleaning the area around the fastener clips. Dirt and dust can hide the clips or cause tools to slip. Use a soft brush or cloth to remove loose dirt. For sticky grime, a mild cleaner works well. Dry the surface completely before starting the removal. Clean surfaces give better grip and reduce the chance of damage.
Protecting Surrounding Surfaces
Cover nearby surfaces to avoid scratches or dents. Use painter’s tape or soft cloth to shield sensitive areas. If working near paint or plastic, extra caution is needed. Place padding under tools to stop accidental hits. Protecting surfaces keeps your work neat and safe.
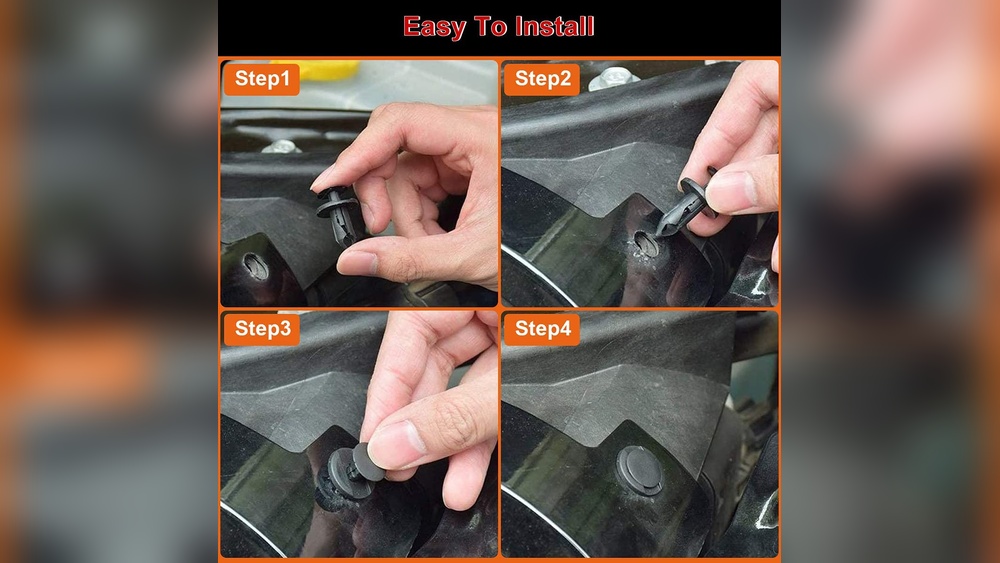
Step-by-step Removal Process
Removing fastener clips can be tricky without the right steps. Follow this clear process to avoid damage. Take your time and work carefully for the best results.
Locating The Fastener Clip
First, find the exact spot of the fastener clip. These clips often hide under panels or trim. Look closely near edges or corners. Clean the area if dirt covers the clip. Good lighting helps spot them easily.
Choosing The Right Tool
Select a tool made for clip removal. A flathead screwdriver or plastic trim tool works well. Avoid sharp tools that can scratch surfaces. Use tools that fit the clip size. This makes removal safer and easier.
Gently Pry Or Pull The Clip
Insert the tool under the clip’s edge carefully. Apply light pressure to lift the clip slowly. Do not force it or pull too hard. Wiggle the clip gently if it resists. Stay patient to prevent breaking the clip.
Checking For Hidden Fasteners
Look around the clip for extra fasteners. Sometimes screws or bolts hold clips in place. Remove all fasteners before pulling the clip out. This avoids damage to the panel or clip. Double-check both sides of the area.
Tips For Stubborn Clips
Stubborn fastener clips can be tough to remove. They may stick tight or break easily. Using the right methods helps avoid damage and saves time. Below are useful tips to handle these tricky clips safely and effectively.
Using Lubricants
Lubricants reduce friction and make clips easier to pull out. Spray a small amount of WD-40 or silicone lubricant around the clip. Let it sit for a few minutes. This softens rust and dirt that hold the clip tight. Then, try to remove the clip gently with a clip tool or pliers.
Applying Heat
Heat can loosen clips stuck by glue or corrosion. Use a heat gun or hair dryer on a low setting. Warm the clip area evenly for one to two minutes. Avoid overheating, which can melt plastic parts. After heating, try to remove the clip carefully. Heat helps expand metal and frees tight clips.
Avoiding Damage
Use tools designed for fastener clips to avoid breaking them. Apply steady, gentle pressure rather than force. Work slowly to prevent snapping or bending clips. Protect surrounding surfaces with cloth or tape before prying. If a clip resists, try lubricants or heat again. Keeping clips intact saves repair costs and effort.
After Removal Care
After removing fastener clips, proper care is important. This helps keep your project safe and ready for the next step. Simple actions can protect the clips and the area where they were used.
Inspecting For Damage
Check each clip closely for cracks or breaks. Look for signs of wear or bending. Damaged clips may not hold parts securely. Using broken clips can cause problems later. Take your time to spot any issues.
Replacing Clips If Needed
Replace any clips that show damage. Using new clips keeps parts firmly in place. Do not reuse clips that are weak or cracked. New clips ensure safety and durability. Keep spare clips on hand for quick replacement.
Storing Removed Clips
Store removed clips in a small container or bag. Keep them in a dry place to avoid rust. Organize clips by size or type for easy access. Proper storage prevents loss and damage. Label containers for quick identification later.

Credit: www.pointsunknown.com
Frequently Asked Questions
What Tools Are Best For Removing Fastener Clips?
Use a flathead screwdriver or a trim removal tool. These tools help pry clips without damage. Needle-nose pliers work for stubborn clips. Always choose the tool based on clip type and location to avoid breaking them.
How Can I Remove Fastener Clips Without Breaking Them?
Gently pry from the edges using a trim tool or screwdriver. Apply slow, steady pressure to avoid snapping. Wiggling the clip slightly can loosen it. Patience and the right tool prevent damage during removal.
Are Fastener Clips Reusable After Removal?
Some fastener clips are reusable if undamaged. Inspect clips for cracks or bends before reuse. If damaged, replacing clips ensures secure fastening. Always have extra clips on hand during repairs or removals.
What Safety Precautions Should I Take When Removing Clips?
Wear safety glasses to protect your eyes from flying debris. Use gloves to avoid cuts or pinches. Work in a well-lit area for better visibility. Use the correct tools to minimize injury risks.
Conclusion
Removing fastener clips can be simple with the right steps. Use proper tools to avoid damage. Work slowly and carefully to keep clips intact. Clean the area before reattaching new clips. Practice makes the process easier and faster. This guide helps you save time and effort.
Now, you can handle fastener clips with confidence. Keep these tips in mind for future projects.