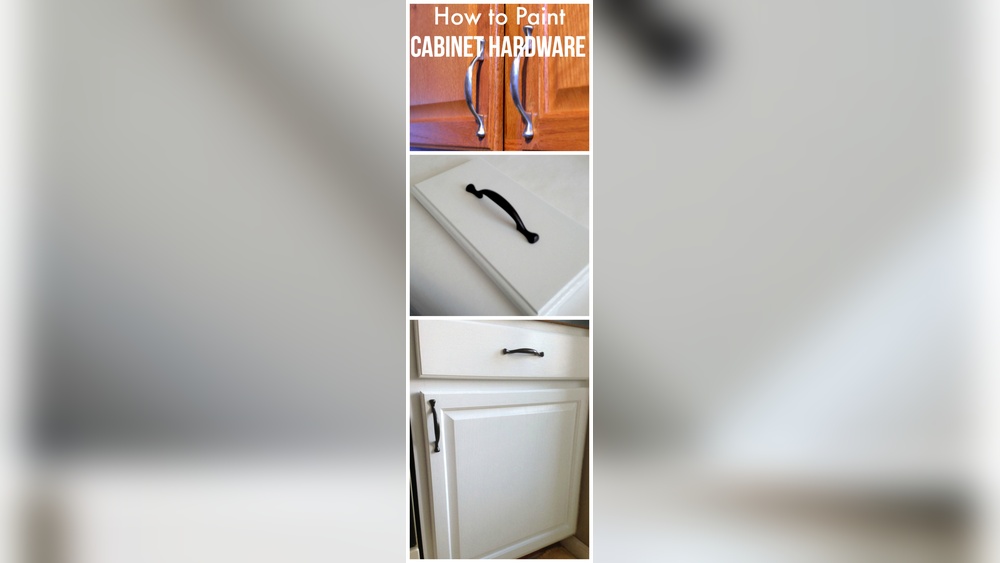
Are your kitchen cabinet handles looking dull or outdated? Repainting your cabinet hardware is an easy and affordable way to give your kitchen a fresh, new look.
You don’t need to spend a fortune or hire a pro to make a big difference. In this guide, you’ll learn simple steps to transform your hardware like a pro. By the end, you’ll have the confidence to upgrade your kitchen’s style and impress everyone who walks in.
Ready to get started? Let’s dive in!

Credit: www.youtube.com
Gathering Supplies
Gathering supplies is the first step to repaint kitchen cabinet hardware. Having the right materials makes the project easier and the results better. Preparing everything before you start saves time and avoids frustration. Here is what you need to consider for a smooth process.
Choosing The Right Paint
Pick paint made for metal surfaces. Spray paint works well for small hardware pieces. It covers evenly and dries quickly. Choose paint that resists chipping and scratching. Satin or semi-gloss finishes look nice and are easy to clean. Avoid regular wall paint because it does not stick well to metal.
Selecting Tools And Materials
You need a few basic tools for this project. Start with a screwdriver to remove the hardware from cabinets. Use sandpaper or a sanding block to smooth the surfaces. A primer designed for metal helps paint stick better. Have gloves and a mask for safety. Use newspaper or a drop cloth to protect your workspace from paint. A small brush can help with touch-ups after spray painting.
Preparing The Hardware
Preparing your kitchen cabinet hardware is the first key step before repainting. It helps the paint stick better and last longer. Taking time to do this right saves effort later. Follow these simple steps for the best results.
Removing Cabinet Hardware
Start by removing all hardware from your cabinets. Use a screwdriver to take off handles and knobs carefully. Keep the screws in a safe place to avoid losing them. Removing hardware makes it easier to paint every part evenly.
Cleaning And Sanding
Clean the hardware thoroughly to remove dirt and grease. Use warm, soapy water and a soft brush for best cleaning. Let the pieces dry completely before moving on.
Next, lightly sand the hardware surface with fine-grit sandpaper. This step roughens the surface slightly. It helps the new paint stick better and last longer. Wipe off dust with a clean cloth after sanding.
Setting Up Your Workspace
Setting up your workspace is the first step in repainting kitchen cabinet hardware. A clean and organized area makes the job easier and faster. It also protects your home from paint spills or damage. Preparing well helps you focus on painting without interruptions.
Protecting Surfaces
Cover your work surface with newspaper or a plastic sheet. This prevents paint from staining counters or floors. Use painter’s tape to secure the covering. Make sure to protect nearby walls and appliances too. A well-covered area keeps your home clean and safe.
Organizing Hardware Pieces
Sort all cabinet hardware by type and size. Use small containers or trays to keep pieces separate. Label each container to avoid confusion later. This organization saves time during painting and reassembly. Keep screws and small parts together to prevent loss.

Credit: porchdaydreamer.com
Priming The Hardware
Priming the hardware is a key step in repainting kitchen cabinet handles and knobs. It helps paint stick better and last longer. Without primer, the paint may chip or peel quickly.
Cleaning the hardware before priming is important. Remove old paint, dirt, and grease. Use a mild cleaner and dry the pieces completely. This step makes sure the primer adheres well.
Applying Primer
Choose a spray primer made for metal surfaces. Hold the hardware steady and spray a thin, even coat. Avoid thick layers that can drip or pool.
Spray from about 6 to 8 inches away. Move your hand steadily to cover all sides. Let the first coat dry, then apply a second one for full coverage.
Drying Time Tips
Allow the primer to dry fully before painting. Check the primer label for recommended drying time.
Drying usually takes 30 minutes to 1 hour. Warmer, dry rooms speed up drying. Avoid touching the hardware to prevent smudges.
Patience pays off. Proper drying ensures smooth, durable paint finish.
Painting Techniques
Painting your kitchen cabinet hardware can give your space a fresh look. Using the right painting techniques helps achieve a smooth and lasting finish. This section explains the best ways to paint hardware easily and neatly.
Choosing Brush Or Spray
Decide between a brush and spray paint based on your project size. Brushes work well for small areas and detailed parts. They allow careful control but may leave brush marks.
Spray paint covers quickly and gives a smooth finish. It suits many pieces or complex shapes. Use spray paint outdoors or in a well-ventilated space. Mask off nearby areas to avoid overspray.
Applying Even Coats
Apply paint in thin, even coats to avoid drips and bumps. Let each coat dry fully before adding the next layer. Multiple thin coats create a stronger, cleaner finish.
Hold the brush or spray can steady and move slowly. Paint in the same direction for a uniform look. Avoid heavy layers that cause runs or uneven texture.
Finishing Touches
Finishing touches give your kitchen cabinet hardware a polished and lasting look. They protect the paint and keep it looking fresh. Taking time on these steps helps avoid chips and scratches. It also makes your hardware easier to clean and maintain.
Adding Protective Sealant
Apply a clear sealant over the painted surface. Use a brush or spray designed for metal or wood. This layer shields the paint from moisture and wear. Choose a matte or glossy finish based on your style. Let the sealant dry completely before handling the hardware.
Ensuring Durability
Proper drying time is key to durability. Avoid rushing the process to prevent smudges. Handle the hardware gently during reinstallation. Clean cabinets and hardware regularly with a soft cloth. Avoid harsh chemicals that can damage the finish. These simple steps help keep your cabinets looking new longer.
Reinstalling Hardware
Reinstalling kitchen cabinet hardware is the final step in refreshing your cabinets. It brings your project to life and completes the new look. Careful reattachment ensures the hardware works well and looks neat.
Aligning And Attaching
Start by lining up the hardware with the original holes. Use a screwdriver to attach screws firmly. Avoid overtightening to prevent damage to the cabinet or hardware. Check that handles or knobs sit straight and even.
Final Adjustments
Test each handle or knob by opening and closing the doors. Tighten screws gently if anything feels loose. Clean any fingerprints or paint smudges around the hardware. Step back and see the fresh, polished look of your cabinets.
Credit: www.kilz.com
Maintenance Tips
Maintaining your freshly painted kitchen cabinet hardware keeps it looking new longer. Proper care prevents chips and fading. Small efforts can extend the life of your hardware and keep your kitchen stylish.
Cleaning Painted Hardware
Use a soft cloth to clean painted hardware. Avoid harsh chemicals or abrasive cleaners. Warm water with mild soap works best. Gently wipe to remove dirt and grease. Dry with a clean, dry cloth to prevent water spots. Regular cleaning keeps paint fresh and vibrant.
Handling Wear And Tear
Inspect hardware regularly for chips or scratches. Touch up small damaged areas with matching paint. Avoid using sharp objects near hardware to prevent damage. Tighten loose screws to keep handles secure. Careful use reduces wear and keeps hardware looking great.
Frequently Asked Questions
How Do I Prepare Cabinet Hardware For Repainting?
Start by removing the hardware from cabinets. Clean thoroughly with soap and water. Sand lightly to smooth surfaces. Use a primer suitable for metal to ensure paint adhesion.
What Type Of Paint Is Best For Cabinet Hardware?
Use spray paint designed for metal surfaces. Look for durable, rust-resistant, and high-adhesion formulas. Satin or semi-gloss finishes work well for a polished look.
Can I Repaint Hardware Without Removing It?
It’s best to remove hardware for even coverage. Repainting in place risks uneven paint and drips. Removing also prevents paint on cabinets.
How Long Does Paint Take To Dry On Hardware?
Spray paint typically dries to touch in 15-30 minutes. Full curing may take 24-48 hours. Avoid handling until paint is fully dry to prevent smudging.
Conclusion
Repainting kitchen cabinet hardware can refresh your space quickly. Choose the right paint and clean the hardware well. Use light coats to avoid drips and let each layer dry fully. Patience brings the best results and a smooth finish. This small update adds style without high costs.
Enjoy your renewed kitchen look with little effort. Simple steps lead to great changes. Try it yourself and see the difference.


