Have you ever struggled with buttons that slip off or zippers that get stuck? Snap fasteners could be the simple solution you need.
Learning how to sew a snap fastener onto your clothes or accessories not only gives your items a professional finish but also adds convenience and style. Whether you’re fixing a favorite jacket or creating a new DIY project, mastering this easy skill will save you time and money.
Ready to make your sewing projects snap into place? Let’s dive into the step-by-step guide that will have you attaching snap fasteners like a pro in no time.
Tools And Materials
Sewing a snap fastener needs specific tools and materials. These help you attach snaps firmly and neatly. Having the right items makes sewing faster and easier. Prepare everything before starting your project.
Types Of Snap Fasteners
Snap fasteners come in many styles and sizes. Metal snaps are strong and often used for jackets. Plastic snaps are lighter and good for baby clothes. Some snaps have a ring or prong backing. Choose snaps that fit your fabric type and project.
Essential Sewing Supplies
You need a few basic supplies for sewing snaps. A pair of sharp scissors cuts threads and fabric. A thimble protects your finger while sewing. A small pair of pliers helps to press metal snaps. A fabric marker or chalk marks snap positions clearly.
Choosing The Right Needle And Thread
Select a needle that fits your fabric thickness. A sharp hand-sewing needle works well for most fabrics. Use strong polyester or nylon thread for durability. Match thread color to your fabric for a clean look. Avoid thick thread that may be hard to sew through snaps.
Credit: www.doinaalexei.com
Preparing Fabric
Preparing the fabric is the first step to sew a snap fastener correctly. It ensures the snaps hold well and last long. Taking time to prepare helps avoid mistakes and fabric damage. Follow these simple steps to get your fabric ready.
Marking Snap Placement
Start by deciding where the snaps will go. Use a fabric marker or chalk to mark the exact spots. Mark both sides of the fabric clearly. This helps keep snaps aligned and makes sewing easier. Double-check the marks before sewing.
Reinforcing Fabric For Durability
Snaps pull on fabric, so reinforce the area. Apply a small piece of interfacing or fusible web behind the snap marks. This adds strength and prevents tearing. Choose a lightweight reinforcement to keep fabric soft. Iron the interfacing carefully for best results.
Cutting And Aligning Layers
If sewing through multiple fabric layers, cut them evenly. Align the layers so the edges match perfectly. Pin or clip the layers to hold them in place. This keeps the snaps straight and prevents fabric shifting while sewing. Accurate alignment creates a neat finish.
Attaching Snap Parts
Attaching snap parts is a key step in sewing snap fasteners. It ensures the fastener stays strong and works properly. Each snap has two parts: the male and the female. Sewing them carefully makes your project last longer. Follow simple steps to attach each part securely.
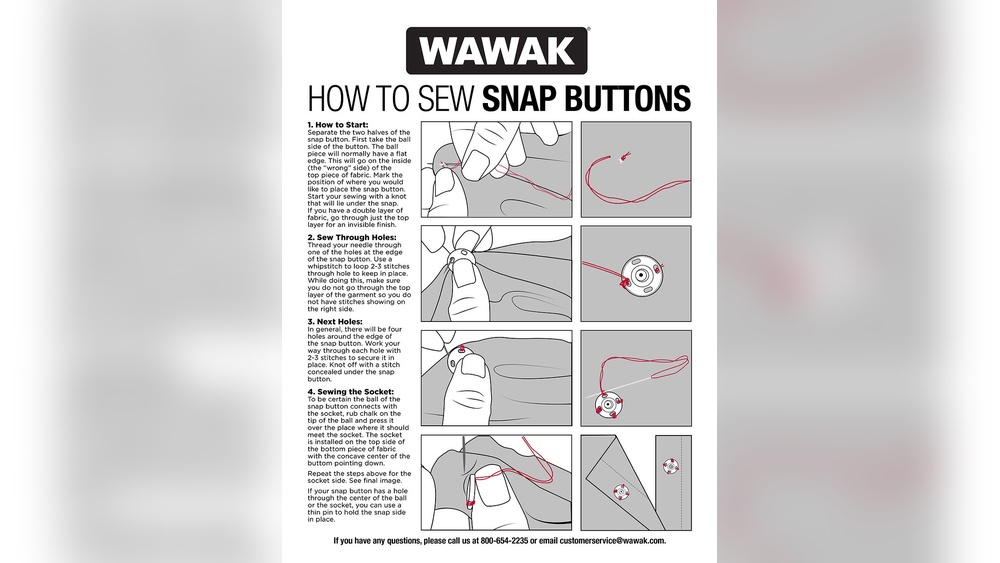
Sewing The Male Snap
Start by placing the male snap on the fabric’s right side. Position it where you want the closure. Thread a needle with strong thread matching your fabric color. Push the needle through the fabric and the snap’s hole.
Sew around each hole several times. This keeps the snap tight and stable. Make sure stitches are close but neat. Tie a knot on the back side to secure the thread. Trim any excess thread carefully.
Sewing The Female Snap
Place the female snap on the opposite fabric piece. Align it with the male snap for a perfect fit. Use the same thread color and needle size as before. Sew through the holes just like the male snap. Wrap the thread around each hole a few times.
Keep the snap flat against the fabric. Avoid pulling the thread too tight to prevent puckering. Finish by knotting the thread securely behind the fabric. Cut off extra thread to keep your work clean.
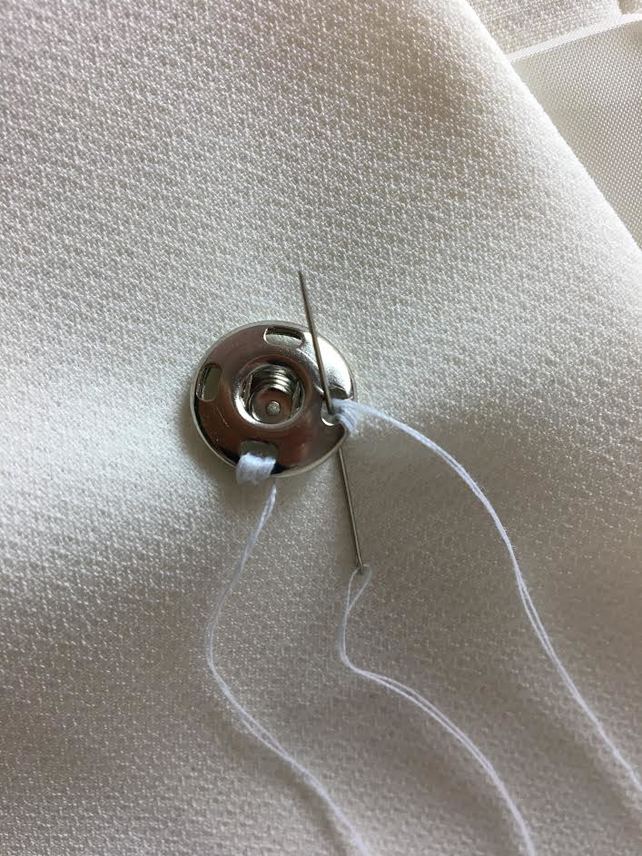
Using Whipstitch Technique
The whipstitch technique is simple and effective for attaching snaps. Bring the needle up from the back near the snap hole. Pass it over the edge of the snap and push it down through the fabric. Repeat this motion around the snap.
This creates small stitches looping around the snap edge. Whipstitching holds the snap firmly without bulky knots. It also makes the snap look neat and tidy. Use this stitch for both male and female snap parts for best results.

Credit: blog.treasurie.com
Securing The Snap
Securing the snap fastener properly ensures it stays strong and lasts long. This step needs care and attention to detail. A firm hold prevents the snap from loosening or falling off during use. Follow the steps below to secure your snap fastener perfectly every time.
Wrapping Thread For Strength
Start by wrapping the thread around the snap base. Pass the needle through each hole multiple times. Keep the thread tight but not too tight to avoid fabric damage. Wrapping adds extra strength and holds the snap firmly in place. Make sure to cover all sides evenly.
Knotting And Finishing Stitches
Once the snap feels secure, tie a strong knot on the backside. Use a double knot to prevent slipping. Hide the knot under the fabric for a clean look. Finish by sewing a few small stitches over the knot. This locks the thread and prevents unraveling.
Checking Snap Alignment
Test the snap by pressing it closed and opening it several times. Check if both parts align perfectly. Misaligned snaps can cause damage or fail to close. Adjust the thread tension or stitching if needed. Proper alignment ensures smooth snapping and long-lasting use.
Tips For Perfect Results
Perfect results need careful attention to detail. Simple steps can improve your snap fastener sewing. Avoid mistakes and ensure durability with these tips.
Each tip focuses on fabric care, snap function, and problem solving. Follow them to achieve a neat, strong finish.
Avoiding Fabric Damage
Choose the right needle size for your fabric type. Thin needles work best on delicate fabrics. Use a small thimble to control stitches and avoid holes. Avoid pulling the thread too tight to prevent puckering. Test on a fabric scrap before starting your project.
Ensuring Snap Functionality
Place snaps evenly to align perfectly when closed. Sew each snap firmly with several stitches for strength. Check that snaps open and close without sticking or loosening. Use a quality thread that matches fabric strength. Reinforce snaps on heavy fabrics with extra stitches.
Troubleshooting Common Issues
Snaps not closing? Check placement and stitch tightness. Loose snaps need more stitches or stronger thread. Fabric puckering? Loosen thread tension and sew gently. Snaps pull off easily? Use backing fabric or fusible interfacing. Practice on scraps to fix errors before working on your project.
Alternative Methods
Alternative methods for attaching snap fasteners offer simple and effective options. These techniques can save time and suit different fabric types. Explore these approaches to find what works best for your project.
Using Snap Pliers Or Tools
Snap pliers make attaching fasteners quick and easy. The tool holds the snap parts firmly in place. Press the handles to secure the snap onto fabric. This method avoids hand sewing and gives a neat finish. Snap pliers come with different sizes for various snap types.
Covering Snaps With Fabric
Covering snaps with fabric hides metal parts for a clean look. Cut a small fabric circle bigger than the snap base. Place the fabric over the snap and press firmly. Sew around the edges to hold the fabric in place. This method adds style and protects the snap from rust.
Installing Plastic Snap Fasteners
Plastic snaps are lightweight and perfect for baby clothes or delicate fabric. Use a special plastic snap tool to press the parts together. No sewing is needed, making the process faster. Plastic snaps come in many colors to match your fabric. They offer a soft, flexible closure option.

Credit: www.youtube.com
Frequently Asked Questions
How To Sew In Snap Fasteners?
Mark snap positions on fabric. Place snap part, sew through holes multiple times. Wrap thread tightly around each hole. Repeat for snap’s other side. Secure knots and trim excess thread. Ensure snaps align and function properly.
How To Cover Snap Fasteners With Fabric?
Cut fabric slightly larger than the snap’s male part. Wrap fabric around it and snap the female side back on. Sew a small running stitch around the fabric center to secure it tightly.
Which Part Of Snap Goes On Top?
The snap’s top part is the male side with the protruding stud. It fits over the female side with the hole.
How To Attach A Snap Closure?
Mark snap position on fabric. Use a hole punch if needed. Align snap parts, then sew through holes tightly. Repeat for the other side. Test closure for secure fit.
Conclusion
Sewing a snap fastener is simple with practice and patience. Start by marking the spot clearly for accuracy. Use strong thread and secure each side well. Take your time stitching through each hole multiple times. Check the snap’s alignment before finishing to ensure it closes properly.
This small skill adds great convenience to your clothing or crafts. Keep practicing to improve your technique and confidence. Snap fasteners make your projects both functional and neat. You can now sew snaps on your own with ease.