Looking to refresh your kitchen without a full remodel? One of the easiest and most impactful changes you can make is installing new hardware on your kitchen cabinets.
Whether you want sleek handles or charming knobs, updating your cabinet hardware instantly transforms the look and feel of your space. But if you’re wondering where to start or how to avoid common mistakes, this guide is made just for you.
Keep reading, and you’ll discover simple, step-by-step instructions that make the process smooth and even enjoyable. By the end, you’ll have the confidence to upgrade your cabinets like a pro—and love the fresh new style you create.

Credit: www.homedepot.com
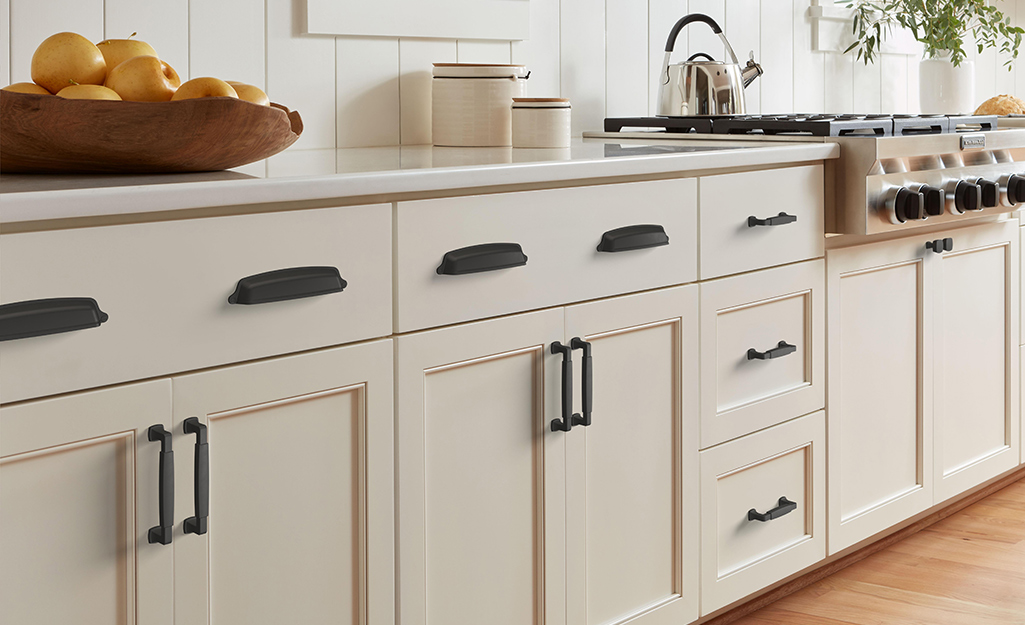
Select Hardware Style
Selecting the right hardware style sets the tone for your kitchen cabinets. It affects both the look and feel of your space. The style you choose should match your kitchen’s overall design. Consider how the hardware will blend with other elements like countertops and appliances. This section helps you pick the best style for your kitchen hardware.
Consider Kitchen Design
Your kitchen’s style guides your hardware choice. For a modern kitchen, sleek and simple hardware works well. Traditional kitchens fit better with ornate or classic designs. Rustic kitchens pair nicely with rougher, natural finishes. Think about the shapes and colors in your kitchen. Hardware should complement, not clash, with these features.
Choose Knobs Or Pulls
Knobs offer a small, simple grip and a subtle look. Pulls provide a larger handle and can be more comfortable to use. Smaller doors often look better with knobs. Larger drawers usually need pulls for easier handling. Decide what feels best in your hand and what looks balanced on your cabinets.
Pick Finish And Material
Hardware finishes affect durability and style. Popular finishes include brushed nickel, chrome, bronze, and matte black. Choose a finish that matches your kitchen fixtures like faucets and lighting. Materials such as metal, ceramic, or glass add different textures. Consider how the finish and material will wear over time in your kitchen’s environment.
Gather Tools Needed
Gathering the right tools is the first step in installing new hardware on kitchen cabinets. Having all tools ready saves time and avoids frustration. It also helps you work safely and efficiently. Prepare your workspace and check that each tool is in good condition. This ensures smooth installation and a professional finish.
Essential Tools List
- Screwdriver (Phillips and flathead) – for screws.
- Measuring tape – to measure placement accurately.
- Pencil – to mark drilling points.
- Drill with drill bits – to make holes for screws.
- Level – to keep hardware straight.
- Screws – usually come with the new hardware.
Optional Helpful Tools
- Template or jig – helps mark holes evenly.
- Masking tape – protects cabinet surface while drilling.
- Awl or nail punch – to create starter holes.
- Magnetic screwdriver – holds screws firmly.
- Safety glasses – protect eyes from dust and debris.
- Work gloves – protect hands during installation.
Remove Old Hardware
Removing old hardware is the first step in updating your kitchen cabinets. It clears the way for new handles or knobs. This simple task helps ensure a smooth installation of your new hardware. Taking care during removal protects your cabinet surfaces from damage.
Unscrew Existing Handles
Start by opening the cabinet door or drawer. Locate the screws holding the handles or knobs in place. Use a screwdriver that fits the screw head perfectly. Turn the screwdriver counterclockwise to loosen each screw. Keep the screws in a safe place if you want to reuse them. Gently pull the old hardware away from the cabinet. Avoid forcing it to prevent scratches or dents.
Clean Cabinet Surfaces
After removing the hardware, clean the cabinet surfaces thoroughly. Use a soft cloth with mild soap and water. Remove any dust, grease, or residue left behind. Dry the area completely with a clean towel. This step helps the new hardware stick better and look cleaner. Avoid harsh chemicals that might damage the cabinet finish.
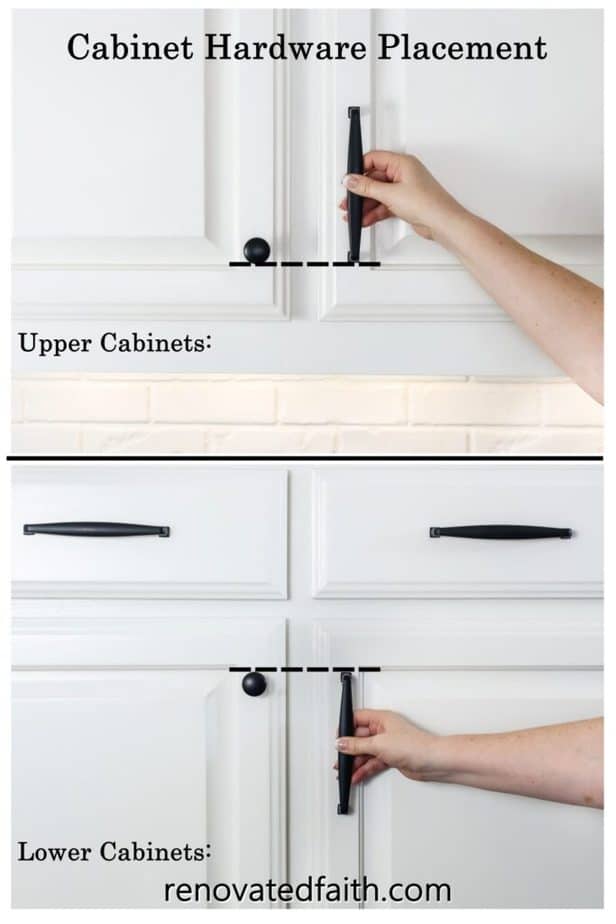
Credit: renovatedfaith.com
Measure And Mark Placement
Measuring and marking the placement of new hardware on kitchen cabinets is a crucial step. It ensures the hardware fits perfectly and looks professional. Accurate measurements prevent mistakes and save time during installation. This step sets the foundation for the entire project.
Use Measuring Tape And Template
Start by using a measuring tape to find the exact spot for your hardware. Measure from the edges of the cabinet door or drawer to create consistent placement. A hardware template can help maintain uniformity across all cabinets. Place the template on the cabinet surface and align it carefully. This tool makes marking easy and accurate.
Mark Drill Points Accurately
Once the template is positioned, mark the drill points with a pencil. Use a sharp pencil to create small, clear marks. Avoid large or smudged marks that can cause drilling errors. Double-check the marks before drilling to ensure they match the template holes. Accurate marks reduce the risk of misaligned hardware.
Check Alignment And Spacing
Check the alignment of your marks using a level or straight edge. Make sure the hardware will be straight and evenly spaced. Consistent spacing between handles or knobs improves the cabinet’s look. Take time to compare marks on several cabinets before drilling. Correct spacing and alignment create a polished finish.
Prepare Cabinets For Drilling
Preparing your kitchen cabinets for drilling is a key step before installing new hardware. Proper preparation ensures precise holes and protects your cabinets from damage. Taking time here saves effort and keeps cabinets looking great.
Tape Marked Areas
Place painter’s tape where you plan to drill. This tape holds the wood fibers in place. It also helps you see the drill marks clearly. Mark the screw holes directly on the tape with a pencil. This step prevents the drill bit from slipping and keeps the surface neat.
Prevent Wood Splitting
Drilling without care can split the wood around the holes. To avoid this, drill a small pilot hole first. Use a drill bit smaller than the screw size. Drill slowly and steadily to reduce pressure on the wood. This method keeps the cabinet surface smooth and crack-free.
Credit: www.homedepot.com
Drill Holes Safely
Drilling holes safely is key to installing new hardware on kitchen cabinets. It prevents damage and keeps your cabinets looking great. Taking time to choose the right tools and drill carefully helps avoid mistakes. Follow simple steps to ensure clean, precise holes every time.
Select Drill Bit Size
Choose a drill bit that matches the hardware screws. Too large a bit makes holes loose and weak. Too small a bit can split the wood or make screwing hard. Check the hardware package for recommended drill bit size. Use a sharp bit to drill smoothly without tearing the cabinet surface.
Drill Straight And Clean Holes
Hold the drill steady and perpendicular to the cabinet surface. A crooked drill can cause uneven holes or damage the wood. Mark the drilling spot clearly with a pencil. Start drilling slowly to create a guide hole. Drill at a consistent speed and apply gentle pressure. Stop drilling as soon as the hole is complete to avoid going too deep.
Attach New Hardware
Attaching new hardware to your kitchen cabinets is a simple step that updates the look instantly. It requires care to ensure the hardware fits well and stays secure. Proper attachment prevents damage and keeps the cabinets functional.
Follow clear steps to place the screws and tighten them correctly. This helps your new knobs or pulls last longer and look great.
Insert Screws Properly
Use the right size screws for your hardware. Place the screw through the hardware hole into the cabinet door or drawer. Turn the screw slowly to avoid stripping the hole. Keep the hardware aligned as you insert screws. Check that the hardware sits flat against the surface. Tighten the screws just enough to hold the hardware firmly in place.
Avoid Over-tightening
Stop tightening once the hardware is secure. Over-tightening can crack the cabinet or damage the screw threads. It can also bend or break the hardware. Use a screwdriver with a comfortable grip for better control. If using a drill, set it to low torque to prevent excess force. Test the hardware by gently pulling to ensure it is firmly attached but not loose.
Check Hardware Function
After installing new hardware on your kitchen cabinets, checking their function is essential. Properly working hardware ensures smooth use and prevents damage. This step confirms that handles and knobs operate without issues.
Test Handle Movement
Grab each handle and pull gently to open the cabinet door. Notice if it moves smoothly or feels stuck. Handles should turn or pull easily without wobbling. Check all installed hardware to spot any tight or loose fittings.
Adjust If Necessary
Tighten screws if handles feel loose. Use a screwdriver to secure them firmly. Loosen screws slightly if handles are too tight or hard to move. Small adjustments can improve comfort and prevent wear over time. Test again after each adjustment to ensure proper function.
Maintain Cabinet Hardware
Maintaining cabinet hardware keeps your kitchen looking fresh and working well. Proper care extends the life of knobs, pulls, and hinges. It also prevents damage and keeps your cabinets safe to use.
Clean And Polish Tips
Clean cabinet hardware regularly using a soft cloth. Avoid harsh chemicals that can damage finishes. Use mild soap and warm water for most metals. Dry hardware completely to prevent rust or water spots.
Polish metal hardware to bring back its shine. Use a polish made for the hardware’s material, like brass or chrome. Apply polish with a soft cloth, then buff gently. Polishing keeps hardware looking new and attractive.
Tighten Screws Periodically
Screws can loosen over time with regular use. Check screws every few months to keep hardware secure. Use a screwdriver to tighten any loose screws carefully. Avoid overtightening, which can strip holes or damage wood.
Tight hardware prevents handles from wobbling or falling off. It also protects cabinet doors from misalignment and wear. Regular checks save money by avoiding major repairs later.
Frequently Asked Questions
Is It Easy To Replace Cabinet Hardware?
Replacing cabinet hardware is simple. Remove old knobs or pulls, measure and mark new spots, then screw in new hardware securely.
What Is The 1 3 Rule For Cabinet Hardware?
The 1-3 rule for cabinet hardware means placing handles 1 inch from the edge and 3 inches apart for balanced, ergonomic use.
How Do You Add Hardware To Your Cabinets?
Mark hardware placement using a template, tape the cabinet to avoid damage, drill holes, then screw in the hardware securely.
How Do I Update Old Cabinet Hardware?
Unscrew old hardware with a screwdriver. Align new hardware, mark holes, drill if needed. Attach new knobs or handles securely.
Conclusion
Installing new hardware on kitchen cabinets is simple and rewarding. Measure and mark carefully before drilling holes. Use the right tools to avoid damage. Take your time to align handles or knobs evenly. A fresh look can brighten your kitchen instantly.
Small updates make a big difference in style and function. Enjoy your improved kitchen with confidence and ease.