Installing license plate fasteners might seem like a small task, but it makes a big difference in keeping your plates secure and your vehicle looking sharp. If you’ve ever struggled with loose or missing screws, you know how frustrating it can be.
The good news is, with the right tools and steps, you can quickly fix or replace your license plate fasteners yourself—no need to wait for a mechanic or risk damaging your car. In this guide, you’ll learn exactly how to install license plate fasteners the easy way, so your plates stay firmly in place no matter where the road takes you.
Keep reading to discover simple tips that save time and avoid common mistakes.

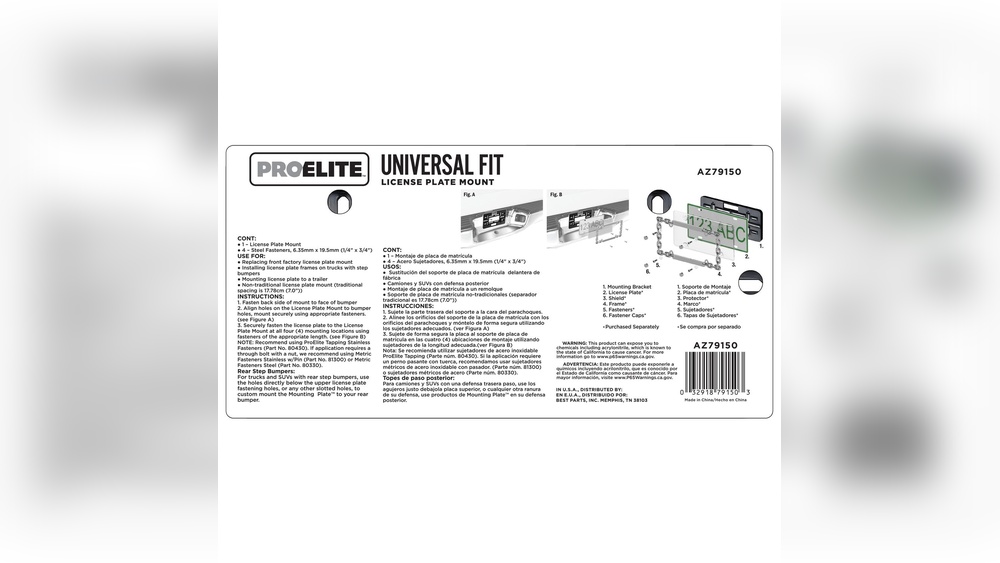
Credit: www.amazon.sa
Choosing Fasteners
Choosing the right fasteners for your license plate is important. The fasteners keep the plate secure and prevent damage. Selecting the right type and material improves durability. It also ensures a perfect fit for your vehicle. This section explains key points to consider when choosing fasteners.
Types Of Screws
Screws come in different shapes and sizes. Common types include Phillips, flathead, and hex screws. Phillips screws are easy to install with a standard screwdriver. Flathead screws fit flush with the plate surface. Hex screws need a special wrench but offer strong grip. Choose screws that match your license plate holes.
Materials And Durability
Fasteners are made from various materials. Stainless steel resists rust and lasts longer. Plastic screws are lightweight but less durable. Zinc-coated screws offer moderate rust protection. Consider climate and weather when picking materials. Durable fasteners reduce the need for frequent replacements.
Matching Fasteners To Vehicle
Vehicle types may require specific fasteners. Some cars have plastic anchors or clips. Trucks may need larger screws for thicker plates. Check the vehicle’s manual for recommended fasteners. Proper matching prevents loose or damaged plates. Secure fasteners keep your license plate safe on the road.
Preparing The Plate
Preparing the license plate before installation is essential for a secure fit. This step ensures the plate attaches firmly and looks neat. Follow these simple steps to get the plate ready.
Cleaning Mounting Area
Start by cleaning the area where the plate will go. Use a cloth with mild soap and water. Remove dirt, dust, and grease. A clean surface helps the plate sit flat and prevents rust.
Dry the area completely before moving on. This avoids slipping and ensures better grip for the fasteners.
Aligning Screw Holes
Check the screw holes on the plate and the car’s mounting area. Make sure they match up perfectly. Hold the plate in place and look through the holes. They should line up without forcing.
Proper alignment makes installation easier and prevents damage to the plate or car.
Selecting Frame Or No Frame
Decide whether to use a license plate frame. Frames add style and protect the edges of the plate. They also help keep the plate clean for longer.
If you choose a frame, check that it fits your plate size. Some frames come with extra holes for screws. Without a frame, use fasteners that fit directly into the plate and car.
Installing Fasteners
Installing license plate fasteners ensures your plate stays secure. Proper installation prevents rattling and loss of the plate. Follow these simple steps to attach fasteners correctly and safely.
Inserting Screws Correctly
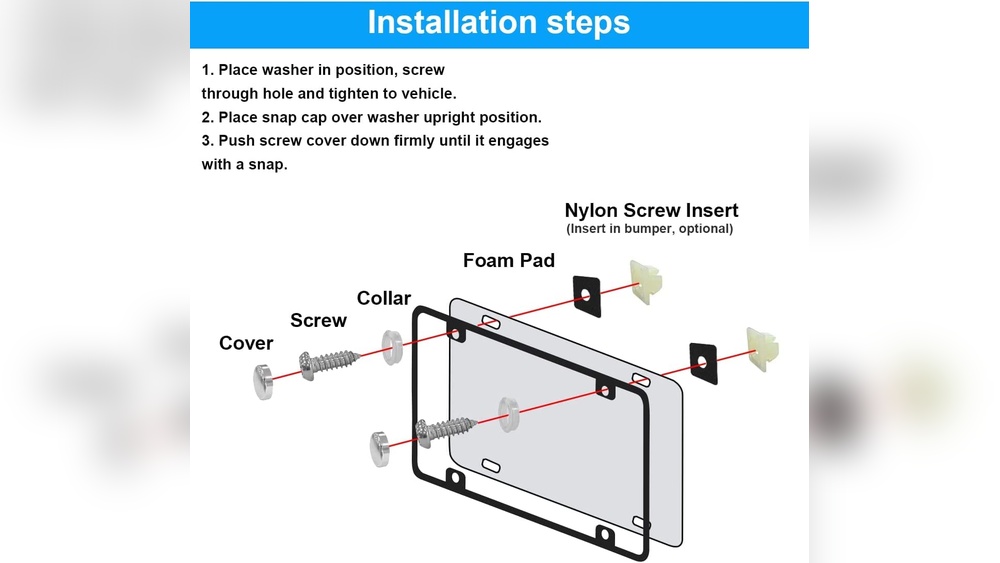
Place the license plate against the mounting area. Align the holes of the plate with the holes on the vehicle. Insert the screws straight into the holes to avoid cross-threading. Turn screws slowly and steadily using a screwdriver. Tighten until snug but avoid over-tightening. Over-tightening can strip the threads or damage the plate.
Using Anchors And Inserts
Use anchors or inserts if your vehicle lacks threaded holes. Insert anchors into drilled holes to provide a secure base. Push anchors fully into the hole until flush with the surface. Insert screws into the anchors and tighten carefully. Anchors help hold screws firmly, especially in plastic bumpers.
Tools Required For Installation
Gather tools before starting the installation. A Phillips head screwdriver is the most common tool needed. You may also need a drill if you must create holes. Anchors require a drill bit matching their size. Have pliers handy to hold small parts or help remove old fasteners.
Securing The Plate
Securing the license plate properly is key to keeping it safe and stable. The fasteners must hold the plate firmly. Loose plates can rattle or even fall off during driving. Follow the right steps to attach the screws just right. This helps maintain the plate’s position and protects it from damage.
Tightening Screws Properly
Start by placing the license plate on the mounting area. Insert the screws into the holes carefully. Use a screwdriver to turn each screw clockwise. Tighten them until the plate feels secure but still can move slightly. This ensures a firm hold without stress on the plate or vehicle.
Avoiding Over-tightening
Do not turn screws too hard. Over-tightening can strip the screw holes or crack the plate. It may also damage the car’s mounting area. Stop tightening as soon as the plate no longer shifts. A gentle but firm hold is enough to keep the plate safe.
Ensuring A Flush Fit
The license plate should sit flat against the vehicle’s surface. Check that no edges stick out or bend. A flush fit prevents wind noise and damage from car washes. Adjust the screws evenly to keep the plate aligned. A smooth fit looks neat and lasts longer.
Special Considerations
Installing license plate fasteners requires attention to certain details. Special situations can affect how you mount the plate securely. This section covers key considerations for tricky installations. These tips help ensure a firm and neat fit.
Installing On Front Bumper Brackets
Some vehicles have front bumper brackets for license plates. Align the plate holes with the bracket holes. Use screws that fit the bracket size. Avoid over-tightening to prevent damage to the bumper. Check that the plate sits flat and secure. Use washers if needed to keep the plate steady.
No-drill Installation Methods
No-drill methods suit those who prefer not to damage their vehicle. Adhesive mounts or magnetic fasteners work well on smooth surfaces. Clean the area before applying adhesives for strong hold. Magnets should be strong enough to resist wind and bumps. These options are easy to remove without leaving marks.
Handling Missing Screw Holes
Some cars lack factory screw holes for plates. Use a universal mounting bracket designed for such cases. These brackets clamp onto the bumper or grill securely. Alternatively, use adhesive fasteners with strong bonding glue. Avoid forcing screws into the body to prevent damage. Measure carefully to align the plate straight and level.

Credit: www.youtube.com
Maintenance Tips
Maintaining your license plate fasteners ensures they stay secure and last longer. Regular care prevents damage and theft issues. Simple checks and replacements keep your license plate firmly attached.
Checking Fastener Tightness
Check your fasteners every few months. Use a screwdriver to ensure screws are tight. Loose screws can cause the plate to rattle or fall off. Tighten them gently to avoid stripping the threads. Proper tightness keeps the plate secure on your vehicle.
Replacing Rusted Screws
Rust weakens screws and affects appearance. Inspect screws for rust or corrosion regularly. Replace any rusty screws with new, rust-resistant ones. Stainless steel screws are a good choice. They resist rust and last longer. Changing rusted screws helps keep your license plate safe and looking good.
Protecting Against Theft
Theft of license plates is common. Use anti-theft screws or fasteners to deter thieves. These require special tools to remove, adding security. Another option is to use screw covers or caps. They hide the screws and make removal harder. Protecting your license plate fasteners reduces theft risk and saves money.

Credit: www.youtube.com
Frequently Asked Questions
How To Install License Plate Fasteners With Screws?
Align the license plate holes with fasteners. Insert screws through the plate into the fasteners. Tighten screws using a screwdriver until snug. Avoid overtightening to prevent damage.
What Kind Of Screws Do I Need For A License Plate?
Use 14 or 12 stainless steel screws, 1 to 1. 5 inches long, with Phillips or hex heads. Choose corrosion-resistant screws for durability.
How Do I Install The Front License Plate Bracket?
Align the bracket with the front bumper holes. Insert screws through the plate and bracket. Tighten screws securely with a screwdriver. Ensure the plate sits flat and stable. Avoid overtightening to prevent damage.
How Tight Should License Plate Screws Be?
Tighten license plate screws until snug without forcing. Avoid overtightening to prevent stripping threads or damaging the plate. Use a screwdriver or allen wrench for proper grip.
Conclusion
Installing license plate fasteners is simple and quick. Start by lining up the holes carefully. Use the right screws and tighten them just enough. Avoid overtightening to prevent damage. Regular checks help keep the plate secure. This small task keeps your license plate safe and legal.
Now, you can confidently install your license plate fasteners yourself.