Have you ever tried to remove plastic fasteners from your car and ended up frustrated or worried about causing damage? You’re not alone.
These small clips hold important parts together, but they can be tricky to handle without the right approach. In this guide, you’ll discover simple, effective steps to remove plastic fasteners safely and quickly. By the time you finish reading, you’ll feel confident tackling this task yourself, saving time and money on repairs.
Keep reading to learn how to protect your car and make the job easier than you thought.
Credit: www.youtube.com
Types Of Plastic Fasteners
Plastic fasteners hold many car parts together. They come in different shapes and styles. Knowing the types helps to remove them without damage. Each fastener fits a specific use and location on the car.
Some fasteners snap in place. Others push or twist to lock. Some have pins that expand the fastener when pushed. Each design needs a different removal method.
Common Fastener Designs
Push-type clips are popular. They have a pin in the center that expands the legs. Pulling the pin out loosens the clip. Screw-type fasteners look like small screws but are made of plastic. They twist out easily with a screwdriver. Rivet-style fasteners lock by pushing the center pin. To remove, pull the pin or pry the head gently. Trim clips hold panels tightly. They often have a flat head and a stem that fits into holes.
Where They Are Used On Cars
Push clips appear on door panels and splash guards. Screw-type fasteners secure bumper covers and wheel liners. Rivet fasteners hold under-hood covers and fender liners. Trim clips attach interior panels and dashboard parts. Each area needs the right fastener to hold parts firmly and allow easy removal later.

Credit: www.youtube.com
Tools Needed For Removal
Removing plastic fasteners from a car needs the right tools. Using proper tools saves time and avoids damage. Some tools are basic and common. Others are made just for fasteners. Knowing which tools to use helps complete the job smoothly.
Basic Tool Kit
A basic tool kit often has what you need. A flathead screwdriver works well to pry fasteners gently. Needle-nose pliers help pull out stubborn clips. A trim removal tool, even a plastic one, prevents scratching the car surface. These tools are easy to find and affordable. They serve many tasks beyond fastener removal.
Specialized Fastener Removers
Specialized fastener removers make the job easier. These tools are designed to fit under plastic clips. They lift the fastener without breaking it. Some have forked ends to grab clips firmly. Others are shaped like wedges to spread fasteners open. Using specialized removers reduces damage risk. They are worth having for frequent car repairs.
Preparing The Area
Preparing the area before removing plastic fasteners from a car makes the task easier. It helps avoid damage and keeps the workspace safe. Taking time to prepare ensures smooth removal and protects your vehicle’s surface.
Focus on cleaning the surface and following safety steps. These small actions protect both you and the car parts.
Cleaning The Surface
Start by wiping the area around the fastener. Use a soft cloth or brush to remove dirt and dust. Clean surfaces prevent scratches during removal. Dirt can make tools slip, which may damage the paint. A clean area also helps you see the fastener clearly. Use mild soap and water if needed. Dry the surface well before starting work.
Ensuring Safety Precautions
Wear gloves to protect your hands from sharp edges. Safety glasses keep your eyes safe from small flying debris. Work in a well-lit space to see better. Avoid loose clothing that can catch on parts. Keep tools organized to prevent accidents. Take your time and do not rush. Safety makes the process smoother and safer for you and the car.
Step-by-step Removal Process
Removing plastic fasteners from a car can seem tricky. Following a clear step-by-step process makes it easy. This guide breaks down each stage. You will learn how to find, loosen, and remove these fasteners safely. Take your time to avoid damage to your car parts.
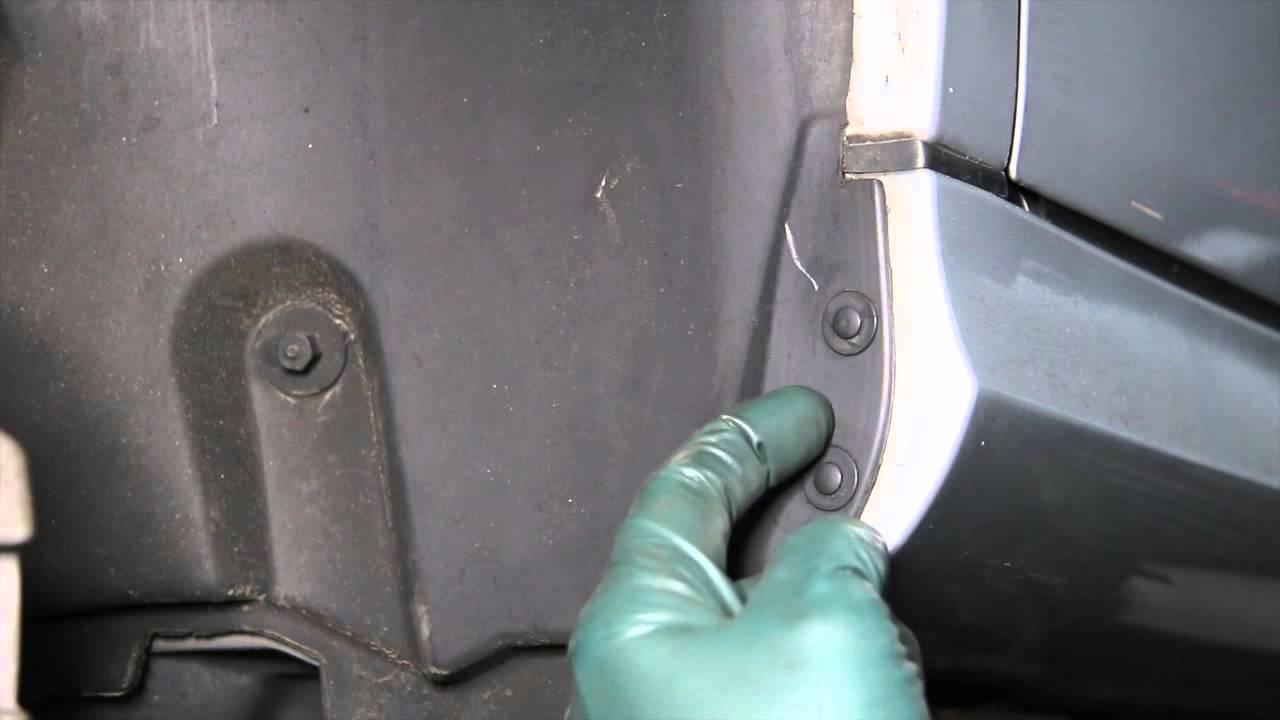
Locating The Fasteners
Plastic fasteners hold many car parts together. Check areas like door panels, bumpers, and under the hood. Look for small round or square heads. They often match the car’s color. Use a flashlight to spot fasteners in dark spaces. Count them to keep track during removal.
Loosening Techniques
Start by cleaning around the fastener. Dirt can block tools from gripping. Use a flathead screwdriver or trim removal tool. Gently wiggle the fastener’s center pin to loosen it. Avoid using too much force to prevent breaking the fastener. Work slowly and carefully for best results.
Prying Out The Fasteners
Once loose, insert a pry tool under the fastener’s edge. Lift the fastener slowly to pop it out. Use even pressure on all sides. If the fastener resists, try loosening the center pin more. Keep tools flat to avoid scratching the car. Remove fasteners one at a time to stay organized.
Handling Stubborn Fasteners
Removing plastic fasteners from a car can be tricky, especially when they are stuck tight. These fasteners often resist simple prying and can break easily. Handling stubborn fasteners needs care and the right method. This helps protect your car’s parts and saves time.
Using Heat Or Lubricants
Applying heat softens plastic fasteners, making removal easier. Use a hairdryer or heat gun at a low setting. Warm the fastener for a few minutes, then try to pull it out. Heat loosens the plastic without breaking it.
Lubricants like WD-40 or silicone spray also help. Spray a small amount around the fastener. Let it sit for a few minutes to penetrate. The lubricant reduces friction and makes the fastener slide out smoothly.
Avoiding Damage To Surrounding Parts
Plastic fasteners often sit near delicate car parts. Use tools like plastic pry bars or trim removal tools. These reduce the risk of scratches and dents. Avoid metal tools that can slip and cause damage.
Work slowly and gently. Force can break the fastener or harm nearby paint and panels. Protect areas with masking tape before prying. This simple step keeps your car looking good during the process.
Replacing Or Repairing Fasteners
Replacing or repairing plastic fasteners on a car keeps parts secure and prevents damage. Over time, fasteners can break or wear out. Replacing them restores the proper fit and function of panels and trims. Repairing fasteners saves money and extends the life of your car’s components.
Choosing Replacement Fasteners
Select fasteners that match the original type and size. Check the car manual or remove one old fastener for comparison. Use plastic fasteners made for automotive use to ensure strength and durability. Avoid cheap or generic fasteners that may not hold well. Choose fasteners that resist weather and vibration for long-lasting results.
Proper Installation Tips
Clean the area before installing new fasteners. Align parts carefully to avoid bending or breaking fasteners. Push fasteners in straight and apply even pressure. Do not force fasteners, as this can cause damage. Use the right tools, like fastener clips pliers, to ease installation. Check that fasteners sit flush and hold parts firmly in place.
Preventing Future Issues
Removing plastic fasteners from your car can be tricky. Preventing future problems helps keep your car parts secure. Simple steps can stop fasteners from breaking or wearing out quickly. Regular care improves their life and saves money.
Regular Inspection
Check fasteners often. Look for cracks or looseness. Early signs of damage help you act fast. Replace any worn fasteners right away. This avoids bigger problems later. Make inspection part of your car routine.
Maintenance Practices
Keep fasteners clean and dry. Dirt and moisture cause damage over time. Use gentle cleaning tools to avoid scratches. Apply a small amount of lubricant to moving parts. Avoid harsh chemicals that can weaken plastic. Handle fasteners carefully during repairs or cleaning.

Credit: www.reddit.com
Frequently Asked Questions
How Do I Safely Remove Plastic Fasteners From A Car?
Use a plastic trim removal tool to gently pry under the fastener head. Avoid metal tools to prevent damage. Work slowly around the edges until the fastener pops out without breaking.
What Tools Are Best For Removing Car Plastic Fasteners?
Plastic trim tools, flathead screwdrivers, and needle-nose pliers work well. Always choose non-metal tools to protect the car’s surface. Having a set of trim removal tools makes the job easier and safer.
Can Plastic Fasteners Be Reused After Removal?
Yes, most plastic fasteners can be reused if undamaged. Inspect them carefully for cracks or deformations. Replace any that look worn to ensure a secure fit when reinstalling.
Why Are Plastic Fasteners Used In Cars?
Plastic fasteners are lightweight, corrosion-resistant, and cost-effective. They securely hold panels and trims without rusting. Their design allows easy installation and removal during maintenance or repairs.
Conclusion
Removing plastic fasteners from your car can be simple and safe. Use the right tools to avoid damage. Take your time and work carefully. Small steps help prevent breaking the clips. Practice makes the process easier over time. Keep your car looking neat and well-maintained.
Now you can handle fasteners without stress or worry. Simple tips like these save you money and hassle. Try these methods next time you need to remove fasteners.