Are your cabinet hardware looking dull or outdated? Repainting them can give your kitchen or bathroom a fresh, stylish look without spending a fortune.
You might think it’s a tough job, but it’s easier than you imagine—and the results can completely transform your space. In this guide, you’ll discover simple steps to repaint your cabinet hardware like a pro. Ready to upgrade your cabinets and impress everyone who sees them?
Keep reading, and let’s get started!
Tools And Materials Needed
Repainting cabinet hardware is a simple way to refresh your kitchen or bathroom. Having the right tools and materials helps the process go smoothly. Gather everything before starting to save time and avoid frustration.
Basic Tools
You need a screwdriver to remove the hardware from cabinets. A small container will hold the screws safely. Use sandpaper to smooth old paint or rough spots. A soft cloth helps clean dust and dirt from the pieces.
Paint And Primer
Choose a spray paint made for metal or plastic, depending on your hardware. A primer improves paint adhesion and durability. Use a primer that works with your chosen paint. This combination ensures a smooth, lasting finish.
Protective Gear
Wear gloves to protect your hands from paint and chemicals. A mask prevents breathing in paint fumes. Use old clothes or an apron to keep your clothes clean. Work in a well-ventilated space to avoid inhaling fumes.
Additional Supplies
Use painter’s tape to cover any spots you want to protect. A drop cloth or newspaper keeps your work area clean. A small brush can help fix any paint mistakes or hard-to-reach spots.
Removing Hardware Safely
Removing cabinet hardware safely is the first step in repainting. It protects the cabinet surface and hardware from damage. Taking your time and following simple steps can prevent scratches and dents. Use the right tools to make the process easier and cleaner.
Proper removal also helps you keep the screws and hardware organized. This saves time when you reattach everything after painting. Safety means protecting both your cabinets and yourself during the work.
Gather The Right Tools
Use a screwdriver that fits the screws well. A wrong size can strip the screw heads. Keep a small container nearby to hold screws and parts. Use painter’s tape to mark hardware positions if needed.
Protect Cabinet Surfaces
Place painter’s tape around the hardware to avoid scratches. Use a soft cloth under the screwdriver to protect the wood. Work slowly to prevent chipping or peeling of the cabinet finish.
Remove Screws Carefully
Turn screws counterclockwise to loosen them. Do not force screws that feel stuck. Apply gentle pressure and wiggle the hardware slightly if needed. Keep screws in your container to avoid losing them.
Handle Hardware Gently
Lift knobs and handles off gently after screws are removed. Avoid bending or dropping hardware pieces. Clean hardware with a soft cloth before repainting. Handle with care to keep their shape and finish.
Cleaning And Preparing Hardware
Cleaning and preparing cabinet hardware is a crucial step before repainting. Proper preparation helps paint stick better and last longer. It also removes dirt, grease, and old finishes that can cause peeling or uneven color. Take your time to do this right for the best results.
Remove Hardware From Cabinets
Start by carefully unscrewing all handles and knobs. Place screws and hardware in a small container to avoid losing them. Removing the hardware makes cleaning and painting easier and prevents damage to the cabinets.
Soak Hardware In Warm Soapy Water
Fill a bowl with warm water and mild dish soap. Soak the hardware for 10 to 15 minutes. This loosens dirt and grease, making it easier to scrub off. Avoid harsh chemicals that may damage the metal.
Scrub With A Soft Brush
Use a soft toothbrush or cloth to scrub the hardware. Focus on crevices and detailed areas. Rinse thoroughly with clean water to remove all soap. Dry completely with a soft towel to avoid water spots or rust.
Remove Old Paint Or Finish
Use fine-grit sandpaper or a chemical paint stripper for old paint or finish. Sand gently to avoid scratching the hardware surface. Wipe away dust with a damp cloth. This step ensures the new paint will stick well.
Use A Degreaser For Stubborn Dirt
For tough grease or grime, apply a degreaser. Let it sit for a few minutes, then scrub lightly. Rinse and dry the hardware again. Clean hardware will provide a smooth base for painting.
Choosing The Right Paint
Choosing the right paint is key to a successful cabinet hardware repaint. The paint must stick well and last long. It should resist chips and wear from daily use.
Not all paints work the same on metal or plastic hardware. The wrong paint can peel or fade quickly. The right paint makes the hardware look fresh and new.
Choosing Between Spray Paint And Brush-on Paint
Spray paint gives a smooth, even finish. It reaches tiny crevices easily. Brush-on paint may leave brush marks but allows more control. For small hardware, spray paint is often better.
Picking Paint Types For Durable Results
Enamel paint is hard and shiny. It holds up well to touching and cleaning. Acrylic paint dries fast but may be less durable. Choose enamel for metal hardware for best wear.
Finding Paints That Stick To Metal And Plastic
Look for paint labels that say “for metal” or “multi-surface.” These paints bond well with metal and plastic. Priming the hardware before painting helps paint stick better.
Choosing The Right Finish For Style And Protection
Glossy finishes shine and highlight details. Matte finishes hide fingerprints and scratches. Satin finish offers a soft shine and good protection. Pick a finish that suits your style and needs.
Priming The Hardware
Priming cabinet hardware is a key step before painting. It helps paint stick better and last longer. Without primer, paint can peel or chip easily. Taking time to prime ensures a smooth, even finish.
Priming also blocks any old finish or stains from showing through. It creates a strong base for the paint. This step improves durability and keeps your hardware looking fresh.
Choosing The Right Primer
Select a primer made for metal surfaces. Look for rust-resistant or bonding primers. These types work well on cabinet handles and knobs. Avoid using general-purpose primers that may not stick well.
Cleaning Hardware Before Priming
Clean hardware with soap and water first. Remove dirt, grease, and oils completely. Use a degreaser if needed. Dry hardware fully to help primer adhere better. Clean surfaces ensure smooth paint application.
Applying The Primer Evenly
Use thin, even coats of primer. Spray primers give a smooth, uniform layer. Brush-on primers work too but may leave brush marks. Let each coat dry before adding another. Follow the primer’s instructions on drying time.
Allowing Primer To Fully Dry
Wait until primer is completely dry before painting. Drying times vary by product and weather. Touch the hardware gently to check dryness. Proper drying prevents paint from bubbling or peeling.
Credit: createandbabble.com
Painting Techniques
Painting cabinet hardware can refresh your space quickly. Choosing the right technique makes a big difference. Two common methods are spray painting and brush painting. Each has its own benefits and tips to get smooth, lasting results.
Spray Painting Tips
Spray painting gives a smooth, even finish fast. Use spray paint made for metal for best results. Shake the can well before starting. Hold it about 6 to 8 inches from the hardware. Spray in light, even coats to avoid drips. Let each coat dry fully before applying the next. Work in a well-ventilated space or outside. Protect nearby surfaces with newspaper or drop cloths. Mask off parts you don’t want to paint with tape.
Brush Painting Tips
Brush painting works well for small details or touch-ups. Use a small, soft brush for smooth strokes. Choose paint designed for metal surfaces. Dip the brush lightly to avoid thick layers. Apply thin, even coats for a neat look. Let the paint dry completely before adding more coats. Sand lightly between coats if needed for better adhesion. Clean the brush with water or paint thinner after use. Take your time and be patient for best results.
Drying And Curing Time
Drying and curing time plays a big role in repainting cabinet hardware. It ensures the paint sets well and lasts long. Rushing this process can cause smudges, chips, or a sticky finish. Patience is key for a smooth, durable result.
Understanding Drying Time
Drying time means how long paint takes to feel dry on the surface. It usually takes a few hours. The paint may seem dry but still soft underneath. Avoid touching or handling the hardware during this period.
What Is Curing Time?
Curing time is the full period paint needs to harden completely. It often lasts longer than drying time. This step makes the paint strong and scratch-resistant. Curing can take days or even weeks depending on the paint type.
Factors Affecting Drying And Curing
Temperature and humidity affect how paint dries and cures. Warm, dry air speeds up the process. Cold or damp conditions slow it down. Thin paint layers dry faster than thick ones. Always follow the paint manufacturer’s instructions.
Tips To Ensure Proper Drying And Curing
Place hardware in a well-ventilated area. Avoid stacking or touching pieces too soon. Use a fan or open window to improve airflow. Give extra time if unsure about the paint’s hardness. Proper drying and curing protect your work for years.

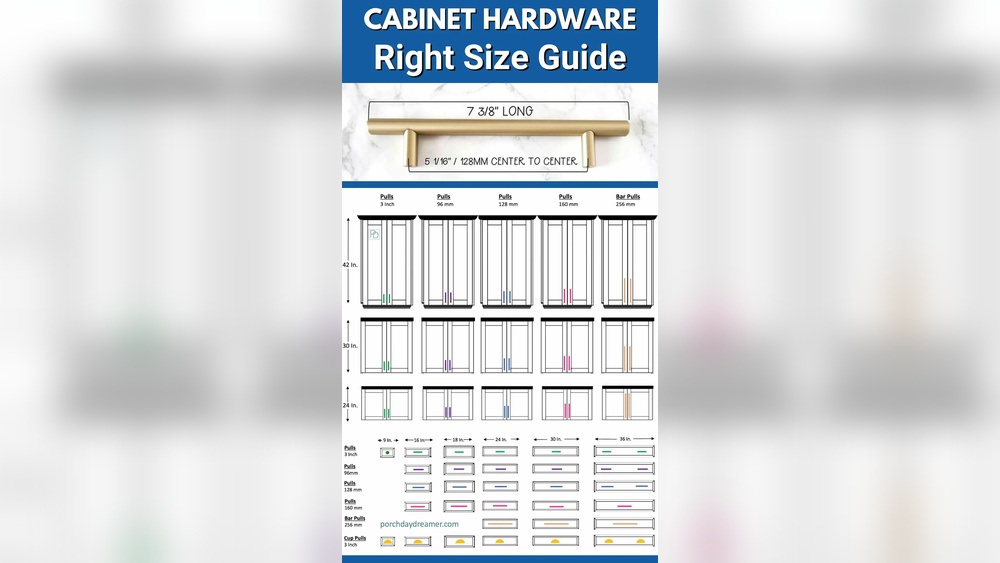
Credit: porchdaydreamer.com
Reinstalling Hardware
Reinstalling cabinet hardware is the final step in the repainting process. It brings the cabinets back to life and completes the fresh new look. Take your time to do this carefully to avoid damage and ensure a perfect fit.
Clean the screws and holes before starting. This helps the hardware stay secure and look neat. Check that the paint is fully dry to prevent smudges or peeling.
Gather All Necessary Tools
Prepare a screwdriver that fits your screws. Keep extra screws handy. Have a soft cloth to wipe any dust or fingerprints. Good lighting helps you see small details better.
Align Hardware Correctly
Place the hardware on the cabinet doors or drawers. Match the screw holes with the drilled holes on the cabinet. Hold the hardware firmly to avoid slipping during installation.
Secure Screws Firmly But Gently
Insert screws by hand first to avoid cross-threading. Tighten screws with the screwdriver. Stop when they feel snug. Over-tightening can strip the holes or damage the hardware.
Test For Stability
Open and close doors or drawers several times. Check for wobbling or loose hardware. Tighten screws slightly if needed. Properly installed hardware lasts longer and looks better.
Maintenance And Touch-ups
Keeping your cabinet hardware looking fresh takes some care. Painted hardware can chip or fade over time. Small problems are easier to fix than big ones. Regular maintenance and touch-ups help your cabinets stay new longer.
Cleaning Painted Hardware Safely
Use a soft cloth to clean painted hardware. Avoid harsh chemicals or abrasive cleaners. Mild soap and water work well. Dry the hardware fully to stop rust or damage. Clean hardware keeps paint looking smooth and bright.
Spotting Chips And Scratches Early
Check your hardware often for small chips or scratches. Catching damage early stops it from growing. Use good light to see tiny flaws. Quick touch-ups fix small spots before they get worse.
Touch-up Painting Tips
Use the same paint you used before. Thin layers work best for touch-ups. Let each layer dry completely. Use a small brush for control. Avoid over-painting to keep a smooth finish.
Protecting Hardware After Touch-ups
Apply a clear topcoat to protect fresh paint. Choose a finish that matches your original look. A topcoat helps resist scratches and wear. Let the hardware dry well before use.
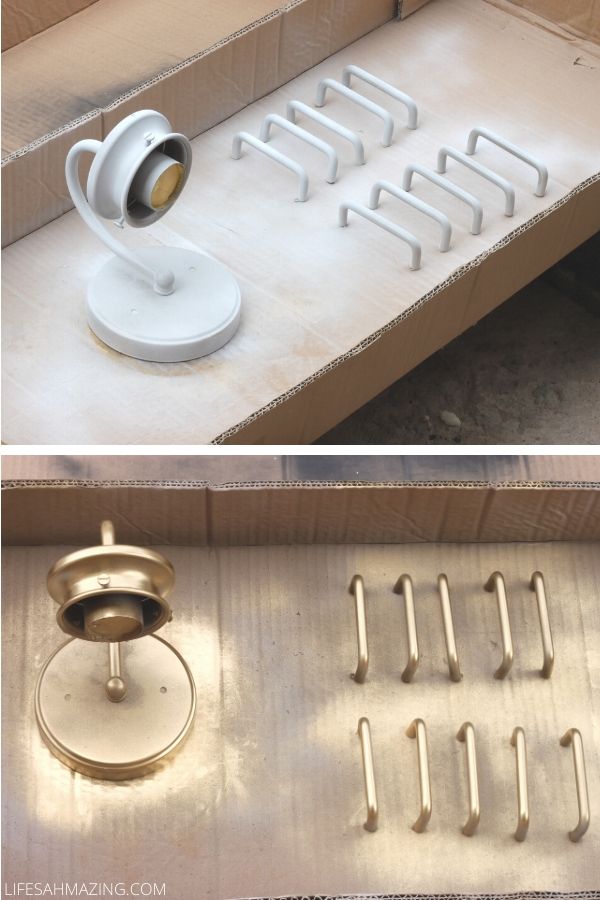
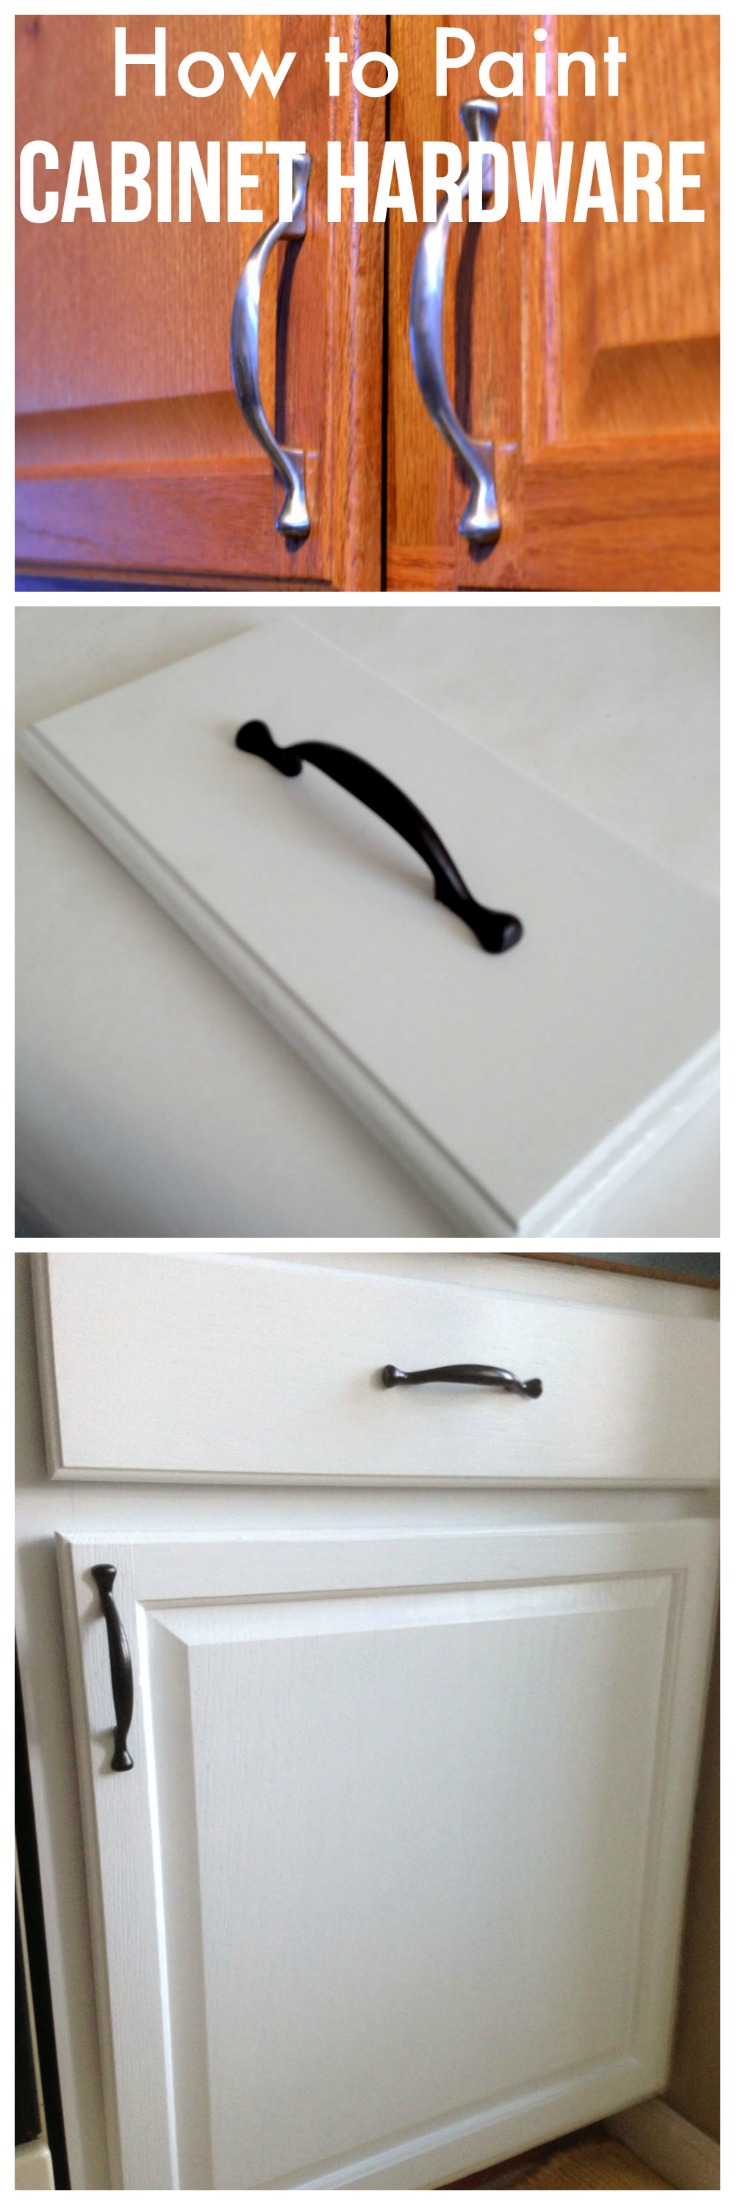
Credit: www.lifesahmazing.com
Frequently Asked Questions
How Do I Prep Cabinet Hardware For Repainting?
Start by removing hardware from cabinets. Clean thoroughly with soap and water. Sand lightly to remove old finish and create a smooth surface. Wipe off dust before painting.
What Type Of Paint Is Best For Cabinet Hardware?
Use spray paint designed for metal surfaces. Choose a paint that offers durability and rust resistance. Satin or semi-gloss finishes work well for hardware.
Can I Repaint Cabinet Hardware Without Removing It?
It is possible but not recommended. Removing hardware ensures even coverage and prevents paint on cabinets. Painting hardware separately gives a professional finish.
How Many Coats Of Paint Should I Apply?
Apply 2-3 thin coats for best results. Allow each coat to dry completely before applying the next. Thin layers prevent drips and ensure smooth coverage.
Conclusion
Repainting cabinet hardware can change your room’s look quickly. Choose the right paint and tools for the best results. Clean and prep the hardware well before you start. Take your time and apply paint in thin layers. Let each layer dry completely to avoid smudges.
This small project can refresh your cabinets without much cost. You will enjoy the new style and feel of your space. Give it a try and see the difference yourself. Simple steps bring big changes.