Are you struggling to remove those stubborn fastener clips? Whether you’re fixing your car, working on furniture, or tackling a DIY project, knowing the right way to remove fastener clips can save you time and frustration.
In this guide, you’ll discover simple, effective techniques that anyone can use—no special tools or experience needed. Stick with me, and you’ll learn how to get the job done quickly, avoid damage, and feel confident handling fastener clips every time.
Let’s dive in and make your next project easier than ever.

Credit: www.theengineeringchoice.com
Types Of Fastener Clips
Fastener clips hold parts together in many products and vehicles. Knowing different types helps in removing them without damage. Each type needs a different approach to take out safely.
Plastic Clips
Plastic clips are common in cars and furniture. They are lightweight and flexible. These clips snap into holes and hold panels tightly. Use a flat tool to pry them out gently.
Metal Clips
Metal clips are strong and durable. They hold heavy parts in place. These clips may rust or bend over time. Use pliers or a clip remover tool for easy removal.
Push Pins
Push pins secure fabric and trim pieces. They have a pin in the center that locks them in place. Press the center to release the clip or pull it out carefully.
Retaining Clips
Retaining clips hold shafts or rods firmly. They fit into grooves to stop parts from moving. Use snap-ring pliers or a small screwdriver to remove them.
Tools Needed For Removal
Removing fastener clips requires the right tools. Using the correct tools makes the job easier and prevents damage. Each tool has a specific role in the removal process. Prepare these tools before starting to save time and effort.
Trim Removal Tools
Trim removal tools are designed to pry clips without breaking them. They are usually made of plastic to avoid scratching surfaces. These tools fit under clips to gently lift them out. They come in different shapes for tight spaces and flat clips.
Pliers And Tweezers
Pliers offer a strong grip to pull stubborn clips. Needle-nose pliers work well for small or deep clips. Tweezers help to grab tiny clips or debris. Use these tools carefully to avoid breaking the clip or surrounding material.
Screwdrivers
Flathead screwdrivers are useful for prying clips loose. Use small screwdrivers for delicate clips or tight areas. Avoid using large screwdrivers that may cause damage. Insert the tip gently to lift the clip without force.
Lubricants
Lubricants make clip removal easier by reducing friction. Spray a small amount around the clip base. This softens dirt and rust that hold clips tight. Use lubricants sparingly to keep surfaces clean and safe.
Preparation Before Removal
Preparation before removing fastener clips is important. It helps avoid damage and makes the job easier. Taking simple steps first will save time and effort later. Focus on cleaning, inspecting, and protecting the area around the clip.
Cleaning The Area
Start by cleaning the area around the clip. Dirt and grease can make removal harder. Use a cloth or brush to wipe away dust and grime. A clean surface helps you see the clip clearly. It also prevents dirt from entering the fastener once removed.
Inspecting The Clip
Look closely at the fastener clip before removal. Check for cracks or damage on the clip. Notice how the clip is attached and where it holds. Understanding the clip’s design helps you remove it safely. Avoid breaking the clip or hurting the surrounding parts.
Protecting Surrounding Surfaces
Cover nearby surfaces to avoid scratches or dents. Use tape or cloth to shield paint and plastic parts. Protecting the area keeps your work neat and damage-free. This step is key, especially on delicate or painted surfaces.

Credit: www.pointsunknown.com
Step-by-step Removal Techniques
Removing fastener clips can be tricky without the right method. Using the correct technique helps avoid damage. Follow these simple steps to remove clips safely and easily.
Prying With Trim Tools
Use a plastic trim tool to pry under the clip’s head. Gently lift the clip by moving the tool side to side. Avoid metal tools that can scratch surfaces. Work slowly to prevent breaking the clip or panel.
Using Pliers For Grip
Grip the clip firmly with needle-nose pliers. Pull straight out to avoid bending the clip. Use steady, even pressure to reduce the risk of snapping. This method works well for clips with exposed heads.
Twisting And Pulling Methods
Twist the clip slightly to loosen it from the hole. This loosens the grip inside the panel. Pull the clip out while twisting gently. This technique helps release clips stuck tightly in place.
Applying Lubricant For Stuck Clips
Spray a small amount of lubricant around the clip base. Let it sit for a few minutes to loosen the grip. Use a trim tool or pliers to remove the clip after lubrication. This step reduces force and prevents damage.
Common Challenges And Fixes
Removing fastener clips can be tricky. Many people face problems during this task. These problems can slow down your work or cause damage. Knowing common challenges helps you avoid mistakes. Easy fixes make the process smoother. Here are some common issues and how to fix them.
Dealing With Broken Clips
Fastener clips often break during removal. Broken clips can get stuck in panels. Use needle-nose pliers to pull out small pieces. If the clip is deeply lodged, try a flathead screwdriver. Gently pry around the clip to loosen it. Patience is key to avoid pushing fragments further in.
Removing Rusted Clips
Rust makes clips hard to remove. Spray rust penetrant on the clip first. Let it sit for 10-15 minutes. Use a clip removal tool or pliers for better grip. Work slowly and apply steady pressure. Avoid sudden force that may break the clip.
Avoiding Damage To Panels
Panels can scratch or crack if you rush. Use plastic pry tools instead of metal tools. Start at the edges and work your way in. Protect the panel surface with tape for extra safety. Take your time to keep panels intact and clean.
Replacing Fastener Clips
Replacing fastener clips is important to keep parts secure and stable. Old or damaged clips can cause loose panels or parts to fall off. Using the right replacement clips helps maintain safety and functionality. Proper installation ensures the clips hold well and last longer.
Choosing The Right Replacement Clip
Pick clips that match the size and shape of the original ones. Check the material type to fit the environment, like plastic or metal. Using the wrong clip can cause damage or poor fit. Always buy clips from trusted suppliers for best results.
Proper Installation Tips
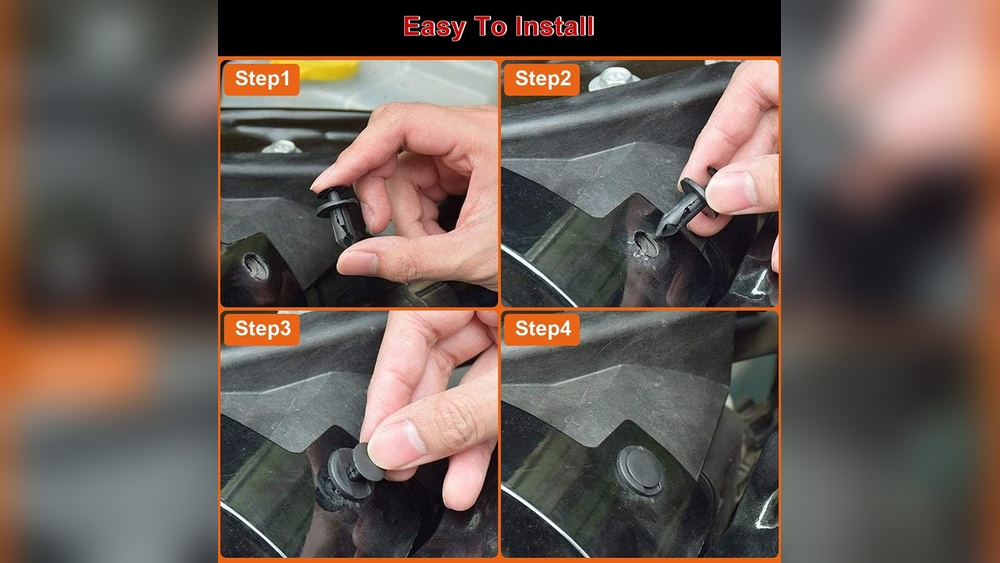
Clean the area before placing the new clip. Align the clip correctly with the hole or slot. Press the clip firmly but avoid forcing it too hard. Use simple tools like pliers for better grip. Make sure the clip snaps into place without gaps.
Testing For Secure Fit
Gently pull on the part secured by the clip to check stability. Wiggle the part slightly to see if it moves. If it feels loose, recheck the clip placement. Secure clips should hold parts tight without bending or breaking. Testing ensures safety and longer clip life.
Safety Tips During Removal
Removing fastener clips can be tricky and risky without proper care. Safety must be the top priority during the removal process. Taking simple precautions helps avoid injuries and damage. Follow these safety tips to protect yourself and your tools.
Wearing Protective Gear
Always wear gloves to protect your hands from sharp edges. Safety glasses shield your eyes from flying debris. Use long sleeves to avoid scratches and cuts on your arms. Protective gear reduces the risk of injury during removal.
Handling Tools Safely
Use the right tools designed for fastener clips. Hold tools firmly to prevent slips and accidents. Avoid using excessive force that can break clips or damage surfaces. Keep fingers clear of the clip’s removal path. Proper tool handling ensures safe and smooth work.
Working In Well-lit Areas
Bright lighting helps you see clips clearly. It reduces mistakes and accidental damage. Use a flashlight or portable light if needed. Good visibility improves safety and speeds up the process. Always choose well-lit spots for fastener clip removal.

Credit: www.youtube.com
Frequently Asked Questions
What Tools Do I Need To Remove Fastener Clips?
You typically need a flathead screwdriver or a trim removal tool. These help pry clips gently without damage. Use pliers for stubborn clips. Having the right tools ensures safe and efficient removal.
How Can I Prevent Damage When Removing Fastener Clips?
Work slowly and apply gentle pressure to avoid breakage. Use a trim tool to leverage clips carefully. Avoid using excessive force, which can crack clips or surrounding materials. Taking time protects your vehicle’s finish.
Are All Fastener Clips Removable Without Replacement?
Most clips can be reused if removed carefully. Some plastic clips may break and need replacement. Inspect clips after removal for cracks or wear. Using new clips ensures a secure fit and prevents future issues.
Can I Remove Fastener Clips Without Tools?
It is possible but not recommended. Tools provide leverage and reduce risk of damage. Using fingers alone may break clips or scratch surfaces. Investing in simple tools makes the process safer and easier.
Conclusion
Removing fastener clips can be simple with the right steps. Use the proper tools to avoid damage. Take your time and work carefully. Practice helps you get better and faster. Always check the clips before you remove them. This keeps your work safe and clean.
Now, you can handle fastener clips with confidence. Keep these tips in mind for your next project.