Are you ready to transform your cabinet drawers with new hardware but don’t know where to start? Installing hardware might seem tricky, but with the right steps, you can do it yourself quickly and easily.
Imagine opening your drawers smoothly and enjoying the fresh look that new handles or knobs bring. In this guide, you’ll discover simple tips and tricks to install hardware like a pro, even if you’ve never done it before. Keep reading, and by the end, you’ll have the confidence to upgrade your cabinets and boost your space’s style instantly.
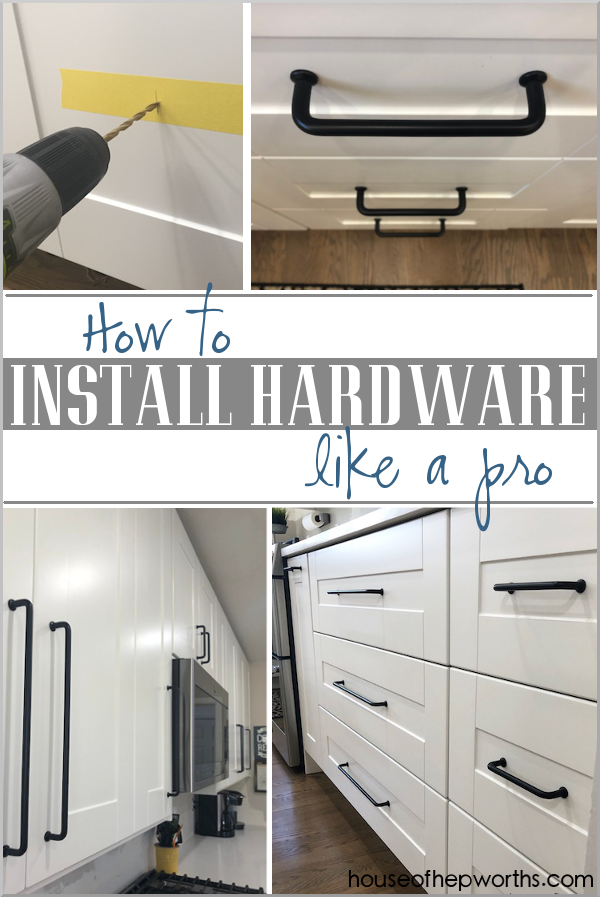
Credit: www.houseofhepworths.com
Choosing The Right Hardware
Choosing the right hardware for cabinet drawers is key to both function and style. The hardware you pick affects how the drawer opens and closes. It also changes the look of your cabinets. Selecting the best hardware means balancing design with durability.
Types Of Cabinet Drawer Hardware
Cabinet drawers use several types of hardware. Pulls and knobs are the most common choices. Pulls come in bars, rings, or arches. Knobs are usually round or square. Both types offer different grip styles and looks. Choose what feels comfortable and fits your cabinet’s style.
Materials And Finishes
Hardware comes in many materials like metal, plastic, and wood. Metal options include stainless steel, brass, and bronze. Each material offers different strength and appearance. Finishes also vary, such as polished, matte, or brushed. Pick a finish that matches other fixtures in your room. This keeps your design consistent and neat.
Measuring For Proper Fit
Measure your cabinet drawers before buying hardware. Note the spacing of existing holes or decide where new holes will go. Use a ruler or tape measure for accuracy. Proper measurement ensures the hardware fits well and looks balanced. Avoid hardware that is too big or small for your drawers.
Tools And Materials Needed
Installing hardware on cabinet drawers is a simple task with the right tools and materials. Prepare everything before starting to save time and avoid mistakes. This section lists what you need to complete the job smoothly and safely.
Essential Tools
First, gather the basic tools needed for drawer hardware installation. A power drill is very useful to make holes fast and clean. Use a drill bit that matches your screws to avoid splitting the wood. A screwdriver, either manual or electric, helps secure the hardware tightly. A tape measure ensures precise placement of handles or knobs. Marking tools like a pencil or marker make it easy to align hardware correctly. Finally, a level helps keep everything straight and even.
Additional Supplies
Besides tools, some extra supplies make the process easier and neater. Screws specific to your hardware size are essential for a strong hold. Wood filler can fix any small holes or mistakes during installation. Sandpaper smooths rough edges or surfaces before attaching hardware. Painter’s tape helps mark spots without damaging the drawer surface. Safety glasses protect your eyes from dust and wood chips. Having these supplies on hand prevents interruptions and ensures a better finish.
Preparing The Drawer
Preparing the drawer is the first step in installing new hardware. This stage ensures the drawer is ready for a smooth and secure fit. Proper preparation helps the hardware last longer and work better.
Removing Old Hardware
Start by taking off the old handles or knobs carefully. Use a screwdriver that fits the screws well. Remove all screws and keep them aside if needed later. Avoid forcing the hardware to prevent damage to the drawer front.
Once the hardware is off, check for any leftover screws or nails. Pull them out with pliers if necessary. This makes the surface clean and safe for new installation.
Cleaning And Inspecting Surface
Clean the drawer surface thoroughly. Use a soft cloth and mild cleaner to remove dirt and grease. Dirt can stop the new hardware from sticking or fitting well.
After cleaning, inspect the area for damage like cracks or holes. Fill small holes with wood filler and let it dry. Sand the surface smooth to create a perfect base for the new hardware.

Credit: www.youtube.com
Marking Drill Points
Marking drill points is a key step in installing hardware on cabinet drawers. It ensures that handles or knobs fit perfectly and look balanced. Precise marking stops mistakes and keeps the drawer front neat and even.
Take your time to mark drill points clearly. A small error can make hardware crooked or loose. Use the right tools and methods for the best results.
Measuring Placement
Start by measuring where the hardware will go. Use a ruler or tape measure to find the center or the spot you want. Measure twice to avoid errors. Mark the point lightly with a pencil.
Measure from the edges of the drawer for consistent placement. Keep marks at the same height on all drawers. This creates a uniform look across your cabinets.
Using Templates For Accuracy
Templates make marking drill points easier and more accurate. You can buy plastic templates or make your own from cardboard. Place the template on the drawer front and align it carefully.
Templates help keep spacing even between holes. They speed up the process, especially for many drawers. Hold the template steady and mark the drill points through its holes.
Drilling Holes
Drilling holes is a key step in installing hardware on cabinet drawers. It allows you to attach handles or knobs securely. Proper drilling ensures the hardware fits well and looks neat. Use the right tools and methods for clean, precise holes.
Choosing The Right Drill Bit
Select a drill bit size that matches the screw diameter. A bit too big will make the hole loose. Too small, and the screw won’t fit. Use a wood drill bit for wooden drawers. For metal or plastic, pick bits made for those materials. Sharp bits make cleaner holes and reduce splitting.
Drilling Tips And Safety
Mark the drilling spots clearly with a pencil or tape. Measure twice to avoid mistakes. Hold the drawer firmly to prevent slipping. Drill straight and steady to keep holes even. Start with a small pilot hole before drilling the final size. Wear safety glasses to protect your eyes. Keep fingers away from the drill bit during use.
Attaching The Hardware
Attaching the hardware on cabinet drawers is a key step. It makes the drawers easy to open and adds style to your cabinets. Take your time to place handles and knobs correctly. Precise attachment ensures the hardware works well and looks good.
Aligning Handles And Knobs
Start by holding the handle or knob in the right spot. Use a ruler or tape measure to find the center. Mark the holes with a pencil. Check that the marks are level and even. Proper alignment prevents crooked handles and uneven spacing.
Securing With Screws
Insert screws through the back of the drawer front. Tighten them slowly to avoid stripping the holes. Use a screwdriver that fits the screw heads well. Make sure the hardware sits flush against the drawer. Screws should be tight but do not overtighten.
Final Adjustments
Final adjustments are key to making your cabinet drawers work smoothly. After installing hardware, small tweaks help everything fit perfectly. These steps ensure your drawers open and close with ease. Take your time to check and correct any misalignment. Proper tightening keeps hardware secure and reliable.
Checking Alignment
Look closely at the drawer front and cabinet frame. The hardware should sit straight and even. Check that handles or knobs line up properly. Use a level or ruler for accuracy. Adjust screws slightly to fix any tilt or shift. Good alignment improves drawer appearance and function.
Tightening And Testing
Once aligned, tighten all screws firmly. Avoid overtightening to prevent damage. Test the drawer by opening and closing it several times. Listen for any rubbing or sticking sounds. If needed, loosen and realign before tightening again. Proper tightening keeps hardware safe and lasting longer.
Troubleshooting Common Issues
Installing hardware on cabinet drawers can sometimes bring small problems. These issues can make the drawers look uneven or feel loose. Fixing these problems quickly keeps your cabinets working well and looking great. This section helps you solve common hardware installation issues easily.
Misaligned Hardware
Misaligned hardware makes drawers look crooked and hard to open. Check the screws first. Tighten or loosen them to adjust the position. Use a level or ruler to align handles straight. Mark the correct spots with a pencil before drilling. This avoids mistakes and keeps hardware balanced.
Loose Screws
Loose screws cause handles to wobble or fall off. Remove the screw and fill the hole with wood glue or toothpicks. Let it dry. Then, reinsert the screw tightly. This fills empty space and holds screws firmly. Regularly check screws and tighten them as needed.
Damaged Drawer Fronts
Damaged drawer fronts can crack or chip during hardware installation. Use small clamps to hold pieces in place if needed. Fill cracks with wood filler and let it dry. Sand the area smooth before attaching hardware. Handle drawer fronts gently to prevent more damage.
Credit: www.homedepot.com
Frequently Asked Questions
What Tools Are Needed To Install Cabinet Drawer Hardware?
You need a drill, screwdriver, measuring tape, pencil, and hardware screws. These tools ensure precise and secure installation of drawer handles or knobs.
How Do I Measure For Hardware Placement On Drawers?
Measure the drawer’s width and height. Mark the center or preferred spot with a pencil for accurate hardware alignment and balance.
Can I Install Hardware On Any Type Of Cabinet Drawer?
Yes, hardware can be installed on wood, metal, or laminate drawers. Just use appropriate screws and drill bits for each material.
How To Avoid Damaging Drawers During Hardware Installation?
Use a drill bit slightly smaller than the screws. Drill slowly and carefully to prevent wood splitting or surface damage.
Conclusion
Installing hardware on cabinet drawers is simple with the right steps. Measure carefully and mark where screws go. Use the right tools to avoid mistakes. Take your time to align handles or knobs perfectly. Clean the surface before attaching hardware to ensure strong hold.
Check each drawer after installing to see if it opens smoothly. This small upgrade can improve your cabinet’s look and function. Keep practicing, and you will get better every time. Enjoy your neat and well-fitted cabinet drawers!


