Are you ready to give your cabinets a fresh new look? Installing cabinet hardware might seem tricky, but with the right guidance, you can do it yourself quickly and easily.
You’ll find a clear, step-by-step video that shows exactly how to install cabinet handles and knobs. Imagine the satisfaction of transforming your space without spending a fortune or waiting for a professional. Keep reading, and you’ll learn the simple tricks that make the process smooth and stress-free—your cabinets are about to get a stylish upgrade!
Choosing The Right Hardware
Choosing the right cabinet hardware is important for both function and style. It affects how your cabinets look and how easy they are to use. The right hardware can update your kitchen or bathroom without a full remodel. This section explains how to pick hardware that fits your needs and style.
Types Of Cabinet Hardware
There are many types of cabinet hardware. The most common are knobs and pulls. Knobs are small and round. Pulls are longer and easier to grip. Some cabinets use handles or latches. Choose the type that feels comfortable and matches your cabinet style.
Materials And Finishes
Hardware comes in many materials like metal, plastic, and wood. Metal is the most popular and durable. Common finishes include chrome, brass, and nickel. Matte finishes hide fingerprints better. Pick a finish that matches your room’s colors and style.
Measuring For Fit
Measure carefully before buying hardware. Check the hole spacing on your cabinets. Most pulls come in standard sizes like 3 or 5 inches. Knobs usually only need one hole. Measure twice to make sure the hardware fits perfectly. This avoids extra holes in your cabinets.
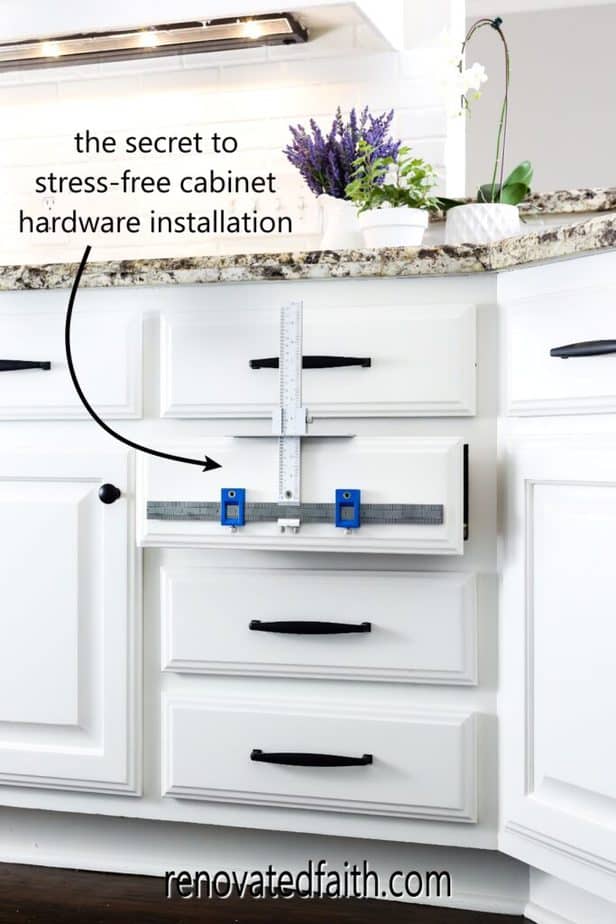
Credit: renovatedfaith.com
Tools You’ll Need
Installing cabinet hardware is a simple task with the right tools. Having the proper tools ready saves time and makes the process smooth. This section lists the tools needed to install cabinet hardware like knobs and handles easily.
Basic Tools Checklist
- Screwdriver (Phillips and flathead)
- Measuring tape
- Pencil for marking
- Drill with drill bits
- Level
- Masking tape
- Safety glasses
These tools cover the basic steps. Use the screwdriver to tighten screws. Measure and mark holes precisely. The drill makes holes for screws fast and accurate. Level ensures hardware stays straight on doors and drawers.
Optional Tools For Efficiency
- Template jig for consistent hole placement
- Power screwdriver
- Center punch for marking drill spots
- Clamp to hold hardware steady
- Work gloves for hand protection
Optional tools speed up work and improve accuracy. A template jig helps place holes evenly. Power screwdrivers reduce hand strain. Center punches prevent drill slipping. Clamps keep parts stable during installation.
Preparing The Cabinets
Preparing the cabinets is the first step to a smooth hardware installation. It sets the stage for precise and clean work. Proper preparation helps avoid mistakes and saves time later. Focus on cleaning and marking drill points carefully. These tasks make installation easier and more accurate.
Cleaning And Clearing Space
Start by removing all items from the cabinets. Clear the area around the workspace. Wipe down the cabinet surfaces with a damp cloth. Remove dust, grease, and dirt. Clean surfaces help hardware stick better and look neat. Ensure the cabinet doors and drawers are dry before moving on.
Marking Drill Points
Use a pencil and measuring tape to mark drill points. Measure carefully for even spacing of handles or knobs. Mark the spots clearly but lightly. Double-check measurements to avoid holes in the wrong places. Use a template if available for consistent marks. Correct marking ensures hardware fits perfectly on each cabinet.

Credit: www.homedepot.com
Drilling Holes Accurately
Drilling holes accurately is key to installing cabinet hardware. Precise holes keep handles straight and secure. Misaligned holes can ruin the cabinet’s look and function. Careful measuring and steady drilling make a big difference. The right tools and techniques help avoid mistakes. Follow simple steps to drill with confidence and ease.
Using A Template
A template guides the drill for perfect hole placement. Use a paper or plastic template made for your hardware. Align the template on the cabinet door or drawer front. Secure it with tape or clamps to stop movement. Mark the drill points clearly through the template holes. Templates save time and reduce errors. They ensure every hole lines up exactly.
Avoiding Common Mistakes
Measure twice before drilling once. Check the hardware size and hole spacing carefully. Use a sharp drill bit suited for wood. Drill slowly and keep the drill straight. Avoid pressing too hard to prevent splintering. Test drill on a scrap piece first. Clean up any wood dust before attaching hardware. These tips help keep your work neat and precise.
Attaching The Hardware
Attaching cabinet hardware is a key step in refreshing your cabinets. It gives your kitchen or bathroom a new look and feels. This step requires care and precision to ensure handles and knobs fit perfectly and work well.
Follow clear steps to attach hardware. Align pieces correctly and secure screws tightly. This helps avoid loose handles or uneven knobs. The right method makes your cabinets look neat and last longer.
Aligning Handles And Knobs
Place the handle or knob on the cabinet door or drawer. Check if the holes line up with the marks or drilled spots. Use a ruler or measuring tape to keep alignment straight. Handles should be level, and knobs centered on the door or drawer.
Double-check the position before attaching screws. A small shift can cause the hardware to look crooked. Take your time to get it right. Proper alignment improves the cabinet’s overall look and feel.
Securing Screws Properly
Insert screws through the back of the door or drawer into the hardware. Use a screwdriver or drill with a proper bit. Turn screws slowly and steadily to avoid stripping the threads. Tighten screws until the hardware is firm but avoid overtightening.
Loose screws make handles wobble. Too tight screws can damage the wood or hardware. Stop once the hardware does not move. Check each handle and knob to ensure all screws are secure.

Credit: www.youtube.com
Final Touches
After installing your cabinet hardware, the final touches make a big difference. These steps ensure your hardware works well and stays beautiful. Taking time to check and clean your hardware keeps your cabinets looking fresh for years.
Checking For Stability
Start by testing each handle and knob. Pull gently to see if it feels loose. Tighten screws with a screwdriver if needed. Make sure every piece sits firmly on the cabinet surface. A stable handle means better use and less damage over time.
Cleaning And Maintenance Tips
Use a soft cloth to wipe away dust and fingerprints. Avoid harsh cleaners that can damage the finish. Mild soap with water works well for regular cleaning. Dry hardware completely to stop water spots or rust. Regular care keeps your hardware shining and working smooth.
Troubleshooting Tips
Installing cabinet hardware can sometimes bring small problems. These issues can slow down your work and cause frustration. This section helps you fix common problems quickly. Follow these easy tips to keep your project on track.
Fixing Misaligned Hardware
Misaligned hardware looks bad and may not work right. Start by loosening the screws a little. Adjust the handle or knob until it lines up with the other pieces. Tighten the screws slowly. Use a level tool to check the alignment. If holes do not match, fill them with wood filler. Drill new holes carefully. Always measure twice before drilling.
Dealing With Stripped Screws
Stripped screws are hard to turn and fix. Use a rubber band over the screw head for extra grip. Turn the screw slowly with a screwdriver. If that fails, try a screw extractor tool. Avoid using too much force; it may damage the cabinet. Replace stripped screws with new ones of the same size. This keeps your hardware secure and stable.
Frequently Asked Questions
What Tools Do I Need To Install Cabinet Hardware?
You need a drill, screwdriver, measuring tape, pencil, and hardware like knobs or pulls. These tools ensure precise and secure installation.
How Do I Measure For Cabinet Hardware Placement?
Measure the cabinet door’s width and height. Mark the desired spot evenly for balanced hardware alignment. Use a template for accuracy.
Can I Install Cabinet Hardware Without Drilling?
Yes, adhesive hardware options exist but are less durable. For long-term use, drilling ensures stronger and stable attachment.
How Long Does It Take To Install Cabinet Hardware?
Installing hardware typically takes 10 to 20 minutes per piece. Time varies based on cabinet type and your experience level.
Conclusion
Installing cabinet hardware is a simple task anyone can do. Follow the video steps carefully and take your time. Use the right tools and measure twice before drilling. Small details make a big difference in the final look. Enjoy the fresh, new style in your kitchen or bathroom.
Now, your cabinets have a neat and polished finish. Keep practicing, and installing hardware will become easy and fast. This project adds value and beauty to your home. Try it today and see the difference yourself.