
Are you ready to give your kitchen a quick and stylish upgrade? Adding hardware to your kitchen cabinets can completely transform their look—and it’s easier than you might think.
But where exactly should you place handles and knobs to make everything look balanced and feel comfortable to use? If you want to avoid costly mistakes and get professional-looking results, this guide is for you. Keep reading to discover simple tips and tricks that will help you place hardware on your kitchen cabinets with confidence and ease.
Your kitchen makeover starts here!
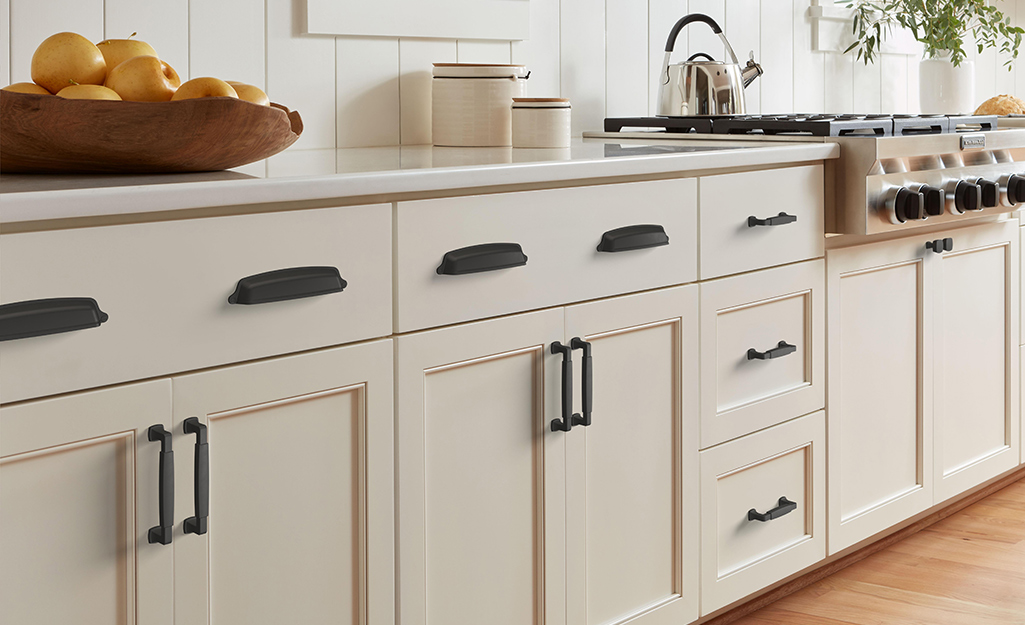
Credit: www.homedepot.com
Choosing The Right Hardware
Choosing the right hardware for kitchen cabinets makes a big difference. It changes how your kitchen looks and how easy it is to use. The right hardware fits your style and works well with your cabinets. It also feels good to touch and lasts a long time. Think about your needs and style before picking the hardware. This helps you make a smart choice.
Types Of Cabinet Hardware
Cabinet hardware comes in many types. The most common are knobs and pulls. Knobs are small and round or square. Pulls are longer and need two screws. Some cabinets use handles or cup pulls. Each type fits different cabinet styles and uses. Choose what feels easy to open and matches your kitchen.
Materials And Finishes
Hardware materials include metal, wood, and plastic. Metal is strong and lasts long. Common metals are brass, stainless steel, and chrome. Wood gives a warm, natural look. Plastic is cheaper but less durable. Finishes affect color and shine. Popular finishes are matte, polished, and brushed. Pick a finish that matches your kitchen’s look and cleaning habits.
Matching Hardware With Kitchen Style
Match hardware to your kitchen’s style for a balanced look. Modern kitchens suit simple, sleek hardware. Traditional kitchens look good with ornate knobs or pulls. Rustic kitchens fit well with iron or bronze hardware. Coastal kitchens work with light, natural finishes. Think about your kitchen colors and cabinets. The right hardware ties the whole room together.
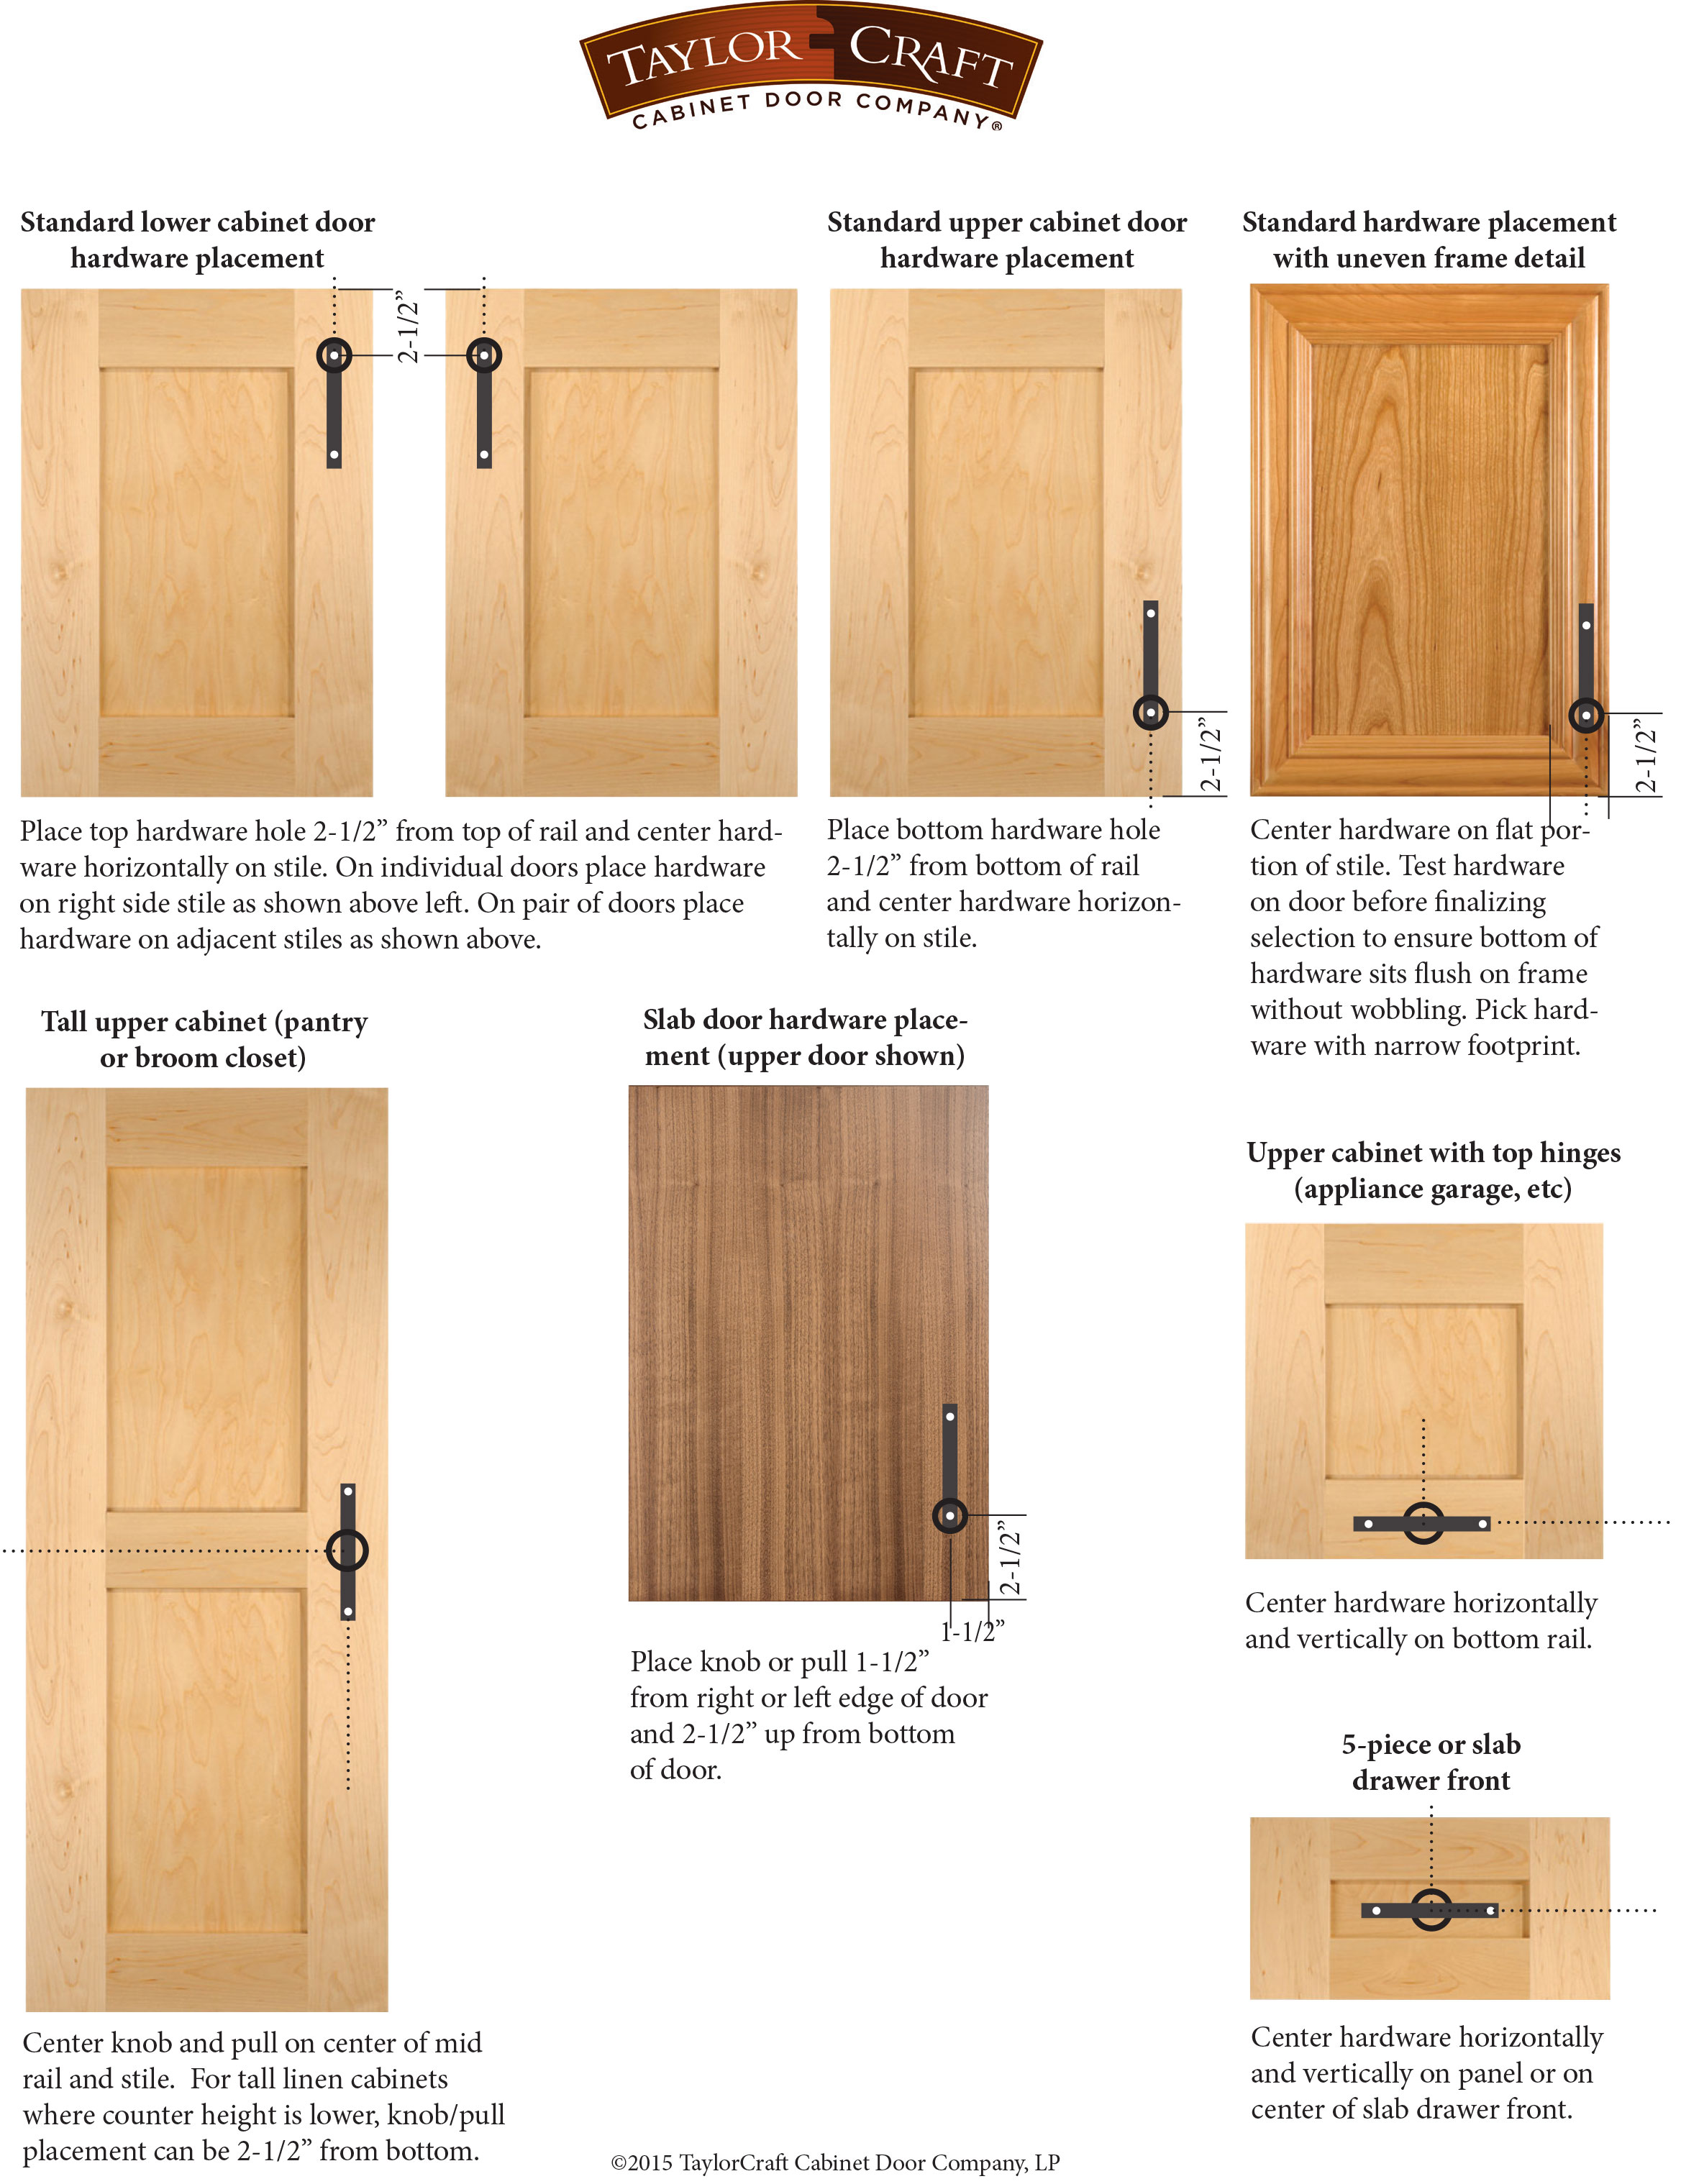
Credit: taylorcraftdoor.com
Measuring For Hardware Placement
Measuring for hardware placement on kitchen cabinets is an important step. Proper measurements help ensure handles and knobs look balanced and fit well. Taking time to measure carefully saves effort and prevents mistakes. This guide covers the tools needed, standard measurements, and how to adjust for different cabinet styles.
Tools You’ll Need
Gather a tape measure or ruler for accurate measurements. A pencil helps mark placement points lightly. A level ensures hardware sits straight. A drill or screwdriver is needed to attach the hardware. Having these tools ready makes the process smooth and precise.
Standard Measurements For Handles And Knobs
Handles usually sit 3 to 4 inches from the edge of cabinet doors. Knobs are often placed in the center of the door or drawer face. For drawers, measure about 2.5 to 3 inches from the top edge. These standard spots create a clean, uniform look throughout the kitchen.
Adjusting For Cabinet Size And Design
Small cabinets need hardware placed closer to the edge for better reach. Large cabinets allow hardware to be placed slightly inward for balance. For glass or frame cabinets, hardware placement may follow the frame lines. Consider cabinet style and size to keep hardware functional and attractive.
Marking The Drill Points
Marking the drill points accurately is a crucial step in placing hardware on kitchen cabinets. Precise marks ensure the handles or knobs fit perfectly and look neat. A small error can cause misaligned hardware, making installation tricky and affecting the cabinet’s look.
Take your time with marking. It sets the foundation for a smooth installation. Use the right tools and techniques for best results.
Using Templates For Accuracy
Templates help place drill points evenly and quickly. They come in plastic or metal and have pre-set holes for screws. Hold the template on the cabinet door or drawer. Align it carefully to keep the hardware level. Mark through the holes with a pencil. This method reduces guesswork and speeds up the process.
Common Marking Techniques
Use a pencil to mark drill spots lightly. A ruler or tape measure helps find the center or edge. Mark all points before drilling. Double-check measurements to avoid mistakes. Use painter’s tape on the cabinet surface. Mark on the tape for cleaner lines and easy correction. Keep your marks clear but not too dark to erase easily.
Avoiding Mistakes
Measure twice, mark once. Check the hardware size before marking. Avoid marking too close to edges to prevent splitting wood. Use a level to keep marks straight. Do not rush the marking process. Clean the surface before marking for better visibility. Mistakes here lead to wasted time and damaged cabinets.
Drilling And Installing Hardware
Drilling and installing hardware on kitchen cabinets requires care and precision. Proper drilling ensures strong attachment of handles and knobs. It also keeps cabinets looking neat and professional. Follow the right steps to avoid damage and get perfect results.
Choosing The Right Drill Bits
Select drill bits made for wood or cabinet materials. Use a bit size that matches the hardware screws. Too big or small holes cause loose or damaged fittings. A brad point bit helps make clean, accurate holes. Check the drill bit condition before starting your work.
Drilling Tips For Clean Holes
Mark the drilling spots clearly with a pencil or tape. Use a small pilot hole first to guide the drill bit. Drill slowly and steady to avoid splintering wood. Hold the drill straight and steady for even holes. Use painter’s tape over the spot to reduce chipping.
Securing Handles And Knobs
Align hardware holes with drilled spots carefully. Insert screws fully to ensure tight fit. Use a screwdriver, not a drill, to avoid stripping screws. Check that handles and knobs sit flush and straight. Tighten screws but avoid overtightening to protect the wood.
Ensuring Symmetry And Alignment
Ensuring symmetry and alignment in placing hardware on kitchen cabinets creates a neat and balanced look. Proper alignment makes the cabinets look well-crafted and professional. It also helps in the smooth operation of doors and drawers.
Small errors in measurement can cause hardware to look off-center or crooked. Careful steps and tools can avoid these mistakes. Follow simple methods to keep everything even and straight.
Double Checking Measurements
Start by measuring the cabinet surface carefully. Mark the spots lightly with a pencil where hardware will go. Measure twice or even three times to avoid mistakes. Use a ruler or tape measure for accuracy. Consistent measurements keep handles or knobs aligned across all cabinets.
Using Levels And Squares
Use a level tool to check horizontal alignment of hardware. This ensures handles do not tilt up or down. A carpenter’s square helps verify vertical placement. Place the square against the edge of the door or drawer. These tools help maintain straight lines for all pieces of hardware.
Adjusting Hardware Placement
If hardware looks uneven, make small changes before drilling holes. Shift marks slightly to match adjacent cabinets. Use the level again to confirm the new position. Adjustments keep the kitchen looking tidy and symmetrical. Take time to perfect placement for the best result.
Maintaining And Updating Hardware
Maintaining and updating your kitchen cabinet hardware keeps your kitchen fresh and functional. Old handles can look worn and catch dirt. New hardware can change the style without much work. Simple care and smart choices help your cabinets look great for years.
Cleaning Tips
Clean cabinet hardware regularly to keep it shiny. Use a soft cloth and mild soap with water. Avoid harsh cleaners that can damage the finish. Dry the hardware well after cleaning to stop rust. Clean hardware makes your kitchen feel bright and neat.
Replacing Old Hardware
Replace old or broken hardware to improve function and look. Measure your current hardware before buying new pieces. Choose hardware that fits the style of your kitchen. Screws may differ in length or size, so check carefully. Changing hardware is an easy way to update your cabinets.
Trends In Cabinet Hardware
Modern trends include matte black, brushed gold, and antique brass finishes. Simple shapes and clean lines are popular. Mixing materials like wood and metal adds interest. Choose hardware that matches your kitchen’s style and colors. Trendy hardware can refresh your kitchen’s look quickly.
:max_bytes(150000):strip_icc()/SPR-where-to-put-knobs-and-handles-on-kitchen-cabinets-6373984-hero-f2b94cb045354a5783a3d927f83b5d21.jpg)
Credit: www.thespruce.com
Frequently Asked Questions
How Do I Measure For Kitchen Cabinet Hardware?
Measure the cabinet door’s width and height. Mark the desired hardware placement. Use a ruler or template for accuracy. Consistent measurements ensure balanced and aligned hardware installation.
What Tools Are Needed To Install Cabinet Hardware?
You need a drill, screwdriver, measuring tape, pencil, and level. These tools help you mark, drill holes, and attach hardware securely. Proper tools ensure precise and efficient installation.
Where Is The Best Place To Position Cabinet Handles?
Place handles 2 to 3 inches from the cabinet edge, centered vertically. This placement is ergonomic and aesthetically pleasing. Consistency across cabinets improves kitchen design harmony.
Can I Install Hardware On Painted Kitchen Cabinets?
Yes, you can install hardware on painted cabinets. Pre-drill holes carefully to avoid paint chipping. Use appropriate screws and clean the surface before installation for a secure fit.
Conclusion
Placing hardware on kitchen cabinets can change your space’s look. Measure carefully to keep handles aligned and even. Mark spots clearly before drilling holes to avoid mistakes. Choose hardware that matches your kitchen style and needs. Take your time and work step-by-step for best results.
Small details make a big difference in your kitchen’s feel. Enjoy the process and the fresh look you create. Simple steps lead to a neat and stylish kitchen upgrade.

