Are you ready to give your cabinets a fresh, stylish look? Installing cabinet hardware might seem simple, but doing it the right way makes all the difference.
If you want your new knobs and pulls to look perfect and last for years, you need a clear, step-by-step guide that anyone can follow. In this post, you’ll discover easy tips and tricks to install your cabinet hardware like a pro—no guesswork, no frustration.
Keep reading, and you’ll transform your space with confidence and ease.
Choosing The Right Hardware
Choosing the right hardware is key for a beautiful and functional cabinet. Hardware affects both the look and ease of use. The perfect choice makes your cabinets stand out and last longer. Consider style, durability, and comfort before buying.
Types Of Cabinet Hardware
Cabinet hardware mainly includes knobs, pulls, and handles. Knobs are small and round, easy to install. Pulls offer a larger grip and come in many shapes. Handles are long bars that provide a strong hold. Pick the type that feels best for daily use.
Materials And Finishes
Hardware comes in many materials like metal, plastic, and wood. Metal types include brass, stainless steel, and bronze. Each material has different strength and look. Finishes change the color and texture. Choose finishes like matte, shiny, or brushed to match your style.
Matching Hardware To Cabinet Style
Cabinet style guides hardware choice. Modern cabinets suit sleek, simple hardware. Traditional cabinets look great with detailed, classic hardware. Rustic cabinets match well with rough, natural finishes. Match hardware size to cabinet size for balance and comfort.

Credit: www.thriftydecorchick.com
Gathering Tools And Supplies
Gathering the right tools and supplies is the first step in installing cabinet hardware correctly. Having everything ready makes the job easier and faster. It helps avoid mistakes and frustration. This section lists the tools you need and tips to prepare your workspace.
Essential Tools Needed
Start with a drill or screwdriver. These are key for attaching hardware. A tape measure helps to mark exact spots. Use a pencil to make light marks on the cabinet surface. A level ensures hardware stays straight. Finally, grab the screws that fit your cabinet handles or knobs.
Optional Tools For Precision
A drill bit set can help create perfect holes. A center punch makes small dents to guide the drill. Clamps hold the cabinet door steady while working. A ruler or square helps check angles. These tools improve accuracy but are not always required.
Preparing Your Workspace
Clear a large, flat area to work on. Lay down a soft cloth to protect cabinet doors from scratches. Make sure the area is well-lit so you see markings clearly. Keep all tools and hardware close by. This saves time and keeps your work organized.
Measuring And Marking
Measuring and marking cabinet hardware is a key step in installation. It sets the stage for neat and balanced results. Taking time here saves effort later. Accuracy helps avoid mistakes and keeps the hardware looking great. Use simple tools and clear techniques for best results.
Finding The Perfect Placement
Start by deciding where the hardware should go. Consider door size and style. Handles often sit in the middle or at a corner. Knobs usually go in the upper corner of drawers. Mark a spot lightly with a pencil. Check the height and distance carefully. Think about comfort and usability.
Using Templates And Jigs
Templates and jigs help keep marks consistent. Use a paper or plastic template for your hardware. Place it on each door or drawer and trace around it. Jigs are tools that hold the hardware in place. They speed up marking and drilling. This reduces errors and improves uniformity.
Ensuring Symmetry And Alignment
Check that all marks line up across cabinets. Use a level or ruler for straight lines. Measure from edges to confirm equal spacing. Symmetry makes your cabinets look tidy and professional. Small mistakes show up here, so double-check each mark. Keep your pencil marks light for easy correction.
Drilling Holes Safely
Drilling holes for cabinet hardware requires care and precision. Mistakes can cause damage or misaligned handles. This section explains how to drill holes safely. Follow these tips to keep your cabinets intact and make the process easier.
Choosing The Right Drill Bit
Select a drill bit that matches the hardware screws. Use a bit slightly smaller than the screw width. This ensures a tight fit without splitting the wood. For soft wood, use brad-point bits for clean holes. For metal or hard surfaces, choose a cobalt or titanium bit.
Preventing Damage To Cabinets
Protect cabinet surfaces with painter’s tape over drilling spots. This prevents wood from splintering around holes. Mark hole positions clearly with a pencil. Drill slowly and steady to avoid cracking. Always drill straight to keep holes aligned and neat.
Drilling Techniques For Accuracy
Measure twice and mark once before drilling. Use a drill guide or level to keep the drill straight. Start drilling with a small pilot hole for better control. Apply light pressure and let the drill do the work. Clean out wood dust between holes for clear visibility.
Attaching The Hardware
Attaching cabinet hardware is a key step in finishing your kitchen or bathroom cabinets. It gives cabinets a fresh, polished look and makes them easy to use. This process needs care and patience to avoid damage and ensure the hardware fits well.
Proper attachment also helps the hardware last longer. Follow simple, clear steps for the best results. Here’s how to attach your cabinet handles and knobs securely and neatly.
Screwing In Handles And Knobs
Start by lining up the handle or knob with the pre-drilled holes. Hold the hardware steady while inserting the screw from inside the cabinet door or drawer. Use a screwdriver to turn the screw clockwise. Tighten it until the handle or knob is snug but not too tight.
Avoid over-tightening. It can crack the wood or strip the screw hole. Make sure the hardware stays straight and even as you tighten.
Dealing With Different Screw Lengths
Screw lengths vary based on cabinet thickness and hardware design. Use screws that fit the thickness of your cabinet door or drawer. Too long screws can poke through the front. Too short screws won’t hold the hardware properly.
Measure the cabinet thickness before buying screws. Keep extra screws on hand for testing. Replace screws if the fit feels loose or unstable.
Securing Tight Fits
Tight fits keep your hardware secure and prevent wobbling. If the screw hole is too large, use a small wood filler or toothpick to fill the space. Let it dry before inserting the screw. This helps the screw grip better.
Check the hardware after installation. Tighten screws slightly if the handle or knob moves. Avoid forcing screws as it can damage your cabinet.
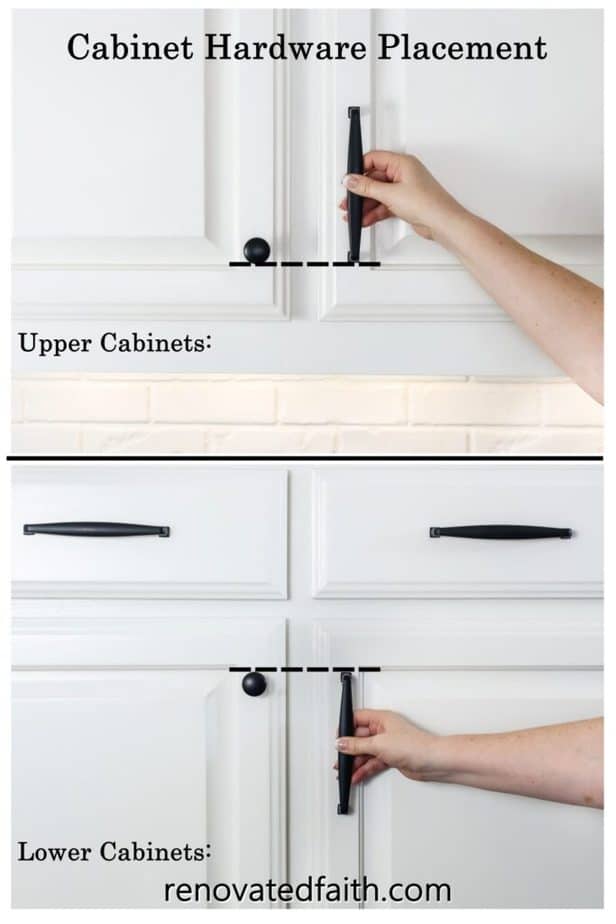
Credit: renovatedfaith.com
Final Adjustments And Care
Final adjustments and care are key steps after installing cabinet hardware. These steps ensure your hardware works well and lasts long. Small tweaks can improve both look and function. Proper care keeps hardware clean and prevents damage.
Checking Alignment And Function
Start by checking if all handles and knobs line up. Use a level or ruler for accuracy. Make sure doors and drawers open smoothly. Tighten any loose screws gently. Adjust hardware if it feels stiff or wobbly. Proper alignment stops wear and tear.
Cleaning And Maintenance Tips
Clean hardware regularly with a soft cloth. Avoid harsh chemicals that damage finishes. Use mild soap and water for tough dirt. Dry hardware fully to stop rust. Polish metal hardware with a gentle product. Routine cleaning keeps hardware shiny and new.
Troubleshooting Common Issues
Hardware may loosen or misalign over time. Tighten screws if handles feel loose. Replace stripped screws for a secure fit. If knobs stick, check for paint or debris. Lubricate hinges if doors squeak or stick. Fix problems early to avoid bigger repairs.
Credit: www.homedepot.com
Frequently Asked Questions
How Do I Choose The Right Cabinet Hardware Size?
Select hardware that fits your cabinet door or drawer dimensions. Measure thickness and style to ensure a proper fit and aesthetic appeal. Consider ergonomics for comfortable use and check compatibility with existing holes if replacing hardware.
What Tools Are Needed To Install Cabinet Hardware?
You need a drill, screwdriver, measuring tape, pencil, and a level. These tools help ensure precise placement and secure attachment. Using the right tools prevents damage and improves installation quality.
How To Align Cabinet Handles Evenly?
Measure and mark the exact spot for each handle using a template or ruler. Use a level to ensure straight alignment. Consistent placement enhances visual appeal and user experience.
Can I Install Cabinet Knobs Without Drilling New Holes?
Yes, if existing holes match the new knobs’ size and placement. Reuse old holes to save time and avoid cabinet damage. Check screw length for secure attachment.
Conclusion
Proper cabinet hardware installation makes a big difference in your space. Take your time to measure and mark each spot carefully. Use the right tools for smooth and easy work. Tighten screws just enough to hold hardware firmly. Check alignment often to keep everything straight.
Small steps lead to a neat and lasting finish. Enjoy the updated look and improved function of your cabinets. Simple care keeps your hardware looking fresh for years. Now, your cabinets look polished and work better every day.