Have you ever wondered how to safely disconnect a light switch from an outlet? Whether you’re upgrading your home or fixing a wiring issue, this task might seem tricky at first.
But don’t worry—you can handle it yourself with the right steps. In this guide, you’ll learn exactly what to do to keep yourself safe and get the job done quickly. Keep reading, and you’ll gain the confidence to tackle this common household project without stress.
Tools You’ll Need
Before starting to disconnect a light switch from an outlet, gather the right tools. Using proper tools makes the job safer and easier. Each tool has a specific role in the process. Prepare all tools to avoid interruptions during work.
Screwdriver Set
A screwdriver set is essential for removing screws from the switch and outlet covers. Use flathead or Phillips screwdrivers based on screw types. A set with different sizes fits various screws.
Voltage Tester
A voltage tester ensures the power is off before touching wires. It checks if electricity still flows in the switch or outlet. Safety first—never skip this step.
Wire Strippers
Wire strippers remove insulation from the wires cleanly. This helps make proper connections or disconnections. Use the right size to avoid damaging wires.
Needle-nose Pliers
Needle-nose pliers help bend and hold wires during work. They reach tight spaces and grip wires firmly. They make handling wires simpler and safer.
Electrical Tape
Electrical tape insulates exposed wire ends after disconnection. It prevents accidental contact and short circuits. Use good-quality tape for secure wrapping.
Flashlight
A flashlight improves visibility in dim areas behind outlets or switches. Clear vision reduces mistakes and speeds up the job. Keep one handy in case lighting is poor.

Credit: www.reddit.com
Safety First
Safety must be your top priority before working on any electrical device. Electricity can cause serious injury or death. Taking simple safety steps protects you and your home.
Never assume power is off. Always check and confirm before touching wires or outlets. Proper tools and careful actions reduce risks.
Turn Off Power
Find the circuit breaker that controls the light switch and outlet. Switch it off to cut the power supply. This stops electricity flow and lowers shock risk.
Do not rely on just the wall switch. Power may still be live inside the box. Turning off the breaker is safer and more effective.
Use A Voltage Tester
Use a voltage tester to check for electricity in the wires. Touch the tester’s probes to the wires or terminals.
The tester will light up or beep if power is present. This confirms if the power is truly off before you start work.
Test every wire separately. Never guess or skip this step. Safety depends on confirming no current is flowing.
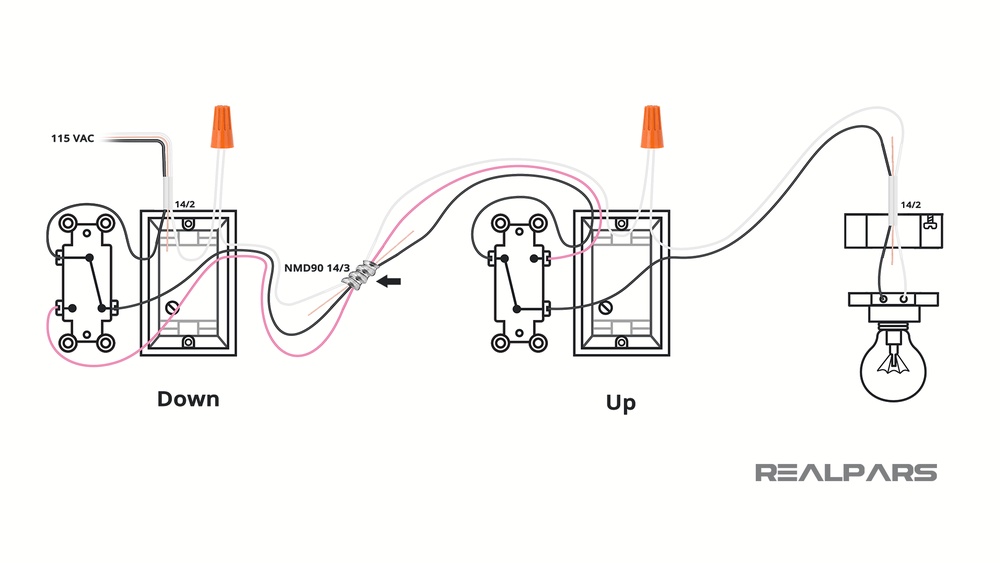
Locate The Switch And Outlet Wiring
Start by turning off the power to avoid shocks. Find the switch and outlet wiring inside the wall box. Identify which wires connect the switch to the outlet before disconnecting.
Before disconnecting a light switch from an outlet, find the wiring for both devices. This step is important for safety and success. Knowing where the wires connect helps avoid mistakes and electrical hazards.
Start by turning off the power at the circuit breaker. This prevents shocks while working on the wiring. Use a voltage tester to be sure no electricity flows to the switch or outlet.
Identify The Switch Wiring
Remove the switch cover plate carefully. Look inside the electrical box for wires. Usually, you will see black, white, and ground wires. The black wire is often the “hot” wire that powers the switch.
Note how the wires connect to the switch terminals. One wire brings power in, and the other sends power out to the light. Remember or take a photo for reference before disconnecting anything.
Identify The Outlet Wiring
Remove the outlet cover plate. Check the wires connected to the outlet. Outlets usually have black (hot), white (neutral), and green or bare copper (ground) wires. These wires may connect to the switch wiring.
Look for a shared wire between the switch and outlet. This wire might control power flow to both devices. Label the wires or take a picture to keep track of connections.

Credit: www.diychatroom.com
Remove The Switch Cover
Removing the switch cover is the first step to disconnect a light switch from an outlet. It gives clear access to the wiring behind the switch. This step is simple but important for safety and ease of work.
Before removing the cover, make sure the power to the switch is off. This prevents any risk of electric shock. Use a circuit tester to confirm no electricity flows to the switch.
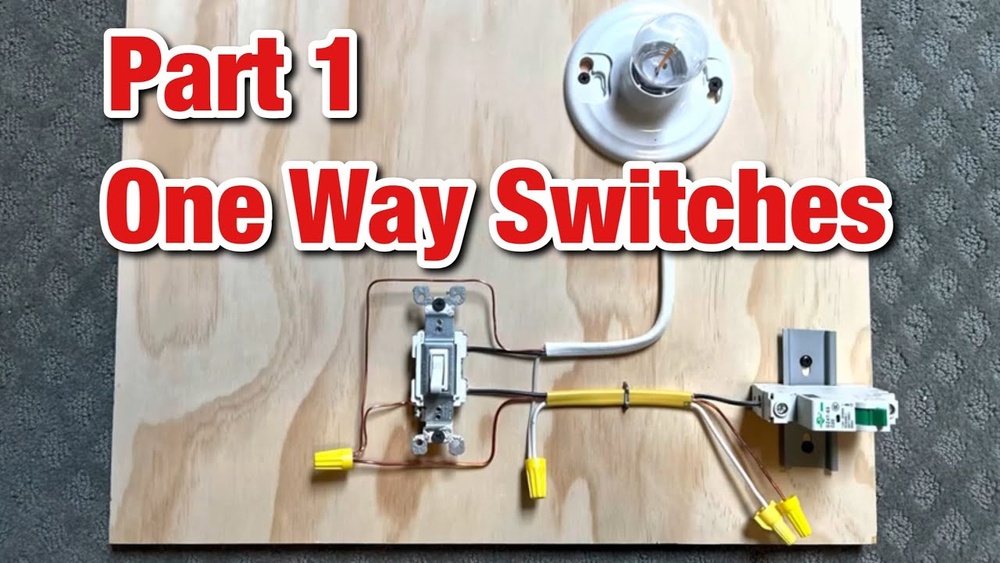
Gather Necessary Tools
Use a screwdriver to remove the switch cover. A flathead or Phillips screwdriver works, depending on the screws. Keep a small container nearby to hold the screws safely.
Remove The Screws Carefully
Find the screws holding the switch cover. They are usually at the top and bottom of the plate. Turn the screwdriver counterclockwise to loosen and remove each screw slowly.
Lift Off The Switch Cover
Gently pull the switch cover away from the wall. Avoid using force to prevent damage to the wall or switch. Set the cover and screws aside in a safe place for reassembly.
Disconnect The Switch Wires
Disconnecting the switch wires is a key step when separating a light switch from an outlet. This process requires careful attention to ensure safety and proper removal. Taking the right steps will prevent damage and make future work easier.
Before loosening any wires, it is important to understand how they are connected. Each wire has a specific role in the circuit. Knowing their positions helps avoid confusion during reassembly or replacement.
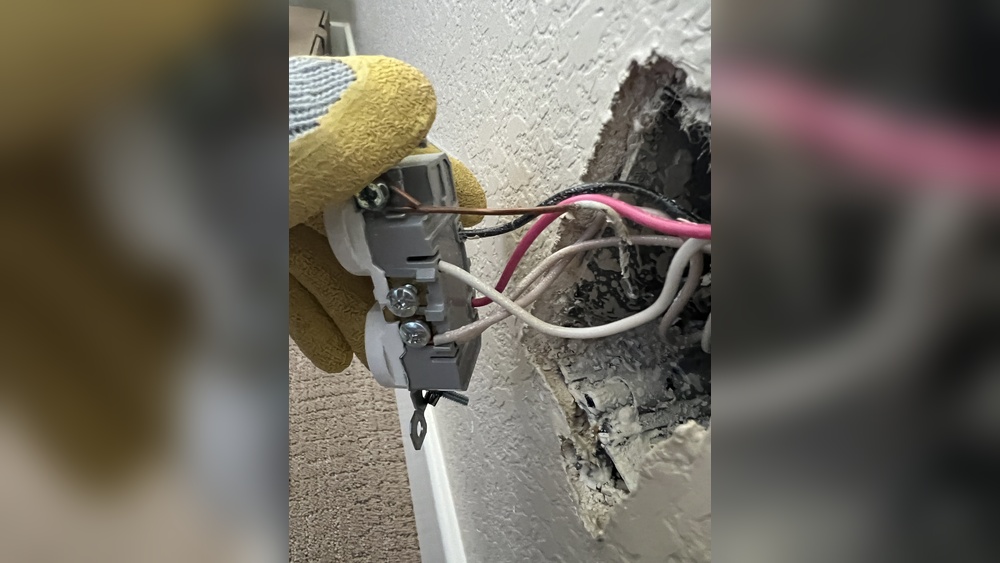
Identify Wire Connections
First, look closely at the wires attached to the switch. Usually, you will see a black (hot) wire and a white (neutral) wire. Some switches also have a green or bare copper ground wire. The wires connect to the switch terminals or screws.
Check the switch terminals for labels or markings. These indicate which wire belongs where. Take a photo or note the connections. This step helps when reinstalling or replacing parts later.
Loosen Terminal Screws
Use a screwdriver to carefully loosen the terminal screws. Turn them counterclockwise until the wires come free. Hold the wires steady to avoid pulling or damage. Do not force the wires out; gentle movement works best.
Once the screws are loose, gently pull each wire from its terminal. Keep the wires separated to prevent accidental contact. This step fully disconnects the switch from the circuit.
Cap And Secure The Wires
After disconnecting a light switch from an outlet, it is crucial to cap and secure the wires properly. This step prevents electrical hazards and keeps the wiring safe. Exposed wires can cause shocks or short circuits if not handled carefully.
Take your time to cover each wire with a wire nut. This simple action stops the wires from touching each other or any metal surface. Properly capped wires reduce the risk of sparks and fire.
Choose The Right Wire Nuts
Select wire nuts that fit the wire gauge perfectly. Too small or too large can cause loose connections. A tight fit ensures safety and reliability.
Twist Wires Before Capping
Twist the wires together before placing the wire nut. This makes a strong bond inside the cap. The wires stay connected firmly and won’t pull apart easily.
Check For Secure Connections
After capping, gently pull each wire to test the hold. None should slip out of the nut. A secure connection means less chance of future problems.
Wrap With Electrical Tape
Wrap electrical tape around the wire nut and wires. This adds an extra layer of protection. The tape keeps the nut from loosening over time.
Push Wires Safely Into The Box
Carefully tuck the capped wires into the electrical box. Avoid sharp bends or overcrowding. A neat arrangement helps when you work on the box later.
Test The Outlet
Testing the outlet is a key step before disconnecting a light switch from it. This step ensures safety and confirms power status. It helps avoid electric shocks or damage to devices.
Use a reliable outlet tester or a multimeter. These tools check if the outlet has power and if wiring is correct. Testing saves time and prevents mistakes during the disconnection process.
Use A Voltage Tester
Turn on the outlet power from the breaker. Touch the voltage tester probes to the outlet slots. A light or beep means the outlet has power. No signal means no power.
Check For Proper Wiring
Test the outlet wiring using the tester’s indicators. Correct wiring shows the right light pattern. Wrong wiring may cause flickering or no light. Fix wiring issues before disconnecting the switch.
Confirm Power Is Off
Switch off the breaker controlling the outlet. Test the outlet again with your tool. No signal proves power is off. This step ensures safe handling of wires.
Replace The Switch Cover
Replacing the switch cover is the final step after disconnecting a light switch from an outlet. It protects the wiring and keeps the area neat. A properly installed cover ensures safety and a clean look.
Choose The Right Switch Cover
Select a cover that fits your switch type and wall box. Covers come in plastic or metal. Plastic covers are common and easy to install. Match the cover color to your room for a uniform look.
Align The Cover Correctly
Place the cover over the switch carefully. Make sure the screw holes line up with the wall box. The cover should sit flat against the wall without gaps.
Secure The Cover With Screws
Use the screws that came with the cover. Tighten them evenly to avoid cracks. Do not overtighten; this can break the cover or strip the screws.
Check The Final Installation
Ensure the cover is stable and not loose. The switch should move freely without touching the cover. A secure cover keeps dust out and prevents accidents.

Credit: diy.stackexchange.com
Frequently Asked Questions
How Do I Safely Disconnect A Light Switch From An Outlet?
Turn off the main power at the circuit breaker. Use a voltage tester to confirm no electricity flows. Unscrew the switch cover and disconnect the wires carefully. Label wires if needed. Reconnect the outlet wires securely. Restore power and test the outlet for functionality.
Can I Disconnect A Light Switch Without An Electrician?
Yes, if you have basic electrical knowledge and follow safety protocols. Always switch off power before starting. Use insulated tools and test for current. If unsure, consult a professional to avoid hazards. Proper knowledge prevents electrical shocks and damage.
What Tools Are Needed To Disconnect A Light Switch?
You need a screwdriver, voltage tester, wire stripper, and electrical tape. A flashlight helps in dark spaces. Insulated tools improve safety. Having these tools ensures smooth and safe disconnection of the switch from the outlet.
Will Disconnecting A Light Switch Affect The Outlet’s Power?
No, if wired correctly, the outlet remains powered independently. The switch typically controls a separate light fixture. Disconnecting the switch won’t interrupt the outlet’s circuit. Always verify wiring before disconnecting to avoid power loss.
Conclusion
Disconnecting a light switch from an outlet can be safe and simple. Always turn off the power before starting any work. Use basic tools and follow clear steps. Double-check connections to avoid mistakes. Taking your time helps prevent accidents. If unsure, ask a professional for help.
Now, you can handle this task with confidence.