Are you struggling to figure out how to hook up a double pole wall flipswitch? You’re not alone.
Wiring a switch like this can feel confusing, especially if you want to get it right the first time. But don’t worry—this guide will walk you through every step clearly and simply. By the end, you’ll have the confidence to install your double pole wall flipswitch safely and correctly.
Keep reading, and you’ll see just how easy it can be to upgrade your electrical setup.
Tools And Materials Needed
Preparing to hook up a double pole wall flipswitch requires the right tools and materials. Using proper equipment ensures safety and efficiency. Having everything ready makes the job smoother and faster.
Essential Tools
You will need a screwdriver set, including flathead and Phillips heads. Wire strippers help remove insulation without damaging wires. A voltage tester checks if wires are live and safe to handle. Needle-nose pliers assist in bending and shaping wires neatly. A drill may be needed for mounting the switch box securely.
Required Materials
The double pole wall flipswitch itself is necessary. Electrical wires of appropriate gauge must match your circuit. Wire nuts secure wire connections safely. Electrical tape provides extra insulation and protection. A switch box holds the switch firmly in place within the wall.
Safety Equipment
Wear insulated gloves to protect against electric shocks. Safety goggles shield your eyes from sparks or debris. Use a flashlight for better visibility in dark spaces. A fire extinguisher nearby adds a safety layer in emergencies.
Safety Precautions
Turn off the power before starting any wiring work. Use insulated tools to avoid electric shock. Double-check all connections for safety and proper function.
Turn Off The Power
Always switch off the main power before starting any wiring work.
Use a voltage tester to confirm no electricity flows to the switch.
This step stops electric shocks and protects your safety.
Use Proper Tools And Equipment
Choose insulated tools made for electrical work only.
Wear rubber-soled shoes to avoid electric shocks.
Use a sturdy ladder if the switch is high on the wall.
Follow Wiring Codes
Check your local electrical codes before wiring the flipswitch.
Proper wiring keeps your home safe and prevents accidents.
Incorrect wiring can cause fires or damage appliances.
Double Check Connections
Tighten all wire connections securely to avoid loose contacts.
Loose wires can cause sparks or switch failure.
Use wire nuts or connectors designed for your wire type.
Wear Safety Gear
Put on safety glasses to protect your eyes from sparks.
Wear gloves to protect your hands from sharp wires.
Keep your workspace clean and dry to avoid slips and shocks.
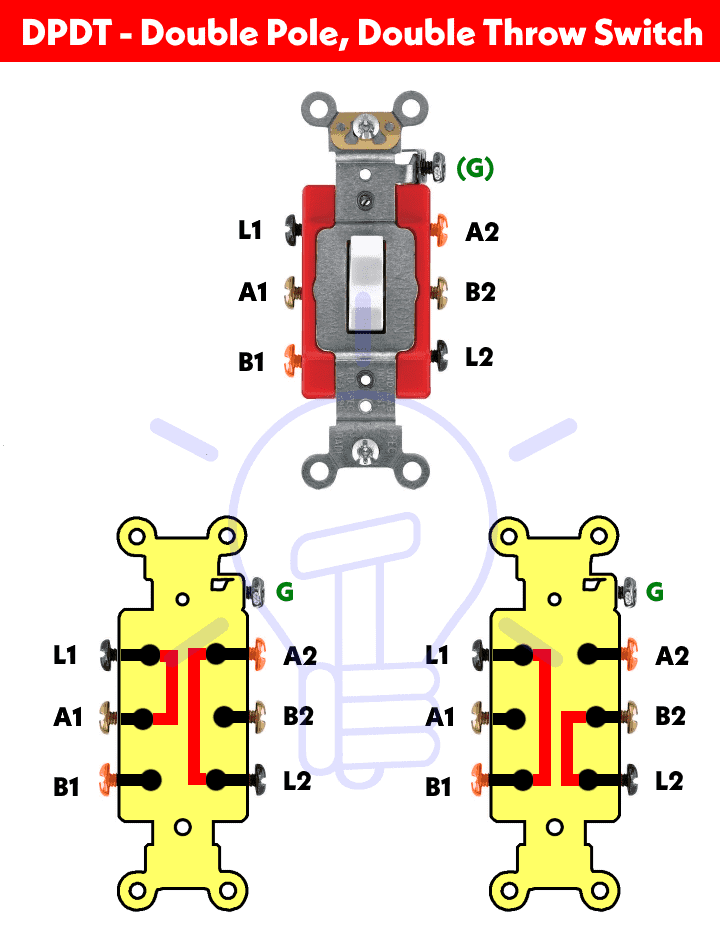
Identifying The Double Pole Switch
Identifying the double pole switch is the first step in wiring a double pole wall flip switch. Understanding its features helps you connect it safely and correctly.
This switch controls two separate circuits at the same time. It is different from a single pole switch, which controls only one circuit.
What Does A Double Pole Switch Look Like?
A double pole switch usually has two toggles or a larger toggle that moves both poles together. It has four terminals on the back. These terminals connect to two separate wires for each circuit.
The body of the switch is often bigger than a single pole switch. This design allows it to handle more power and two circuits.
Checking The Number Of Terminals
Count the terminals on the switch to identify it. A double pole switch has four terminals for wires. Two terminals connect to the power source, and two go to the load.
Some switches also have a ground terminal. This is usually green or marked with a ground symbol. Always connect the ground wire for safety.
Reading Labels And Markings
Look for labels on the switch body. It may say “DPST” or “Double Pole.” These labels confirm the switch type. The voltage and current ratings are often printed too.
These ratings tell you how much power the switch can handle safely. Use a switch that matches your circuit’s requirements.
Credit: learn.sparkfun.com
Turning Off Power
Turning off power is the first and most important step before wiring a double pole wall flipswitch. It keeps you safe from electric shocks and prevents damage to your electrical system. Always treat electricity with respect. Never skip this safety step.
Before starting, locate the main breaker panel. This is where you cut the power supply to your home or specific circuits. Turning off power ensures no current flows through the wires you will work on.
Locate The Main Breaker Panel
Find the main breaker panel in your home. It is usually in the basement, garage, or utility room. Open the panel door carefully. Look for the switch labeled “Main.” This switch controls power to the whole house.
Turn Off The Main Breaker
Flip the main breaker switch to the “Off” position. This stops electricity from flowing to all circuits. You will see no power in the entire house. Double-check by trying to turn on a light or device connected to the circuit.
Verify Power Is Off
Use a voltage tester or multimeter to confirm no power is present. Test the wires where you plan to work. Never assume power is off without checking. Safety depends on this verification.
Use Safety Gear
Wear insulated gloves and use tools with insulated handles. These protect you from accidental shocks. Make sure your work area is dry and well-lit. Safety gear and conditions reduce risk during wiring.
Removing The Old Switch
Removing the old switch is the first step in installing a double pole wall flipswitch. This process requires care and attention to ensure safety and prepare the wiring for the new switch. Follow each step carefully to avoid any electrical hazards.
Turn Off Power At The Breaker
Start by turning off the power at the circuit breaker. This stops electricity from flowing to the switch. Use a voltage tester to double-check that the power is off. Safety first.
Remove The Wall Plate
Unscrew the wall plate covering the switch. Keep the screws safe for later use. Removing the plate reveals the switch and wiring behind it.
Unscrew The Old Switch
Loosen the screws holding the old switch in place. Gently pull the switch out from the wall box. Be careful not to touch any wires directly.
Disconnect The Wires
Note how the wires connect to the old switch. Use a screwdriver to loosen the terminal screws. Carefully disconnect each wire and set the old switch aside.
Wiring The Double Pole Switch
Wiring a double pole wall flip switch requires careful steps to ensure safety and proper function. This switch controls two separate circuits at once. Each pole handles a different circuit line. Proper wiring keeps your electrical system safe and reliable. Follow the steps below to connect each wire correctly.
Connecting The Line Wires
Locate the two line wires coming from your power source. These wires carry current into the switch. Connect each line wire to the brass screws on the switch. Tighten the screws firmly to hold the wires. Ensure no copper wire is exposed outside the screws.
Attaching The Load Wires
Find the load wires that lead to your electrical devices. These wires carry current out from the switch. Attach each load wire to the silver screws on the switch. Make sure the wires are secure and do not move. Proper connection helps the switch control the devices safely.
Ground Wire Connection
Identify the ground wire, usually bare copper or green. Connect this wire to the green grounding screw on the switch. This connection prevents electrical shocks and protects the circuit. Tighten the screw well to hold the ground wire firmly in place.
Mounting The Switch
Mounting the double pole wall flipswitch is a key step in the installation process. Proper mounting ensures the switch works safely and lasts longer. It also makes the switch easy to use and access.
Start by choosing a suitable location on the wall. The place should be dry, flat, and close to the wires you will connect. Avoid spots near water or where the switch may get bumped.
Turn Off Power
Before mounting, always turn off the power at the breaker. This stops any chance of electric shock. Use a voltage tester to confirm the power is off.
Prepare The Wall Box
Use a wall box that fits the switch size. Secure the box firmly in the wall cavity. The box should be flush with the wall surface for a clean finish.
Position The Switch
Place the switch into the wall box carefully. Align the screw holes with the box holes. Make sure the switch lever points up or follows your preference.
Secure The Switch
Use screws to fasten the switch to the wall box. Tighten screws evenly to avoid bending the switch frame. Check that the switch does not wobble.
Attach The Cover Plate
Put the cover plate over the switch. Align it with the screw holes. Tighten the plate screws gently to avoid cracking the plate.
Credit: www.electricaltechnology.org
Testing The Installation
Testing the installation of a double pole wall flipswitch is a crucial step. It ensures the switch works correctly and safely. Proper testing prevents electrical hazards and confirms the wiring is right.
Start testing only after you complete the wiring. Use the right tools and follow safety rules strictly. Never test with wet hands or in a damp environment.
Turn Off Power Before Testing
Always switch off power at the circuit breaker before testing. This step protects you from electric shock. Use a voltage tester to confirm no power flows to the switch.
Check Continuity With A Multimeter
Set your multimeter to continuity mode. Touch the probes to the switch terminals. Flip the switch on and off. The meter should beep or show zero resistance when on.
Verify Both Poles Switch Correctly
A double pole switch controls two wires simultaneously. Test each pole individually using the multimeter. Ensure both poles open and close circuits properly.
Restore Power And Test Load
Turn the power back on after confirming wiring. Turn the switch on and off to test the connected device. The device should power on and off smoothly.
Look For Signs Of Trouble
Watch for sparks, buzzing, or overheating during the test. Any unusual signs mean you must recheck the wiring. Do not use the switch until the problem is fixed.
Troubleshooting Common Issues
Troubleshooting common issues with a double pole wall flipswitch can save time and frustration. Problems often come from wiring mistakes or faulty parts. Identifying the issue quickly helps fix the switch safely and correctly.
Check each step carefully and follow safety rules. Turn off power before starting any work. Use simple tools and take your time.
Check For Loose Connections
Loose wires cause the switch to fail or work intermittently. Tighten all terminal screws firmly. Make sure wires are properly wrapped around the screws.
Look for broken or frayed wires. Replace any damaged wires before reconnecting.
Verify Proper Wiring
Double pole switches control two circuits. Each pole must connect to the correct wires. Use a wiring diagram to match wires to the right terminals.
Wrong wiring can cause the switch to trip breakers or not work at all. Label wires if needed to avoid confusion.
Test The Switch Itself
The switch may be faulty even if wiring is correct. Use a multimeter to check continuity. Switch should connect or disconnect circuits as you flip it.
Replace the switch if the test shows no continuity or inconsistent results.
Check Circuit Breakers And Fuses
A tripped breaker or blown fuse may look like a switch problem. Reset breakers or replace fuses and test again. If breakers trip repeatedly, there may be a wiring fault.
Inspect For Short Circuits
Short circuits cause breakers to trip and switches to fail. Look for bare wires touching each other or metal parts. Use electrical tape or wire nuts to cover exposed wires.
Fix any signs of damage or overheating before turning power back on.

Credit: www.youtube.com
Frequently Asked Questions
What Tools Are Needed To Hook Up A Double Pole Wall Flipswitch?
You need a screwdriver, wire strippers, voltage tester, and electrical tape. Safety gloves and a wire connector are also helpful. Having these tools ensures a smooth and safe installation process for your double pole wall flipswitch.
How Do I Identify Wires For A Double Pole Flipswitch?
Look for two hot wires, typically black or red, and two neutral or ground wires. Use a voltage tester to confirm live wires before connecting. Proper identification ensures correct wiring and switch functionality.
Can I Replace A Single Pole Switch With A Double Pole Switch?
Yes, if the circuit requires controlling two separate hot wires. Double pole switches manage 240V circuits or two power lines safely. Ensure your wiring matches the switch specifications before replacing.
What Safety Precautions Should I Follow When Wiring Switches?
Turn off the power at the breaker panel first. Use a voltage tester to confirm no current flows. Wear insulated gloves and follow local electrical codes to avoid hazards.
Conclusion
Hooking up a double pole wall flipswitch is simple with the right steps. Always turn off power before starting work. Connect wires carefully to the correct terminals. Tighten screws firmly to avoid loose connections. Test the switch after wiring to ensure it works well.
Safety matters most, so follow instructions closely. Taking time to do it right saves trouble later. Now, you can control two circuits safely and easily. Feel confident in your wiring skills.