If you’re building a retaining wall, securing it properly is key to making sure it stands strong for years. The Simpson MAB15 mudsill anchor is a reliable tool that helps you do just that.
But how do you install it correctly? In this guide, you’ll learn simple, step-by-step instructions to install the MAB15 anchor with confidence. By the end, you’ll have the knowledge you need to strengthen your retaining wall and protect your property from damage.
Keep reading to make sure your project is built on a solid foundation.

Credit: connectorsonly.com
Choosing The Right Location
Choosing the right location for the Simpson MAB15 mudsill anchor is key to a strong retaining wall. This step ensures the anchor holds the wall firmly and prevents future damage. Careful planning saves time and effort during installation.
Assessing Wall Requirements
Start by examining the size and height of your retaining wall. Taller walls need stronger support and more anchors. Check the soil type near the wall; some soils need deeper or more anchors. Consider the load the wall must carry. This includes soil pressure and any structures above the wall. Measure the distance between anchor points based on the wall’s length.
Checking Local Building Codes
Local rules affect where and how you install anchors. Visit your city or county building office for guidelines. Some areas require specific anchor spacing and depth. Building codes also dictate the materials and installation methods. Follow these rules to avoid fines or having to redo work. Keep permits ready before starting the installation.
Gathering Tools And Materials
Before starting to install the Simpson MAB15 Mudsill Anchor in your retaining wall, gather all necessary tools and materials. Having the right items ready makes the job easier and safer. It helps avoid delays and errors during installation.
Organize everything in one place. Check each tool and material to ensure they work well. This step saves time and helps the project run smoothly.
Required Tools
Use a hammer drill to make holes in concrete or masonry. A tape measure helps to mark exact anchor locations. A pencil or marker is useful for marking spots. Safety glasses protect your eyes from dust and debris. A socket wrench or impact driver is needed to tighten the anchor bolts. A level ensures proper alignment of the anchor. Gloves keep your hands safe during work.
Anchor And Hardware Specifications
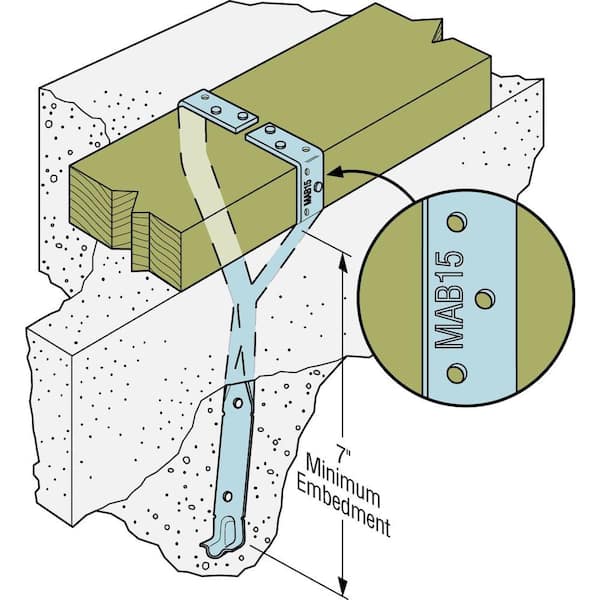
The Simpson MAB15 Mudsill Anchor is made of strong steel for durability. It fits into a 3/4-inch hole drilled into concrete. The anchor comes with a bolt and washer to secure the connection. Use anchors rated for structural loads to ensure safety. Check the manufacturer’s instructions for specific size and load limits. Choose hardware that resists rust and corrosion for outdoor use.
Preparing The Retaining Wall
Preparing the retaining wall is a crucial step before installing the Simpson MAB15 Mudsill Anchor. A well-prepared surface ensures strong attachment and long-lasting support. This process involves making the surface clean and marking the exact spots for the anchors.
Cleaning The Surface
Start by removing dirt, dust, and loose material from the wall. Use a wire brush or stiff broom for this task. A clean surface helps the anchor stick better. Check for any cracks or damage and fix them before moving on. Dry the surface completely to avoid moisture problems during installation.
Marking Anchor Positions
Measure carefully to mark where each anchor will go. Use a pencil or chalk to make clear marks. Keep the marks evenly spaced according to the anchor instructions. Double-check the measurements to avoid errors. Proper marking saves time and ensures the wall stays secure.
Drilling Anchor Holes
Drilling anchor holes is a crucial step for installing the Simpson MAB15 Mudsill Anchor. Proper holes ensure the anchor holds firmly in the retaining wall. The size and depth of these holes affect the strength and safety of the installation.
Careful drilling prevents damage to the wall and guarantees a secure fit. Use the right tools and techniques for best results. Follow the guidelines below to drill precise and effective anchor holes.
Selecting Drill Bit Size
Choose a drill bit that matches the anchor diameter exactly. The Simpson MAB15 requires a specific hole size for a tight fit. Too small a bit stops the anchor from fitting. Too large a bit weakens the hold.
Check the anchor instructions for the recommended drill bit size. Use a high-quality masonry bit for concrete or brick walls. Ensure the bit is sharp for clean holes and faster drilling.
Drilling Technique Tips
Mark the hole spots clearly on the retaining wall. Use a level to keep holes straight and aligned. Start drilling slowly to avoid bit slip or wall cracks. Apply steady pressure without forcing the drill.
Drill to the exact depth needed for the anchor length. Clean dust and debris from holes after drilling. This ensures the anchor seats properly and holds tightly. Repeat for each anchor point with care and precision.
Installing The Mudsill Anchor
Installing the Simpson MAB15 Mudsill Anchor in a retaining wall strengthens the connection between the wood and concrete. This step is key to ensure the wall’s stability and safety. Follow the instructions carefully to place the anchor correctly.
Inserting The Anchor
Start by positioning the MAB15 anchor in the designated spot on the concrete. The anchor should fit tightly into the drilled hole. Make sure the anchor’s base rests flush against the concrete surface. Check that the anchor is vertical and aligned properly. This alignment helps the mudsill sit evenly and securely.
Securing With Fasteners
Next, use the correct fasteners to attach the wood mudsill to the anchor. Drive the screws or bolts through the anchor holes into the mudsill. Tighten the fasteners firmly but avoid over-tightening. Over-tightening can damage the wood or the anchor. Ensure all fasteners hold the mudsill tightly to prevent movement.

Credit: www.fastenersplus.com
Final Checks And Adjustments
Maintaining your Simpson MAB15 Mudsill Anchor is key to keeping your retaining wall safe and strong. Regular care helps avoid problems and extends the anchor’s life. Simple steps can protect your investment and ensure lasting performance.
Regular Inspection
Check the anchor at least twice a year. Look for signs of wear, rust, or damage. Inspect bolts and fasteners for tightness. Catching small issues early prevents bigger repairs later. Record your findings to track changes over time.
Preventing Corrosion
Keep the anchor dry and clean. Remove dirt, debris, and moisture around the base. Apply a rust-resistant coating if you see any metal exposure. Use protective paint or sealant to block water. Good drainage near the anchor reduces corrosion risk.
Credit: www.homedepot.com
Frequently Asked Questions
What Tools Are Needed To Install Simpson Mab15 Anchor?
You need a hammer drill, socket wrench, tape measure, and safety gear. These tools help ensure proper and secure installation of the MAB15 anchor in retaining walls.
How Deep Should The Mab15 Anchor Be Installed?
The anchor should be embedded at least 3 inches into concrete or masonry. Proper depth ensures maximum holding power and structural stability.
Can Mab15 Anchors Be Used In All Retaining Wall Types?
MAB15 anchors are best for concrete or masonry walls. They are not recommended for wood or block walls due to different material properties.
How To Ensure Correct Placement Of The Mab15 Anchor?
Measure and mark drill points accurately before installation. Proper spacing and alignment prevent wall damage and optimize anchor performance.
Conclusion
Installing the Simpson MAB15 mudsill anchor strengthens your retaining wall. Follow each step carefully for the best results. Use the right tools to make the job easier and safer. Check the anchor’s position before securing it tightly. This simple process helps keep your wall stable and secure.
Regular inspection can prevent future problems. Take your time and do it right. Strong walls protect your property and add value. Now, you are ready to install the anchor with confidence.