Are you looking for a fun and creative way to brighten up your walls? Making a latch hook wall hanging is easier than you think—and it’s a perfect project whether you’re new to crafting or want a relaxing hobby.
Imagine turning simple yarn into a soft, colorful piece that adds personality to your space. In this guide, you’ll discover step-by-step how to create your own unique wall art. By the end, you’ll have the skills to make something truly special that you’ll be proud to display or gift.
Ready to get started? Let’s dive in!
Materials Needed
Making a latch hook wall hanging starts with gathering the right materials. Choosing the best supplies helps create a beautiful and durable piece. Knowing what you need saves time and makes the process easier.
Choosing The Right Yarn
Select yarn that feels soft and looks bright. Acrylic yarn works well because it is strong and colorfast. Choose colors that match your design and style. Cut yarn into small pieces, about 2 to 3 inches long. Avoid very thin or slippery yarn as it can be hard to hook.
Selecting A Latch Hook Canvas
Pick a canvas with a clear grid pattern. Canvas size depends on your project size. A 10-by-10 inch canvas suits small designs. Larger canvases allow more detailed patterns. Make sure the canvas has square holes for easy hooking. Plastic canvas is also an option for sturdier hangings.
Essential Tools
A latch hook tool is necessary to pull yarn through the canvas. Choose a tool with a comfortable handle for easy gripping. Scissors help trim yarn ends neatly. A ruler or measuring tape keeps your pieces even. Have a pattern or design guide ready to follow.
Credit: www.youtube.com
Preparing Your Design
Starting your latch hook wall hanging means planning your design carefully. This step helps you create a clear and beautiful piece. Choose the right pattern and place it well on the canvas. A good design makes the project easier and more fun.
Take your time. Think about colors and shapes. This will guide you as you work with yarn and hook.
Picking A Pattern
Select a pattern that matches your skill level. Simple designs with big blocks of color are best for beginners. You can find patterns online or in craft books. You may also create your own pattern on graph paper. Use basic shapes or favorite images. Keep patterns small to finish quickly.
Transferring The Design To Canvas
Use latch hook canvas with clear squares. Mark the outline of your design lightly on the canvas. You can use a washable marker or pencil. Count the squares to match your pattern. This helps you place each yarn piece correctly. Work slowly to avoid mistakes. A clear guide on the canvas saves time later.
Basic Latch Hook Techniques
Basic latch hook techniques are essential for creating a beautiful wall hanging. These skills help you work faster and get a clean look. Understanding the tool and how to tie yarn makes the process simple and fun.
Practice these steps before starting your project. It builds confidence and ensures your design stays neat. Let’s explore the main techniques you need to know.
How To Use The Latch Hook Tool
Hold the latch hook tool like a pencil. The small metal latch at the tip opens and closes as you pull it through the canvas.
Slide the tool under one square of the canvas grid. Place a yarn piece on the hook. Pull the tool back through the canvas slowly.
The latch closes automatically, catching the yarn and pulling it through the hole. This locks the yarn in place. Repeat for each yarn piece.
Knotting And Securing Yarn
Cut yarn into equal lengths before starting. Usually, 2 to 3 inches work best. Fold the yarn piece in half to make a loop.
Push the loop through a canvas square with the latch hook tool. Pull the ends of the yarn through the loop. Pull tight to knot it securely.
This knot keeps yarn from falling out. Make sure knots are tight but not too tight. Loose knots can come undone easily.
Step-by-step Hooking Process
The step-by-step hooking process is key to creating a beautiful latch hook wall hanging. This method helps you place each yarn piece neatly. Following clear steps makes the work easier and more fun.
Start by understanding the base grid and yarn colors. Each step builds your design, making it come alive. Patience and care give the best results.
Starting Your Wall Hanging
Begin by securing your canvas on a flat surface. Find the first square on the grid. Cut yarn into equal lengths. Use the latch hook tool to pull yarn through the canvas. Make sure the yarn forms a tight knot. Work from the top left corner for better control.
Filling In The Pattern
Follow the pattern closely to match colors. Insert yarn in each square one by one. Check your work often for accuracy. Fill rows or small sections to avoid mistakes. Keep yarn strands smooth and straight. This helps your design look clean and sharp.
Tips For Even Yarn Placement
Hold the yarn firmly but gently while hooking. Use consistent tension to keep knots uniform. Avoid pulling yarn too tight or too loose. Space yarn pieces evenly for a balanced look. Trim any long strands to keep the surface neat. Regular breaks help maintain steady hands and focus.
Finishing Touches
Finishing touches give your latch hook wall hanging a neat, polished look. These final steps help your piece last longer and look professional. Small details make a big difference in your finished art. Follow these steps to complete your project with care and style.
Trimming And Shaping
Use sharp scissors to trim loose yarn ends. Cut evenly to shape the edges and create a clean outline. Trim any uneven or long strands to keep the design clear. Be gentle to avoid pulling or damaging the yarn. Shaping your wall hanging improves its overall appearance.
Adding A Backing Or Frame
Attach a fabric or felt backing to hide knots and yarn tails. This backing adds strength and stops the yarn from slipping. Use glue or sew the backing in place for a secure hold. Consider framing your piece for extra support and style. A frame makes your art ready to hang and display.
Hanging Your Wall Decor
Choose a sturdy hanger or rod for your wall hanging. Sew or glue loops to the top edge for easy hanging. Make sure the hanger can hold the weight of your piece. Hang your art in a spot with good lighting and space. Proper hanging shows off your creation beautifully and safely.
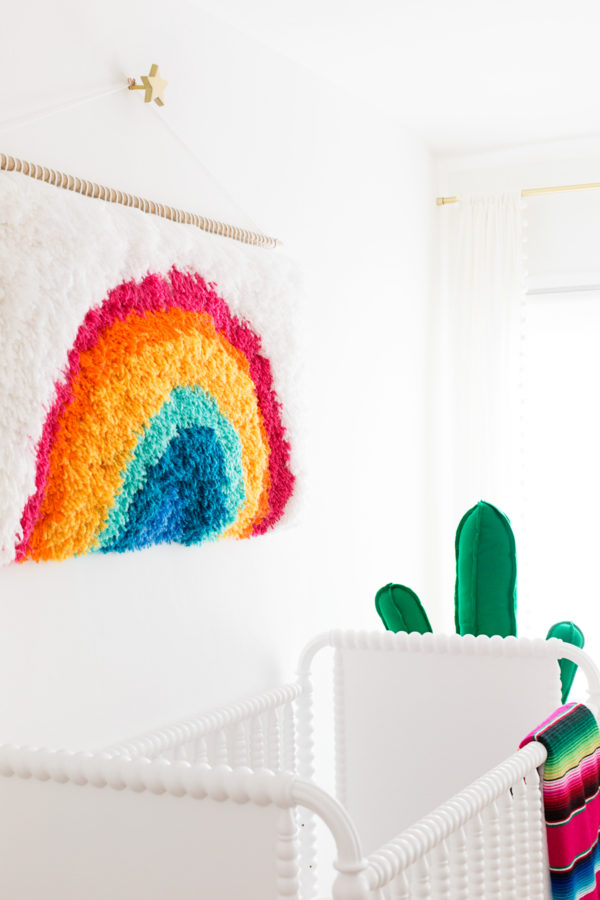
Credit: studiodiy.com
Creative Variations
Creative variations bring life to latch hook wall hangings. They let you explore new styles and textures. These ideas help your project stand out. Personal touches make your wall hanging unique. Experimenting with materials adds fun to crafting. Try different ways to make your piece special.
Using Different Yarn Textures
Choose yarn with various textures for fresh looks. Soft yarn creates a smooth, cozy feel. Thick yarn adds bulk and depth to the design. Rough yarn gives a rustic and natural touch. Mix smooth and rough yarns for contrast. Textured yarns catch light in interesting ways. These changes make your wall hanging more lively.
Incorporating Beads Or Embellishments
Beads add sparkle and detail to your wall hanging. Small beads fit well between yarn strands. Larger beads create bold focal points. Use wooden or metal beads for different styles. Sew or glue beads securely to the base. Embellishments bring a new dimension and shine. They turn simple designs into eye-catching art.
Troubleshooting Common Issues
Troubleshooting common issues in latch hook wall hanging helps keep your project neat and strong. Small problems can affect the final look. Fixing these issues early saves time and effort. Below are simple tips to solve frequent problems while making your wall hanging.
Fixing Loose Knots
Loose knots make your latch hook design weak and messy. To fix this, pull each knot tight right after hooking. Check knots regularly as you work. If a knot loosens, undo it carefully. Then, retie it firmly around the canvas. Use the latch hook tool to push the yarn snugly in place. Tight knots keep your wall hanging secure and looking good.
Dealing With Uneven Edges
Uneven edges can ruin the shape of your wall hanging. Trim extra yarn that sticks out beyond the canvas. Use sharp scissors for a clean cut. To prevent uneven edges, start hooking yarn from the center. Work your way outward slowly. This method keeps edges balanced. If edges still look rough, fold them under and sew a border. A neat edge gives your piece a polished finish.

Credit: www.youtube.com
Frequently Asked Questions
What Materials Are Needed For Latch Hook Wall Hanging?
You need a latch hook canvas, yarn, a latch hook tool, and a pattern or design. Optional items include scissors and a frame for finishing.
How Do You Start A Latch Hook Project?
Begin by securing your canvas and selecting yarn colors. Use the latch hook tool to pull yarn through canvas holes following your pattern.
How Long Does It Take To Make A Latch Hook Wall Hanging?
Time varies by size and complexity but usually takes several hours to days. Beginners may need more time to complete the project.
Can Beginners Easily Learn Latch Hooking Techniques?
Yes, latch hooking is beginner-friendly. Simple patterns and basic tools make it easy to learn with practice and patience.
Conclusion
Creating a latch hook wall hanging is fun and relaxing. You can choose colors and patterns you like best. Each step is simple and easy to follow. This craft helps you decorate your space with a personal touch. It also makes a great gift for friends or family.
Keep practicing to improve your skills and try new designs. Enjoy the process and show off your handmade art proudly. Crafting brings joy and a sense of calm. Give it a try and see how rewarding it feels.