Looking to hang something on your wall but unsure how to put a hook screw in the wall the right way? You’re not alone.
Getting it wrong can mean a crooked picture, a damaged wall, or even something falling down unexpectedly. But don’t worry—once you know the simple steps, you’ll feel confident and ready to tackle this task like a pro. Keep reading, and you’ll discover easy tips that save you time, protect your walls, and make sure your hooks hold strong every time.

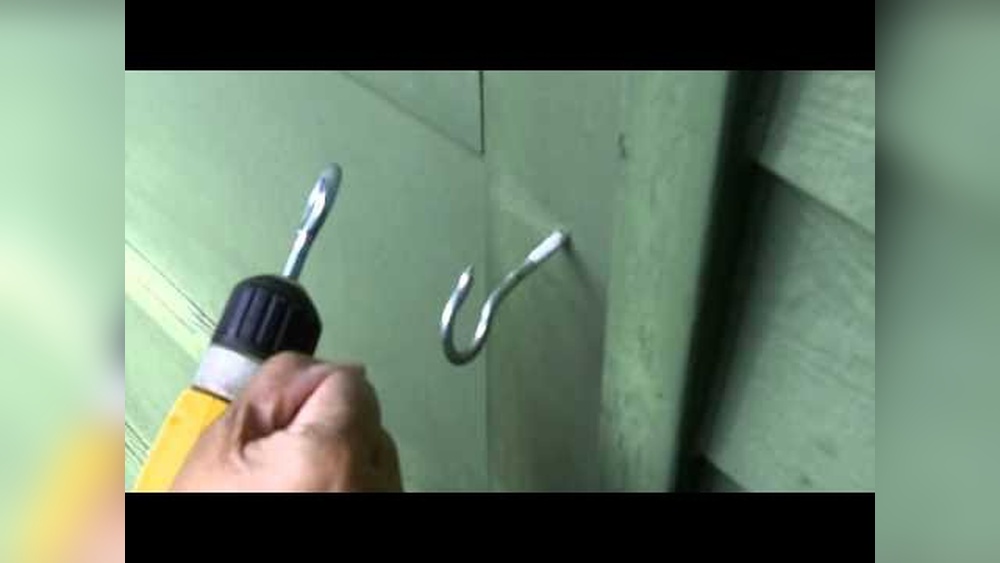
Credit: diy.stackexchange.com
Choosing The Right Hook Screw
Choosing the right hook screw is important for a secure hold. The correct hook screw prevents damage to your wall and keeps items safe. Different walls and loads need different hooks. This guide helps you pick the best hook screw for your project.
Types Of Hook Screws
Hook screws come in several shapes and sizes. The most common types are cup hooks, screw hooks, and eye hooks. Cup hooks are small and good for light items like keys. Screw hooks have a strong curve for heavier objects. Eye hooks form a closed loop for hanging ropes or chains. Pick the type that fits your hanging needs.
Matching Hook Screws To Wall Materials
Different walls need different hooks. Drywall requires hooks with anchors for strong support. Wood walls can hold screw hooks directly. Concrete or brick walls need special masonry hooks or anchors. Matching the hook screw to your wall type avoids damage and ensures safety.
Selecting The Proper Size
Size matters for hook screws. A small hook cannot hold heavy items safely. Large hooks might damage thin walls. Choose a hook screw length that goes deep enough for a firm grip. Also, consider the thickness of the item to hang. Correct size keeps your wall and item secure.
Gathering Necessary Tools
Before you start putting a hook screw in the wall, gather all the tools you need. Having the right tools makes the job easier and faster. It also helps you avoid mistakes and damage to your wall. Below are the tools you must have and some that might help with harder walls.
Essential Tools List
- Hook screw
- Drill or screwdriver
- Drill bit (size matching the hook screw)
- Wall anchors (if needed for extra support)
- Measuring tape or ruler
- Pencil or marker
- Level (to keep the hook straight)
Optional Tools For Tougher Walls
- Masonry drill bit for brick or concrete walls
- Hammer for wall anchors
- Stud finder to locate wooden studs
- Protective goggles to shield your eyes
- Vacuum or brush to clean dust from drilling
Preparing The Wall
Preparing the wall is a crucial step before inserting a hook screw. It ensures the hook stays secure and prevents damage to your wall. Taking time to prepare helps you place the hook in the best spot. It also protects hidden pipes and wires. Follow these simple steps for safe and strong installation.
Locating The Best Spot
Choose a spot that can hold the weight of the hook. Avoid weak places like thin drywall or damaged areas. Look for solid wood or wall studs behind the surface. These provide better support for heavy items. Use a stud finder or tap the wall to find firm spots. Pick a location that fits your needs and matches the hook size.
Marking The Drilling Point
Use a pencil to mark the exact spot for drilling. Make the mark small and clear. This helps keep the hole straight and accurate. Double-check the position to avoid mistakes. Correct marking leads to easier drilling and a tighter fit for the hook screw.
Checking For Hidden Utilities
Walls often hide electrical wires and plumbing pipes. Drilling into these can cause serious problems. Use a wire detector or stud finder with a wire sensor. Scan the area carefully before drilling. Avoid marked spots with utilities to keep yourself safe and prevent damage.
Drilling The Pilot Hole
Drilling the pilot hole is a key step to install a hook screw properly. It helps guide the screw and prevents the wall from cracking. The pilot hole should be the right size and depth for the hook screw. This makes sure the screw fits tight and holds strong.
Before drilling, prepare your tools and mark the spot carefully. Using the right drill bit and technique depends on the wall type. The goal is a clean hole that supports the hook screw well.
Choosing The Right Drill Bit
Select a drill bit that matches the hook screw size. Usually, the bit should be slightly smaller than the screw’s diameter. This gives the screw threads a good grip in the wall.
Use a wood bit for wooden walls and a masonry bit for brick or concrete. Metal bits work best for drywall with metal studs. Picking the correct bit reduces damage and makes drilling easier.
Drilling Techniques For Different Walls
For drywall, drill slowly to avoid breaking the surface. Use a small bit to start, then widen the hole if needed. Drywall is soft, so a gentle touch works best.
Brick or concrete walls need a masonry bit and steady pressure. Drill straight and keep the drill perpendicular to the wall. Pause often to clear dust and prevent overheating.
Wood walls require a sharp wood bit and steady speed. Drill the pilot hole deep enough for the full length of the screw. Avoid pushing too hard to keep the hole clean.
Inserting The Hook Screw
Inserting a hook screw into the wall is a simple task that anyone can do. It holds items like pictures, plants, or decorations firmly. Doing it right ensures safety and prevents damage to your walls. This section will guide you through the best ways to insert a hook screw.
Manual Vs. Power Tools
Using your hands to screw in a hook is easy for small hooks. It gives you control and feels safer. Twist the hook slowly and steadily until it goes into the wall. You will feel resistance as the hook bites into the surface.
Power tools make work faster, especially for bigger hooks or hard walls. An electric drill with a screwdriver bit helps start the hole. This reduces effort and stops the wall from cracking. Be careful not to push too hard or drill too deep.
Ensuring Secure Installation
Pick the right spot on the wall. Avoid areas with wires or pipes behind. Use a stud finder if possible. Studs provide strong support for heavy items.
Start by making a small pilot hole with a drill or nail. This guides the hook and prevents wall damage. Insert the hook slowly and check its tightness. It should feel firm and not wobble.
Test the hook by gently pulling on it. If it feels loose, try tightening or repositioning it. A well-fixed hook keeps your items safe and your wall intact.

Credit: www.wikihow.com
Using Wall Anchors
Using wall anchors helps secure hook screws in walls that cannot hold screws alone. Anchors provide extra grip and support. They stop the hook from pulling out or loosening over time.
Anchors come in different types for various wall materials. Choosing the right one ensures your hook stays strong and safe.
When Anchors Are Needed
Use anchors in drywall, plaster, or hollow walls. These walls are too soft for screws alone. Anchors spread the weight across a larger area. They prevent damage and keep the hook steady. Also, use anchors for heavy items or if the hook feels loose.
Types Of Wall Anchors
Plastic expansion anchors are common and easy to use. They work well in drywall and light loads. Metal anchors provide stronger support for heavier items. Toggle bolts expand behind the wall for maximum hold. Self-drilling anchors screw directly into the wall without pre-drilling. Choose based on wall type and hook weight.
Installing Anchors Properly
Start by marking the spot for the hook. Drill a hole that fits the anchor size. Push or tap the anchor into the hole until flush with the wall. Insert the hook screw into the anchor and turn it slowly. Tighten firmly but avoid over-tightening. The hook should feel solid and stable.
Testing The Hook Screw
Testing the hook screw after installation is important. It ensures the hook can hold the items safely. A poorly tested hook may fall, causing damage or injury. The two main checks are weight capacity and stability. These simple tests help confirm the hook is secure and ready to use.
Weight Capacity Checks
Start by gently applying weight to the hook. Use the item you plan to hang or a similar object. Pull down slowly to see if the hook holds firmly. If the hook moves or slips, it may not support the weight. Try smaller weights first, then increase gradually. Never exceed the hook’s recommended weight limit.
Observe closely for any cracks or looseness in the wall. These signs mean the hook is not secure. Adjust or reinstall the hook if needed before adding more weight. Repeat the test until you are confident the hook can carry the load safely.
Adjusting For Stability
If the hook feels loose, tighten it carefully. Use a screwdriver or your hand, depending on the hook type. Avoid over-tightening, which can damage the wall or hook. Check for wobbling by gently shaking the hook side to side. A stable hook stays firm without moving.
Sometimes adding a wall anchor improves stability. Anchors give extra support for heavier items. Install the anchor before putting in the hook screw. Test the hook again after adjustments to ensure it holds steady. A stable hook gives peace of mind and protects your belongings.

Credit: www.ebay.com
Common Mistakes To Avoid
Putting a hook screw in the wall seems simple but mistakes can cause problems. Avoiding common errors saves time and keeps your wall safe. Learn what to watch out for to get the job done right.
Over-tightening Issues
Turning the hook screw too hard can damage the wall. It may crack or break the surface. The screw can also bend or strip its threads. Stop turning as soon as the hook feels secure.
Ignoring Wall Material Differences
Not all walls are the same. Drywall, plaster, and brick need different hooks and tools. Using the wrong type can cause the hook to fall out. Check your wall material before starting.
Skipping Safety Precautions
Forgetting safety steps risks injury or damage. Wear goggles to protect your eyes from dust. Use a stud finder to avoid drilling into wires or pipes. Take your time and work carefully.
Frequently Asked Questions
How Do I Choose The Right Hook Screw Size?
Select a hook screw based on the wall material and item weight. Use thicker screws for heavier objects and drywall anchors for added support.
What Tools Do I Need To Install A Hook Screw?
You need a drill, wall anchors (if drywall), a screwdriver, and a hook screw. A pencil helps mark the spot accurately.
Can I Install Hook Screws In Drywall Without Anchors?
No, drywall alone may not support weight. Use anchors to prevent damage and ensure the hook screw holds firmly.
How Deep Should I Drill Before Inserting A Hook Screw?
Drill a pilot hole slightly smaller than the screw’s diameter. This ensures easy insertion and prevents wall damage.
Conclusion
Putting a hook screw in the wall is simple with the right steps. Start by choosing the right spot and tools. Drill a small hole if the wall is hard. Screw the hook in carefully to avoid damage. Test the hook by gently pulling on it.
This will keep your items safe and secure. Practice makes perfect, so don’t rush. Soon, hanging pictures or decorations will feel easy. Keep these tips in mind for your next project.