Have you ever wished you could control one light from two different switches? Whether it’s for convenience, safety, or just to add a smart touch to your space, connecting two light switches to one light can make a big difference.
Imagine turning on your hallway light both at the top and bottom of the stairs without walking back and forth. In this guide, you’ll discover simple, clear steps to make this happen—even if you’re not an expert. Ready to take control of your lighting and make your home more functional?
Keep reading, because this is easier than you think.
Credit: www.reddit.com
Tools And Materials Needed
Before starting to connect two light switches to one light, gather the right tools and materials. Having everything ready makes the job easier and safer. This section lists the basic items needed for this electrical project.
Tools Required
You will need a screwdriver set with flathead and Phillips heads. A voltage tester helps ensure the power is off before working. Wire strippers make it easy to remove insulation from wires. Needle-nose pliers assist in bending and twisting wires. A drill may be useful for mounting switches if needed.
Materials Needed
Buy two single-pole light switches designed for household use. Use electrical wire, typically 14/3 or 12/3 gauge, suitable for switch wiring. Wire nuts are necessary to connect wires safely. Electrical tape helps secure wire nuts and prevent shorts. A light fixture compatible with the switches completes the setup.
Safety Equipment
Wear insulated gloves to protect against electric shocks. Safety goggles guard your eyes from debris or sparks. Have a flashlight or headlamp ready if the power is off. A circuit breaker finder can help identify the correct breaker to switch off.
Safety Precautions
Always turn off the power before working with electrical wires to avoid shocks. Use a tester to check that wires are not live. Follow wiring instructions carefully to ensure safe connections.
Turn Off Power At The Circuit Breaker
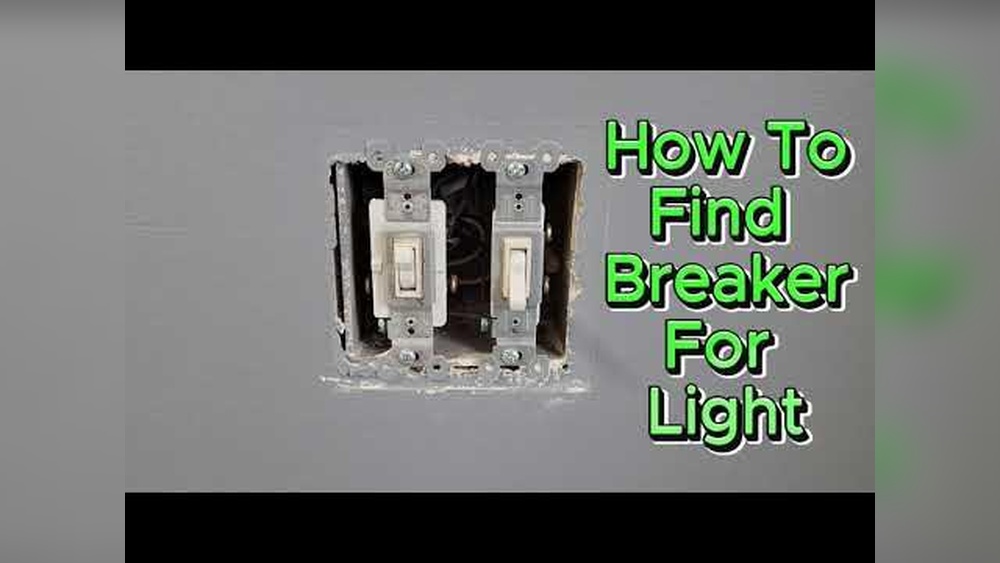
Always switch off the power before starting any electrical work. This stops the risk of electric shock. Find the correct breaker and turn it off. Double-check by flipping the light switch to see if the light goes off. Safety first.
Use A Voltage Tester
Use a voltage tester to confirm no electricity flows in the wires. Touch the tester to each wire carefully. If the tester shows no power, it is safe to proceed. Never skip this step.
Wear Protective Gear
Wear rubber gloves to protect your hands from shocks. Use safety glasses to guard your eyes from sparks or dust. Dress properly to avoid accidents. Simple gear can prevent serious injuries.
Follow Wiring Diagrams
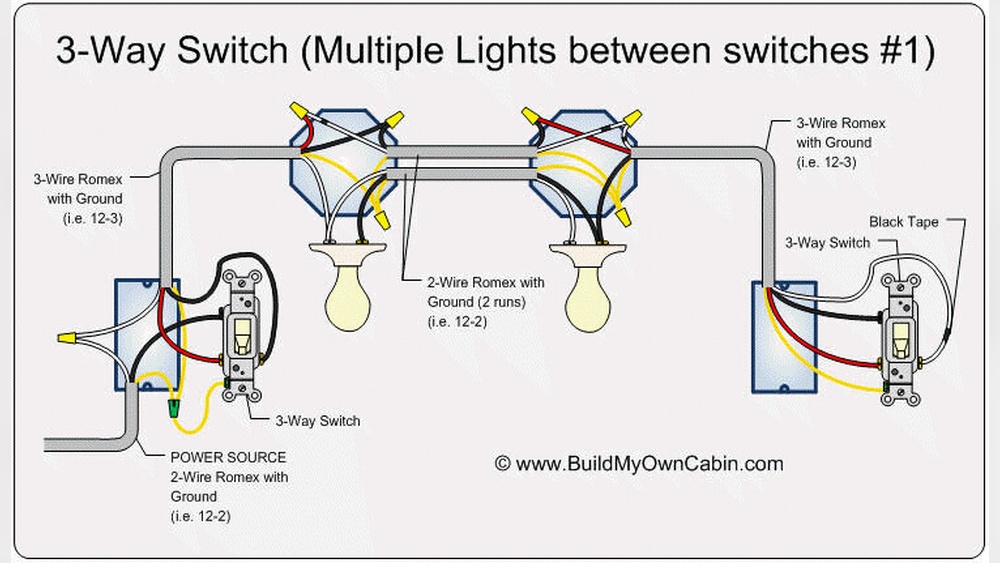
Use clear wiring diagrams designed for two switches and one light. Incorrect connections can cause short circuits or fires. Study the diagram carefully before starting. Take your time.
Use Proper Tools
Use insulated tools made for electrical work. Avoid using damaged or worn-out tools. Proper tools make the job easier and safer. Keep them in good condition.
Check Local Electrical Codes
Check local electrical rules before starting. Some places need permits or inspections. Following rules keeps your home safe and legal. Stay informed to avoid fines.
Types Of Switches For Two-way Control
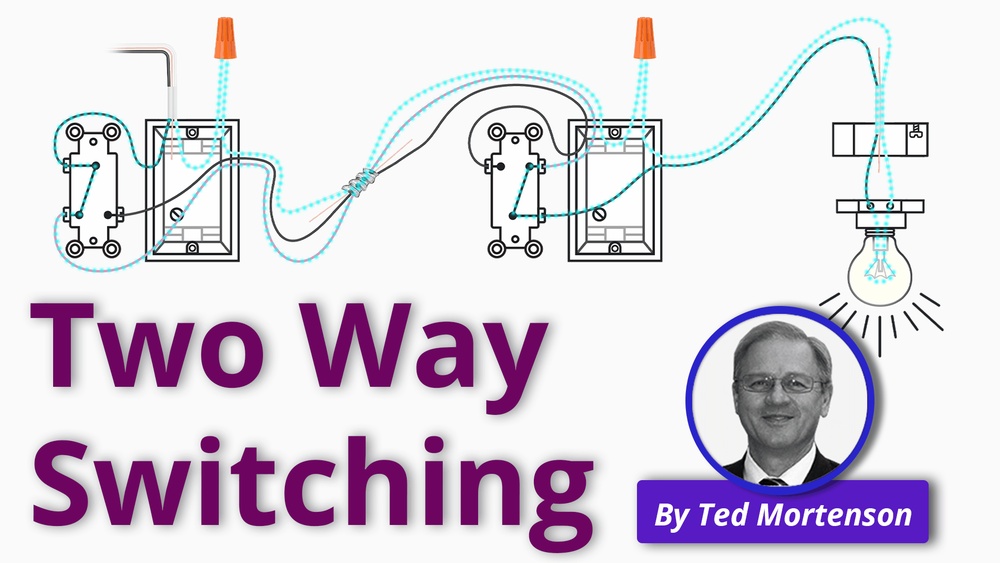
Two-way control allows you to operate one light from two different switches. This setup is common in hallways, stairs, or large rooms. Different switches make this possible. Choosing the right type is key for a smooth installation and reliable use.
Single-pole Double-throw (spdt) Switches
SPDT switches have three terminals. They let current flow between one common terminal and either of two others. This design supports two-way control with simple wiring. SPDT switches are popular in basic two-switch light circuits. They offer clear on/off control from two locations.
Three-way Switches
Three-way switches are a common US term for SPDT switches. They work the same way, with three terminals. These switches enable you to control one light from two spots. Wiring connects the switches using traveler wires. Three-way switches are easy to find in hardware stores and fit most homes.
Basic Wiring Concepts
Understanding basic wiring concepts is key to connecting two light switches to one light. These concepts explain how electricity flows through wires. Knowing the role of each wire helps you wire safely and correctly.
Live, Neutral, And Ground Wires
The live wire carries electricity from the power source to the switch. It is usually red or brown. The neutral wire completes the circuit by carrying electricity back to the power source. It is often blue or black. The ground wire is a safety wire. It helps prevent electrical shocks and is usually green or bare copper.
Traveler Wires
Traveler wires connect two switches in a multi-way switch setup. They carry current between the switches. Traveler wires are usually two separate wires in the same cable. Their color varies but often are red and black. These wires allow either switch to control the light.
Step 1: Turn Off Power
Always cut off power from the main switch before starting any electrical work. This step keeps you safe from electric shocks. Double-check by using a tester to ensure the power is really off.
Safety is the top priority when working with electricity. Turning off the power stops electricity flow to the light switch. This helps prevent electric shock or injury.
Before starting, locate the main electrical panel. This is usually in the basement, garage, or utility room. Find the circuit breaker that controls the light switch you want to work on.
Switch off the correct breaker to cut power to the switch. Double-check by flipping the light switch on and off. The light should not turn on if power is off.
Locate Your Circuit Breaker
Look for a labeled panel with switches inside. Each switch controls different parts of your home. Find the one marked for your light or room.
If labels are missing, turn off one breaker at a time. Check the light switch after turning off each breaker. This method helps identify the correct breaker.
Use A Voltage Tester
A voltage tester shows if wires have electricity. Touch the tester to the switch wires after turning off power. If no light or sound comes from the tester, power is off.
This step confirms that you can work safely without risk of shock. Never skip testing wires before touching them.
Take Extra Safety Steps
Wear insulated gloves to protect your hands. Use tools with insulated handles to avoid accidents. Keep your work area dry and well-lit.
Remember, safety first. Turning off power protects you and your home. Do not start wiring until you are sure power is off.

Credit: diy.stackexchange.com
Step 2: Prepare The Switch Boxes
Step 2 is all about getting the switch boxes ready. This step is important for a safe and neat connection. Proper preparation makes the wiring easier to handle. It also helps to avoid mistakes later on.
Start by turning off power to the switches at the circuit breaker. Safety first. Use a voltage tester to be sure no electricity flows in the wires. This keeps you safe while working.
Remove The Existing Switches
Take off the switch covers carefully. Unscrew the switches from the boxes. Pull the switches out gently to see the wires behind. Note how wires connect to the switches. You may take a photo to remember the setup.
Check The Switch Boxes Size
Look inside the boxes. They must be large enough for extra wires. Crowded boxes can cause problems later. Replace old or small boxes with bigger ones if needed. This gives enough room for safe wiring.
Inspect The Wiring
Look at the wires in each box. Check for damaged or frayed wires. Replace any damaged wires before proceeding. Make sure you have enough wire length to connect switches. If wires are too short, extend them with new wire.
Step 3: Connect The First Switch
Step 3 focuses on connecting the first switch in your dual-switch setup. This step is crucial because it sets the foundation for controlling the light from two points. Take your time and follow each instruction carefully for a safe and effective connection.
Turn Off Power
Always switch off the power at the circuit breaker before starting. This prevents electric shock and keeps you safe while working. Use a voltage tester to ensure no current flows through the wires.
Identify Wires
Locate the common wire, traveler wires, and ground wire in the switch box. The common wire usually carries power from the source. Traveler wires connect the two switches. The ground wire ensures safety.
Connect The Common Terminal
Attach the common wire to the common terminal on the first switch. This terminal is often marked or colored differently. Secure the wire tightly to avoid loose connections.
Attach Traveler Wires
Connect the two traveler wires to the traveler terminals on the switch. These terminals allow the switch to communicate with the second switch. Ensure each wire is firmly connected.
Connect The Ground Wire
Connect the ground wire to the green grounding screw on the switch. Grounding protects against electrical faults. Tighten the screw securely to maintain a good ground connection.
Step 4: Wire The Second Switch
Connect the wires to the terminals on the second switch carefully. Match the traveler wires to the same screws used on the first switch. Tighten all connections to ensure they are secure.
Preparing The Second Switch
Start by turning off the power to the circuit at the breaker. Safety first. Use a voltage tester to confirm no electricity flows. Remove the cover plate and unscrew the old switch if there is one. Check the wires connected to the switch box. Identify the traveler wires and the common terminal.
Connecting The Traveler Wires
Take the two traveler wires coming from the first switch. Connect them to the traveler terminals on the second switch. These terminals usually have brass screws. Tighten the screws securely but do not overtighten. Ensure the wires are wrapped clockwise around the screws for a solid connection.
Attaching The Common Wire
Find the common wire on the second switch. This wire controls the power flow to the light. Connect it to the common terminal, often a black or dark-colored screw. Double-check that this wire is firmly attached to avoid loose connections that cause flickering.
Securing The Ground Wire
Locate the ground wire, usually bare copper or green. Connect it to the green ground screw on the switch. This step is vital for safety and code compliance. If the box is metal, attach a ground wire to it as well. Tighten all screws properly for a safe setup.
Final Checks Before Closing
Inspect all connections carefully. Make sure no wires touch other terminals or each other. Push the wires gently back into the box. Screw the switch into place without pinching any wires. Attach the cover plate securely. Restore power and test both switches to confirm correct operation.
Step 5: Connect The Light Fixture
Step 5 is the moment to connect the light fixture to your wiring. This step completes the circuit and lets your switches control the light.
Take your time to ensure all wires are connected safely and correctly. A good connection means your light will work without flickering or problems.
Turn Off The Power
Before touching wires, switch off the power at the breaker. This keeps you safe from electric shock. Use a tester to confirm no electricity flows to the fixture.
Connect The Ground Wire
Attach the ground wire from the light fixture to the ground wire in the box. This wire is usually green or bare copper. Secure them with a wire nut.
Join The Neutral Wires
Find the neutral wire from the fixture, typically white. Connect it to the neutral wires in the electrical box. Twist them together tightly and cover with a wire nut.
Connect The Hot Wire
Identify the hot wire on the fixture, often black or red. Connect this wire to the traveler or switched hot wire from your switches. Use a wire nut to secure the connection.
Secure The Fixture
After wiring, carefully tuck the wires into the box. Mount the light fixture as the instructions say. Tighten screws to hold it firmly in place.
Step 6: Double Check Connections
Step 6 is very important. Double checking connections ensures safety and proper function. It helps avoid loose wires and short circuits. Take time to review every connection carefully.
Check each wire to make sure it is tight and secure. Loose wires can cause flickering or failure. Use a screwdriver to gently tighten all terminal screws.
Inspect Wire Positions
Make sure wires are in the right terminals. Match the wires with the correct labels or colors. Wrong wire placement can cause the switches to not work properly.
Look For Exposed Wires
Exposed wires can cause electric shocks or shorts. Cover any bare wire ends with electrical tape. Use wire nuts to connect wires safely.
Verify Ground Connections
The ground wire keeps the circuit safe. Check that the ground wire is connected to both switches and the light fixture. A proper ground prevents electric shocks.
Test Switch Operation Before Closing
Turn on the power and test both switches. Each switch should turn the light on and off. If something is wrong, turn off the power and check again.
Step 7: Restore Power And Test
Step 7 is the moment of truth. It involves restoring power and testing your work to ensure everything functions correctly.
After wiring two light switches to one light, this step confirms your effort was successful and safe.
Turn The Circuit Breaker Back On
Locate your home’s circuit breaker panel. Find the switch you turned off earlier. Flip it back to the “on” position. This action restores power to the light switches.
Test Each Switch Separately
Go to the first switch and flip it on. Check if the light turns on. Then, flip it off. Repeat the process with the second switch. Both switches should control the light independently.
Check For Any Issues
Look for flickering or no light at all. Listen for any unusual sounds. If everything works smoothly, your wiring is correct. If not, turn off the breaker and review your connections.
Safety Reminder
Always make sure your hands are dry while testing. Do not touch any wires or terminals. If unsure, seek help from a professional electrician.

Credit: www.realpars.com
Troubleshooting Common Issues
Troubleshooting common problems helps keep your two-switch setup working well. Small issues often cause big headaches. Checking these problems saves time and effort. Follow simple steps to find and fix faults.
Light Not Turning On
Check the bulb first. It might be burnt out or loose. Look at the wiring connections in each switch box. Loose wires stop the light from turning on. Make sure power is on at the breaker panel. Test the switches one by one. Replace the bulb if needed.
Switches Not Working Together
Both switches should control the light properly. If not, check the wiring setup. The traveler wires may be swapped or disconnected. Use a voltage tester to find the problem. Confirm each switch is a three-way switch. Replace faulty switches for smooth operation.
Flickering Light
Flickering shows a poor connection. Check the bulb for a tight fit. Inspect wires for damage or looseness. Loose wiring inside switches or the fixture causes flickers. Tighten screws and connectors. Replace damaged wires to stop flickering.
Tips For Neat And Safe Wiring
Keeping wiring neat and safe is important when connecting two switches to one light. Good wiring prevents accidents and makes future repairs easier. Organize wires clearly and follow safety rules carefully.
Use the right tools and materials. Avoid overcrowding wires in the box. Proper spacing helps prevent overheating and short circuits. Label wires if needed to avoid confusion later.
Use Color-coded Wires For Easy Identification
Choose wires with standard colors for each function. Black or red for hot wires. White for neutral wires. Green or bare wire for ground. This makes wiring safer and simpler to check.
Secure Wires With Proper Connectors
Twist wires tightly together before adding connectors. Use wire nuts or terminal blocks rated for your wire size. Loose connections can cause sparks or power loss. Check that all connectors fit firmly.
Keep Wire Lengths Manageable
Cut wires to fit the space without excess slack. Too long wires create clutter and risk tangling. Too short wires can pull loose or break. Measure carefully before cutting.
Protect Wiring With Electrical Tape And Boxes
Wrap exposed wire ends with electrical tape for extra safety. Use junction boxes to house all connections. Boxes protect wires from damage and reduce fire risk. Always cover boxes with proper lids.
Frequently Asked Questions
How Do I Wire Two Switches To One Light?
To wire two switches to one light, use a three-way switch setup. This allows control from two locations by connecting traveler wires between the switches. Proper wiring ensures safe, efficient operation and requires following electrical codes.
Can I Use Regular Switches For Two-switch Control?
No, regular single-pole switches cannot control one light from two locations. You need special three-way switches designed for this purpose. Three-way switches have additional terminals for traveler wires to enable two-way control.
Is It Safe To Install Two Switches On One Light?
Yes, installing two switches for one light is safe if done correctly. Use proper three-way switches, follow wiring instructions, and turn off power before installation. When unsure, consult a licensed electrician to ensure safety and compliance.
What Tools Do I Need For Connecting Two Switches?
You need a screwdriver, wire stripper, voltage tester, electrical tape, and wire nuts. These tools help you safely strip wires, test power, and secure connections when wiring two switches to one light.
Conclusion
Connecting two light switches to one light is easier than it seems. Follow each step carefully and stay safe. Use the right tools and check your work twice. This setup gives you more control over your lighting. It can save energy and add convenience.
Take your time and ask for help if needed. Soon, you’ll enjoy switching your light from two places. Simple changes can improve your home a lot. Keep practicing and learning new skills. You’ve got this!