Have you ever struggled with a confusing 4 way light switch that just won’t work right? Changing it might seem tricky, but with the right steps, you can fix it yourself quickly and safely.
Imagine saving money and gaining confidence by handling this common home task on your own. In this guide, you’ll discover simple, clear instructions that make changing your 4 way light switch easier than you thought. Keep reading, and by the end, you’ll have the know-how to brighten your space without calling an electrician.
Tools And Materials Needed
Changing a 4 way light switch needs the right tools and materials. These items make the work safe and simple. Prepare them before starting your project. This saves time and avoids frustration.
Each tool has a specific job in the process. Using the correct materials ensures your switch works well. Here is what you need for this task.
Essential Tools For Changing A 4 Way Switch
- Flathead screwdriver – to remove switch covers and screws
- Phillips screwdriver – for screws with a cross shape
- Voltage tester – to check if wires carry electricity
- Wire stripper – to strip the insulation from wires
- Needle-nose pliers – for bending and holding wires
- Electrical tape – to cover wire connections safely
- Flashlight – to see clearly in dark areas
Materials Required For The Switch Replacement
- New 4 way switch – matches your old switch type
- Wire nuts – to connect wires securely
- Replacement wires (optional) – if old wires are damaged
- Switch plate cover – to fit the new switch

Credit: www.reddit.com
Safety Precautions
Changing a 4 way light switch requires careful attention to safety. Electricity can be dangerous if not handled properly. Taking safety steps protects you from shocks and accidents. Follow these precautions closely to work safely and confidently.
Turn Off Power At The Circuit Breaker
Always switch off the power at the circuit breaker before starting. Do not rely on the wall switch alone. Use a voltage tester to confirm the power is off. This step prevents electric shocks while working on the switch.
Use Insulated Tools
Choose tools with insulated handles. These tools reduce the risk of electric shock. Never use metal tools without insulation near live wires. Insulated tools keep you safer when handling wires.
Wear Safety Gear
Wear rubber-soled shoes to avoid grounding yourself. Use safety glasses to protect your eyes from sparks or dust. Avoid loose clothing that could catch on wires or tools. Safety gear helps prevent injuries during the task.
Work In A Dry Environment
Ensure the area around the switch is dry. Water and electricity do not mix well. Dry hands and tools before touching any electrical parts. A dry workspace lowers the risk of electric shock.
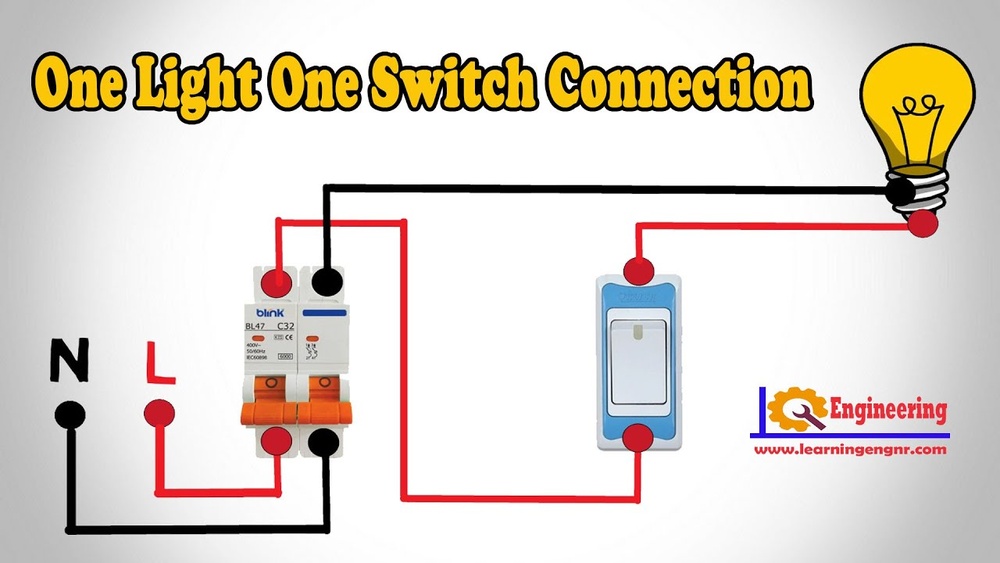
Follow Proper Wiring Diagrams
Use the correct wiring diagram for your 4 way switch setup. Incorrect wiring can cause short circuits or damage. Double-check connections before turning the power back on. Proper wiring ensures safe and reliable switch operation.
Identifying A 4 Way Switch
Identifying a 4 way switch is the first step in changing it. Knowing the right switch helps avoid mistakes and saves time. A 4 way switch is part of a multi-switch setup that controls one light from three or more places.
This type of switch works between two 3 way switches. It allows the light to be turned on or off from several locations. Recognizing it by look and function helps you handle the wiring correctly.
What Does A 4 Way Switch Look Like?
A 4 way switch has four terminal screws on the back. These screws connect to wires that carry electricity. Unlike regular switches, it does not have a simple on/off label.
The switch toggles between two sets of terminals. It often has a rectangular shape and is larger than a standard switch. Sometimes, it also has a label saying “4 way” or “4W.”
Where To Find A 4 Way Switch?
A 4 way switch is usually found in hallways, staircases, or large rooms. It sits between two 3 way switches in the circuit. Check the switches controlling the same light fixture to spot it.
Look for the switch without a light fixture directly connected to it. This switch controls the current flow between the other two 3 way switches.
How To Test If A Switch Is A 4 Way?
Turn off the power before testing any switch. Remove the switch cover and check the wiring. A 4 way switch has four wires connected to the terminal screws.
Use a voltage tester to check if power flows through the switch. The tester shows if the switch controls current between two other switches. No light fixture wiring means it is a 4 way switch.

Credit: www.youtube.com
Turning Off Power
Turning off the power is the most important step before changing a 4 way light switch. It keeps you safe from electric shocks. Never start any electrical work without cutting the power first.
Electricity can be dangerous. Even a small mistake can cause injury or damage. Taking the time to turn off the power protects you and your home.
Locate The Main Circuit Breaker
Find the main circuit breaker box in your home. It is usually in the basement, garage, or utility room. Look for the breaker labeled for the lighting or the area where the switch is located.
Turn Off The Correct Breaker
Switch off the breaker that controls the 4 way light switch circuit. This stops electricity from flowing to that switch. Double check by flipping the switch and seeing if the lights turn off.
Use A Voltage Tester
Before touching any wires, use a voltage tester. This tool confirms if the power is really off. Test the wires carefully to avoid any shock risk. Never skip this step.
Inform Others In The House
Tell everyone in the house about the power shutdown. This prevents anyone from turning the breaker back on by mistake. Safety is a team effort.
Removing The Old Switch
Wiring the new 4 way switch is an important step to ensure your lighting works correctly. This process involves careful matching of wires and secure connections. Follow the steps carefully for a safe and efficient setup.
Matching Wire Colors
Start by identifying the wire colors in your switch box. Most 4 way switches use black, red, and white wires. Match each wire on the new switch to the same color wire in the box. This helps keep the circuit consistent and safe.
Connecting Traveler Wires
The traveler wires usually have red and black colors. Connect these traveler wires to the traveler terminals on the 4 way switch. These connections allow the switch to communicate with other switches in the circuit.
Securing Ground Wire
Locate the ground wire, usually green or bare copper. Attach it to the green ground screw on the switch. Proper grounding protects against electrical shocks and keeps the wiring safe.
Wiring The New 4 Way Switch
Testing the new 4 way light switch is an important step. It ensures the switch works correctly and safely before you finish the job. This process helps you catch wiring mistakes or faulty switches early. Follow these simple steps to check your work and enjoy your new switch setup.
Turn The Power Back On
First, restore power at the circuit breaker. This allows electricity to flow to the switch. Never test the switch with power off. Safety first.
Check Each Switch Position
Flip each switch in the circuit one by one. Watch the light to see if it turns on or off as expected. The light should respond from any switch. This confirms proper wiring.
Use A Voltage Tester
Use a voltage tester to check for power at the switch terminals. This tool helps confirm electricity flow. It also ensures no live wires touch accidentally.
Look For Flickering Or Delays
Observe the light for flickering or delays when switching. These signs may show loose connections or a bad switch. Fix these issues before finalizing.
Testing The New Switch
Troubleshooting common issues helps solve problems with a 4 way light switch. Many issues occur due to wiring errors or worn parts. Fixing these issues saves time and prevents bigger problems later.
Understanding typical problems makes repairs easier. Follow simple steps to identify and fix faults safely.
Check For Loose Wiring Connections
Loose wires cause flickering lights or no power. Turn off the power before inspecting wires. Tighten any loose connections. Ensure wires are connected to the right terminals.
Test The Switches For Faults
Faulty switches stop lights from working properly. Use a voltage tester to check each switch. Replace switches that do not respond or feel stuck. Proper switch function ensures the system works correctly.
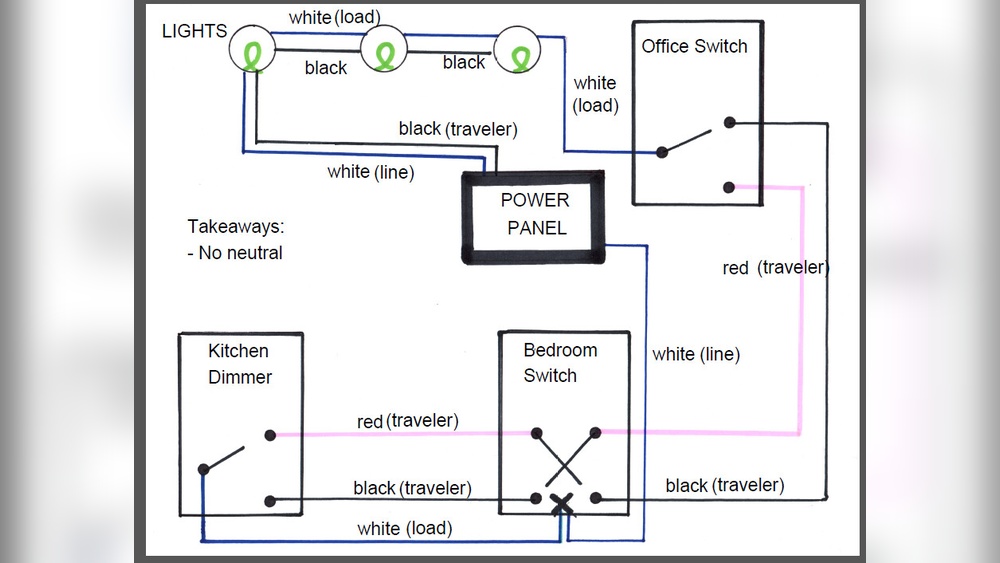
Verify Correct Wiring Sequence
Incorrect wiring creates confusion and malfunctions. Follow the wiring diagram carefully. Confirm traveler wires connect between 3 way and 4 way switches. Wrong connections cause switches to fail.
Look For Damaged Components
Damaged switches or wires cause shorts or no light. Inspect for cracks, burn marks, or frayed wires. Replace any damaged parts immediately. Safe parts prevent electrical hazards.
Confirm Power Supply To The Circuit
No power means the switch cannot work. Check the circuit breaker or fuse box. Reset breakers or replace blown fuses if needed. Power must reach the switch for it to operate.

Credit: www.youtube.com
Frequently Asked Questions
What Tools Are Needed To Change A 4 Way Light Switch?
You need a screwdriver, voltage tester, wire stripper, and electrical tape. These tools help safely remove and install the switch.
How Do You Identify A 4 Way Light Switch?
A 4 way switch has four terminal screws and connects between two 3 way switches. It controls lights from three or more locations.
Is It Safe To Change A 4 Way Light Switch Yourself?
Yes, if you turn off power at the breaker and use a tester to confirm no electricity flows. Follow instructions carefully.
How Do You Wire A 4 Way Light Switch Correctly?
Connect traveler wires to the middle terminals and line/load wires to the ends. Match wire colors and tighten screws securely.
Conclusion
Changing a 4-way light switch is simple with the right steps. Turn off power first to stay safe. Follow each step carefully and check your work. Take your time and avoid rushing. You can improve your home lighting by doing this yourself.
Practice makes perfect, so don’t feel worried. Soon, you will handle basic electrical tasks with ease. Keep tools and instructions handy for future repairs. Enjoy the confidence that comes with fixing things on your own.