Have you ever wished you could control your room’s lighting from two different spots? Maybe a hallway switch that turns on the living room light or a bedroom switch that controls the hallway lamp.
Adding another switch to an existing light can make your daily routine smoother and more convenient. But how do you do it without calling an electrician or dealing with confusing wires? In this guide, you’ll discover simple steps that anyone can follow to add that extra switch, saving you time and hassle.
Ready to make your home smarter and more functional? Let’s dive in.

Credit: www.finehomebuilding.com
Tools And Materials Needed
Adding another switch to an existing light requires some basic tools and materials. Having the right items makes the job easier and safer. This list covers everything needed for a smooth installation.
Tools Needed
- Screwdriver (flathead and Phillips)
- Wire stripper
- Voltage tester
- Drill with bits
- Needle-nose pliers
- Measuring tape
- Flashlight or work light
Materials Required
- Two-way light switch
- Electrical wire (14/3 or 12/3 cable)
- Wire nuts
- Electrical tape
- Switch box
- Wall plate
- Wire connectors
Safety Gear
- Insulated gloves
- Safety goggles
- Dust mask (if drilling)
- Non-conductive shoes

Credit: www.youtube.com
Safety Precautions
Working with electrical wiring can be risky. Safety must be your top priority. Taking the right precautions protects you and your home.
Before starting, prepare your workspace carefully. Avoid hazards that can cause shocks or injuries. Follow clear safety steps to keep the job safe and smooth.
Turn Off The Power
Always switch off power at the circuit breaker. Never rely on the wall switch alone. Use a voltage tester to confirm no electricity flows to the wires.
Use Proper Tools
Choose tools made for electrical work. Insulated screwdrivers and pliers reduce shock risks. Avoid using damaged or worn tools.
Wear Safety Gear
Wear rubber-soled shoes and safety glasses. Gloves can protect your hands from cuts and shocks. Keep your clothes tight to avoid snagging.
Check Local Codes
Follow local electrical codes and regulations. They ensure safe and legal wiring. Contact a professional if unsure about rules.
Work In A Dry Area
Never work near water or damp places. Wet conditions increase the chance of electric shock. Ensure the area is dry before starting.
Types Of Switches For Multiple Controls
Adding another switch to control the same light requires choosing the right type of switch. Different switches work best for various wiring setups and control needs. Understanding these switch types helps make the installation easier and ensures smooth operation.
Each switch type lets you control one light from more than one location. Some switches are simple, while others need extra wiring or special devices. Knowing the differences guides you to pick the perfect switch for your home.
Single-pole Switches
Single-pole switches control a light from one location only. They are the most common and simplest switches. You cannot use a single-pole switch to add another control point. Instead, you need special switches designed for multiple controls.
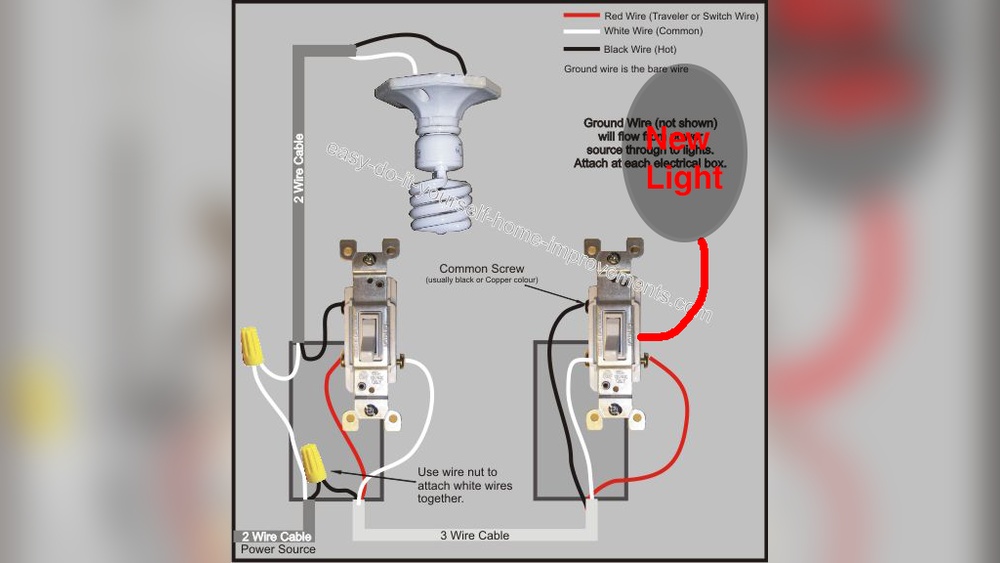
Three-way Switches
Three-way switches allow control of one light from two different places. They work in pairs and need special wiring called traveler wires. This type is perfect for rooms with two entrances or hallways. Installing three-way switches is common for adding a second control point.
Four-way Switches
Four-way switches work with two three-way switches. They allow controlling one light from three or more places. You place a four-way switch between two three-way switches on the circuit. This setup is useful for large rooms or long hallways with many entrances.
Smart Switches
Smart switches connect to Wi-Fi or smart home systems. They let you control lights from phones or voice commands. Some smart switches work with existing wiring and can replace traditional switches. They offer flexible control without extra wiring for multiple locations.
Locating Existing Wiring
Locating existing wiring is the first step in adding another switch to a light. You must know where the wires run before starting any work. This helps avoid mistakes and keeps the job safe.
Take your time to find the wires behind switches and outlets. Use simple tools like a voltage tester to check for power. Always turn off the power at the breaker box before touching any wires.
Identify The Switch Box
Find the switch box that controls the current light. Remove the cover plate carefully. Look inside for the wires connected to the switch. Note the colors and how they are attached.
Trace The Wire Path
Follow the wires from the switch box. They usually run through the wall to the light fixture. Use a wire tracer or flashlight to see inside the wall cavity. Mark the wire path with tape or pencil.
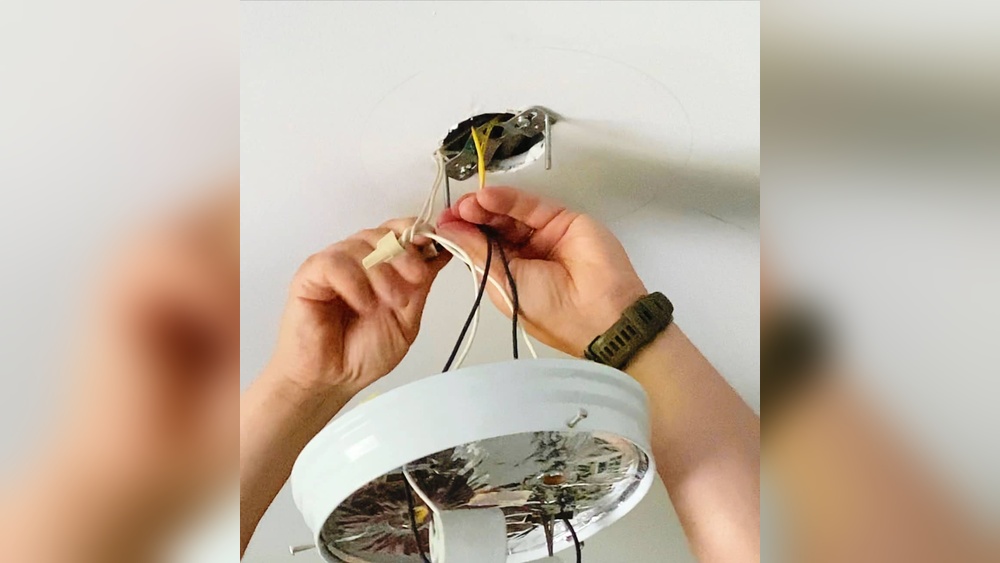
Locate The Light Fixture Box
Find the box where the light fixture is mounted. This is where the wires meet. Open the box to examine the wire connections. Check for power and grounding wires here.
Check For Neutral And Ground Wires
Look for white neutral wires and bare or green ground wires. These are important for adding a new switch. Make sure they are available and in good condition. This ensures your new switch will work safely.
Wiring Basics For Adding A Switch
Adding another switch to an existing light can improve convenience and control. Understanding basic wiring helps ensure safety and success. This section explains simple steps and parts needed for wiring a new switch.
Wiring involves connecting electrical wires properly. Each wire has a specific role. Knowing these roles prevents mistakes and electrical hazards.
Understanding Electrical Wires
There are three main wires: live, neutral, and ground. The live wire carries power from the source. The neutral wire completes the circuit back to the power source. The ground wire protects from electrical shocks.
Prepare a screwdriver, wire stripper, voltage tester, and electrical tape. Also, have wire nuts and the new switch ready. These tools make wiring easier and safer.
Turning Off Power Before Wiring
Switch off the power at the circuit breaker. Test wires with a voltage tester to confirm no electricity flows. Safety first prevents accidents during installation.
Connecting The New Switch
Connect the live wire from the power source to the new switch’s terminal. Link the wire going to the light fixture to the other terminal. Secure all wire connections with wire nuts and electrical tape.
Testing The New Switch
Turn the power back on at the breaker. Test the new switch by turning the light on and off. Check that both switches work correctly without flickering or delay.
Step-by-step Installation Guide
Adding another switch to an existing light can improve convenience in any room. This guide breaks down the installation into clear steps. Follow each part carefully for a safe and successful setup. No need for special skills, just basic tools and attention.
Turn Off Power
Start by turning off the power at the circuit breaker. This step protects you from electric shock. Use a voltage tester on the switch to confirm the power is off. Safety first before touching any wires.
Remove Existing Switch
Unscrew the cover plate on the current switch. Next, remove the screws holding the switch in place. Gently pull the switch out of the wall box. Take note of how wires connect to the switch for later.
Run New Wires
Run new electrical wires from the existing switch box to the new switch location. Use wire fish tape to guide wires through walls if needed. Make sure the wires are long enough to connect comfortably.
Connect Wires To New Switch
Strip about half an inch of insulation from each wire end. Attach the wires to the new switch terminals matching the original wiring setup. Tighten screws firmly to avoid loose connections. Use wire nuts for any splices.
Mount The New Switch
Carefully push the wires back into the wall box. Screw the new switch into the box securely. Attach the cover plate over the switch. Make sure everything is flush and neat for a clean look.
Restore Power And Test
Turn the power back on at the circuit breaker. Test both switches to ensure they control the light properly. Flip each switch and watch the light turn on and off. If it works, you finished the job safely.
Troubleshooting Common Issues
Adding another switch to an existing light can be simple. Yet, some problems may occur. Knowing common issues helps fix them fast. This section covers how to spot and solve these problems.
Checking The Wiring Connections
Loose or wrong wires cause most switch issues. Turn off power before checking. Ensure all wires connect tightly to the right terminals. Look for damaged or frayed wires. Replace any that look worn out. Double-check the wire colors match the instructions.
Testing The Switch Function
Sometimes the switch itself fails. Use a tester or multimeter to check it. A good switch shows continuity when flipped on. No reading means a broken switch. Replace the faulty switch with a new one. Test the light after installing the new switch.
Verifying The Power Supply
No power means no light. Confirm the circuit breaker is on. Check the fuse box for blown fuses. Test the outlet or wiring feeding the switch. Use a voltage tester to see if power reaches the switch. Fix any power supply problems before proceeding.
Inspecting The Light Fixture
The problem might be with the light, not the switch. Check if the bulb is burned out. Replace the bulb with a new one. Inspect the light socket for damage or dirt. Clean or repair as needed. Ensure the fixture wires are connected well.

Credit: diy.stackexchange.com
When To Call A Professional
Adding another switch to an existing light can be a simple DIY project. Yet, some situations need a professional’s help. Safety is the top priority. Incorrect wiring can cause shocks or fires. Knowing when to call a professional saves time and prevents danger.
Complex Wiring Systems
Older homes often have complex wiring. If wires look tangled or unclear, do not proceed alone. Professionals understand complicated wiring layouts. They ensure safe and correct connections. This prevents damage to your electrical system.
Missing Or Damaged Wiring
Sometimes wires are missing or broken behind walls. Finding and fixing these requires skill. A professional can locate hidden wires safely. They can replace or repair damaged parts without risk.
Working With Circuit Breakers
Switches connect to circuit breakers. Any mistake here can trip breakers or cause outages. Professionals know how to work safely with breakers. They handle electrical panels with care and expertise.
Local Electrical Codes And Permits
Electrical work must meet local codes. Some areas require permits for new switches. Professionals are aware of these rules. They ensure your installation meets all legal standards.
Unfamiliarity With Electrical Tools
Using the wrong tools leads to errors and accidents. Professionals use proper tools for wiring tasks. Their experience reduces the chance of mistakes and injury.
Signs Of Electrical Problems
Flickering lights, burning smells, or sparks indicate issues. These signs need expert inspection. A professional can diagnose and fix problems safely and quickly.
Frequently Asked Questions
How Do I Add A Second Switch To One Light?
To add a second switch, use a three-way switch setup. This lets two switches control one light. Connect the traveler wires between switches and ensure proper grounding for safety.
What Tools Do I Need To Add Another Switch?
You need a screwdriver, wire stripper, voltage tester, three-way switch, wire nuts, and electrical tape. These tools ensure safe and accurate installation.
Can I Add A Switch Without Rewiring The Entire Circuit?
Yes, if existing wiring supports a three-way switch. Otherwise, you may need to run new wires between switches and the light.
Is It Safe To Install A Switch Myself?
Yes, if you follow electrical codes and turn off power first. Use a voltage tester to confirm power is off before working.
Conclusion
Adding another switch to a light makes your space more flexible. It allows control from different spots. Always turn off power before working on wiring. Use the right tools and follow safety steps carefully. Double-check connections to avoid problems later.
This simple upgrade can improve your home’s convenience. Take your time and work with patience. Soon, you will enjoy easy light control everywhere you need it.