Have you ever wished you could control an outlet with a simple flip of a light switch? Imagine turning on your favorite lamp or holiday lights without bending down or unplugging cords every time.
It’s easier than you think, and once you know how, you’ll wonder why you didn’t do it sooner. In this guide, you’ll discover step-by-step how to make your outlet work with a light switch, saving you time and adding convenience to your daily life.
Ready to take control of your outlets? Let’s get started.
Tools And Materials Needed
Starting a project to control an outlet with a light switch requires some basic tools and materials. Preparing these items beforehand saves time and helps avoid frustration during the work. Safety is also important, so having the right tools ensures a smooth process.
Below is a list of essential tools and materials needed for this task. Each item plays a key role in completing the installation properly. Knowing these helps anyone feel more confident about the project.
Tools Required
- Screwdriver (flathead and Phillips) for removing and attaching screws
- Wire stripper to safely remove insulation from wires
- Voltage tester to check if wires are live and ensure safety
- Pliers to bend and twist wires as needed
- Electrical tape to insulate wire connections
- Drill with bits if new holes are needed for wiring
Materials Needed
- Light switch suitable for controlling an outlet
- Electrical outlet compatible with your home wiring
- Wire nuts or connectors to join wires securely
- Electrical wires (usually 14 or 12 gauge) for connections
- Switch box to house the light switch safely
- Faceplate covers to protect and finish the installation
Safety Precautions
Working with electrical outlets and light switches requires care. Safety is the top priority to avoid shocks or fires. Taking the right safety steps keeps you and your home safe.
Follow these safety tips before starting any electrical work. Simple precautions make a big difference.
Turn Off Power At The Circuit Breaker
Always switch off power from the main circuit breaker. This cuts electricity to the outlet and switch. Double check with a tester to confirm no power flows.
Use Proper Tools And Equipment
Use insulated screwdrivers and voltage testers. Avoid metal tools without insulation. Proper tools reduce the risk of electric shock while working.
Wear Protective Gear
Wear rubber gloves and safety glasses. Gloves prevent shocks. Glasses protect eyes from sparks or debris during work.
Follow Electrical Codes And Instructions
Read and follow local electrical codes carefully. Use the right wires and connectors. Follow product instructions to ensure safe installation.
Keep Area Dry And Clear
Do not work in wet or damp places. Water increases the risk of shock. Clear the work area of clutter to avoid accidents.
Test The Outlet And Switch After Installation
After finishing, turn the power back on. Test the outlet and switch to make sure they work properly. Check for any unusual sounds or smells.
Identifying The Outlet Wiring
Identifying the outlet wiring is the first step to control an outlet with a light switch. It helps you know how the wires connect inside the outlet box. Understanding these connections ensures you can safely link the switch to the outlet. This knowledge prevents mistakes and helps the switch control the power flow correctly.
Every outlet has several wires. Each wire has a specific job. Knowing these wires helps you spot the right ones to connect to the switch. Let’s explore the common types of outlet wiring.
Understanding Hot, Neutral, And Ground Wires
The hot wire carries electricity to the outlet. It is usually black or red. The neutral wire carries electricity back to the panel. It is usually white. The ground wire is for safety. It is bare copper or green. Identifying these wires is important before making any connections.
Checking For A Switched Hot Wire
Some outlets have a switched hot wire controlled by the light switch. This wire turns the outlet on and off. It usually connects to one half of the outlet. Use a tester to find this wire. It helps control only part of the outlet with the switch.
Using A Voltage Tester Safely
A voltage tester helps find the hot wire and check power. Always turn off the breaker before touching wires. Then turn it on to test. The tester lights up or beeps when it finds voltage. This tool is key to identifying the correct wires safely.

Credit: projectsbypeter.com
Turning Off The Power
Turning off the power is the first and most important step before working on any electrical outlet. It keeps you safe from electric shock. Always take this step seriously to avoid accidents. Power must be off to control an outlet with a light switch safely.
Follow these steps carefully to ensure the power is completely off before you start.
Locate The Circuit Breaker
Find your home’s circuit breaker box. It is usually in the basement, garage, or a utility room. Open the box and look for the switch that controls the outlet you want to work on. The switches are often labeled by room or area.
Turn Off The Correct Breaker
Flip the switch to the off position. This stops electricity from flowing to the outlet. Double-check by turning off the light switch that controls the outlet. No power means no risk of shock.
Test The Outlet For Power
Use a voltage tester or plug in a small device like a lamp. Turn the light switch on and off. If the device does not work, power is off. Always test to confirm before touching wires.
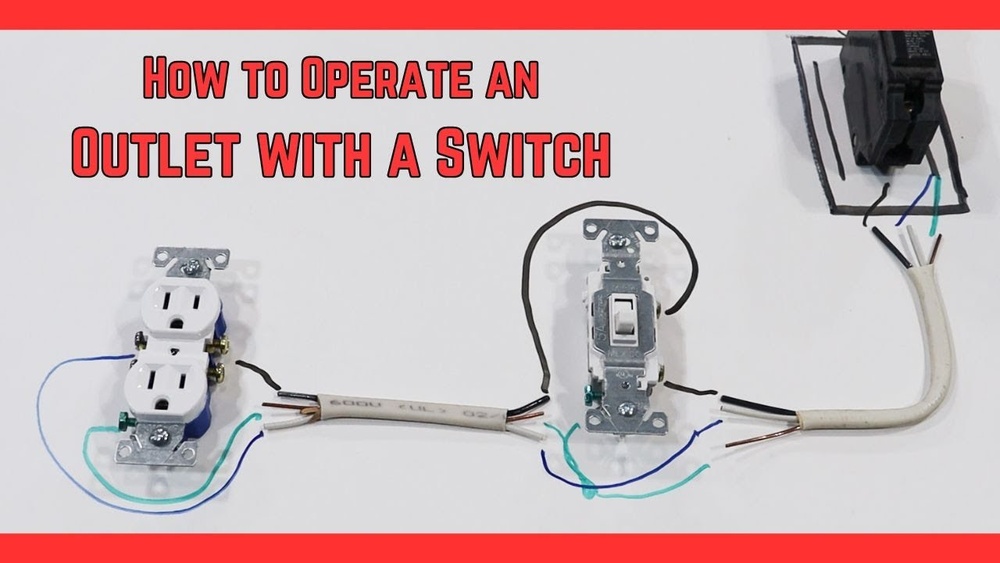
Wiring The Outlet To The Switch
Wiring the outlet to the switch is the key step in controlling your outlet with a light switch. This process lets you turn the outlet’s power on or off from the switch. It involves connecting wires safely and correctly. Careful wiring helps avoid electrical problems and keeps your home safe.
Locating The Switch Box
Find the switch box on the wall where you want to install the switch. Switch boxes are usually behind existing light switches or near the outlet. Turn off power at the breaker before opening the box. Use a voltage tester to ensure no electricity flows. This protects you from electric shocks during wiring.
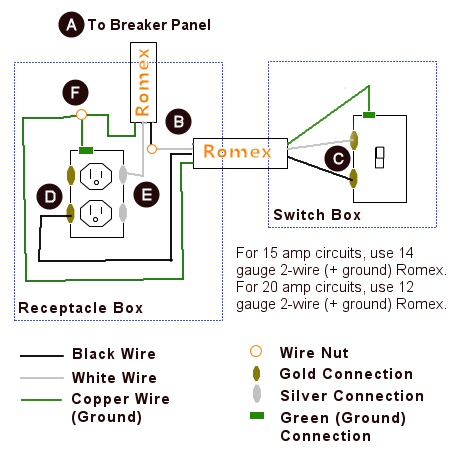
Connecting Wires Correctly
Identify the wires inside the switch box: hot (usually black), neutral (white), and ground (green or bare copper). Connect the hot wire from the power source to the switch’s input terminal. Then connect the hot wire that goes to the outlet to the switch’s output terminal. Neutral wires typically connect together and do not touch the switch. Attach the ground wire to the switch’s ground screw.
Using Wire Nuts And Electrical Tape
Secure all wire connections with wire nuts. Twist the wires tightly before placing the wire nut on. Wrap electrical tape around the wire nuts for extra safety. This prevents wires from loosening over time. Neat and tight connections reduce the risk of sparks and shorts. Always double-check each connection before closing the switch box.
Credit: www.oneprojectcloser.com
Testing The Setup
Testing the setup is a crucial step after wiring an outlet to a light switch. It ensures the connections work properly and the switch controls the outlet as intended. Careful testing prevents electrical issues and keeps your home safe.
Start by turning on the main power supply. This activates the circuit and allows you to check the outlet and switch functions. Safety is important. Use caution during this step.
Check The Switch Operation
Flip the light switch on and off. Watch the outlet closely. Any device plugged into the outlet should turn on and off with the switch. If the device stays powered when the switch is off, the wiring may need correction.
Test The Outlet With A Device
Plug in a lamp or another small device. Turn the switch on. The device should power up immediately. Turn the switch off. The device should lose power. This confirms the outlet responds to the switch.
Use A Voltage Tester
Use a voltage tester to check the outlet’s power state. Test the outlet terminals while switching the light switch on and off. The tester should show voltage only when the switch is on. No voltage means the switch controls the outlet correctly.
Inspect For Loose Connections
Look closely at all connections. Loose wires can cause intermittent power or failures. Tighten any screws or wire nuts as needed. A secure connection ensures reliable operation and safety.
Common Troubleshooting Tips
Controlling an outlet with a light switch can sometimes cause issues. Common problems include the outlet not working or the switch not controlling the outlet properly. Troubleshooting these problems helps fix the setup quickly and safely. Below are some simple tips to guide you through common problems.
Check The Power Source
First, make sure the power to the outlet is on. Check the circuit breaker or fuse box for any tripped switches. Reset the breaker if needed. Without power, the outlet cannot work.
Inspect The Wiring Connections
Turn off the power before touching wires. Open the outlet and switch covers. Look for loose or disconnected wires. Tighten any loose screws. Make sure the wires connect to the right terminals.
Test The Light Switch
Use a voltage tester to check if the switch sends power to the outlet. Flip the switch on and off to see if the tester reacts. A faulty switch may need replacement.
Verify Outlet Compatibility
Not all outlets work well with switches. Some outlets have separate controls or internal parts. Check if your outlet type supports switch control. Replace the outlet if necessary.
Replace Faulty Components
If the switch or outlet is damaged, swap it out. Use parts rated for your home’s voltage. Faulty parts can cause problems or safety hazards.

Credit: www.do-it-yourself-help.com
Upgrading To Smart Switches
Upgrading to smart switches offers a modern way to control outlets with a light switch. These devices replace traditional switches and add convenience and flexibility to your home. Smart switches connect to your Wi-Fi network and allow control from your smartphone or voice commands.
Smart switches provide more than just on/off functions. They let you schedule outlet use and monitor energy consumption. This upgrade fits well in any room, improving comfort and saving energy.
What Are Smart Switches?
Smart switches are electrical switches with wireless connectivity. They work with apps on your phone or smart home systems. You can turn outlets on or off without touching the switch physically. Some models support voice assistants like Alexa or Google Assistant.
Benefits Of Upgrading To Smart Switches
Smart switches add control and convenience. They help save electricity by scheduling outlet use. They also improve home security by controlling lights remotely. Many models offer dimming and scene settings for better ambiance. Upgrading is a simple way to modernize your electrical system.
How To Install Smart Switches
Turn off power at the circuit breaker before installation. Remove the old switch and disconnect wires carefully. Connect the smart switch following the instructions. Usually, it needs a neutral wire for power. After wiring, restore power and connect the switch to Wi-Fi. Use the app to finish setup and control your outlet.
Frequently Asked Questions
How Do I Wire An Outlet To A Light Switch?
To wire an outlet to a light switch, connect the switch to the outlet’s hot wire. This controls power flow. Turn off electricity first. Use a switch loop or control one half of a split outlet for safe operation.
Can I Control Multiple Outlets With One Switch?
Yes, you can control multiple outlets with one switch. Connect the switch to the hot wire feeding all outlets. Ensure wiring capacity matches the load. This setup simplifies control but follow electrical codes for safety.
What Tools Are Needed To Control An Outlet With A Switch?
You need a voltage tester, wire strippers, screwdrivers, electrical tape, and wire nuts. These tools help safely disconnect and connect wires. Always turn off the power before starting any electrical work.
Is It Safe To Install A Switch-controlled Outlet Myself?
It can be safe if you know basic electrical skills. Always turn off power, use proper tools, and follow local codes. If unsure, hire a licensed electrician to avoid hazards and ensure code compliance.
Conclusion
Controlling an outlet with a light switch is simple and useful. You can easily turn devices on or off with one switch. This setup saves energy and adds convenience to your home. Always follow safety steps when working with electricity.
With the right tools and care, anyone can do it. Try it yourself and enjoy the easy control. Small changes like this make daily life better. Keep your home safe and smart with this tip.