Are you ready to add shelves, hooks, or heavy decorations to your brick wall but unsure how to secure them safely? Installing anchors into a brick wall might seem tricky, but with the right steps, you can do it yourself with confidence.
This guide will walk you through every detail, helping you avoid common mistakes and ensuring your anchors hold strong. Keep reading, and you’ll soon have the skills to make your wall both functional and stylish without any guesswork.
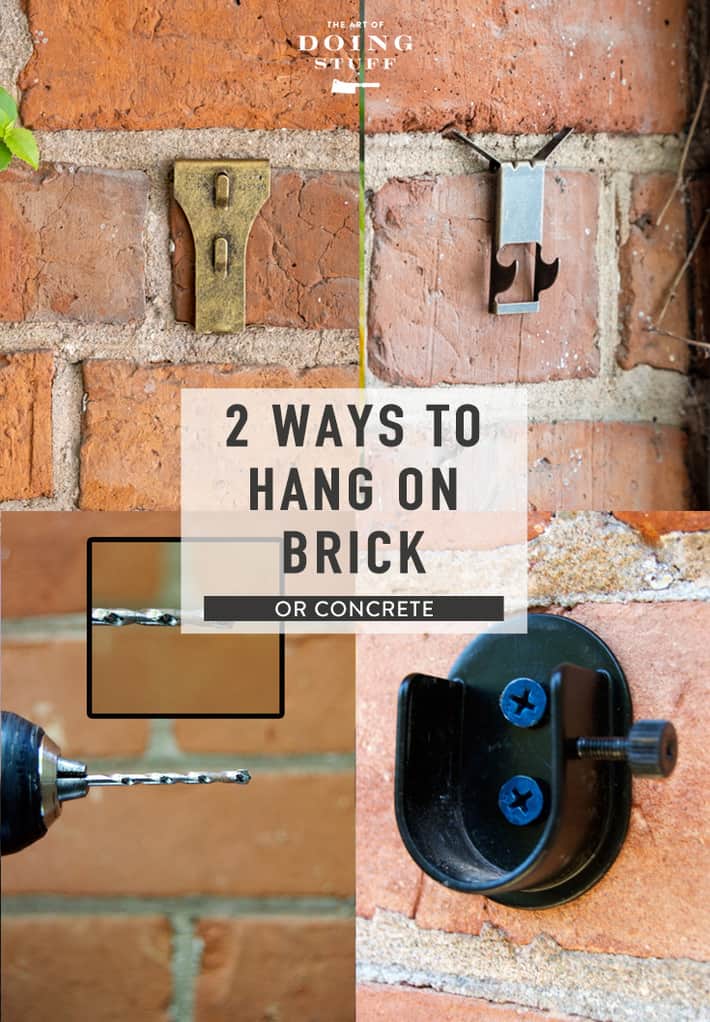
Credit: www.theartofdoingstuff.com
Choosing The Right Anchor
Choosing the right anchor is key for a strong hold in a brick wall. Different anchors suit different tasks. Picking the right one makes installation easier and safer. It also protects the wall from damage. Learn about the types of anchors and what to consider before buying.
Types Of Anchors For Brick Walls
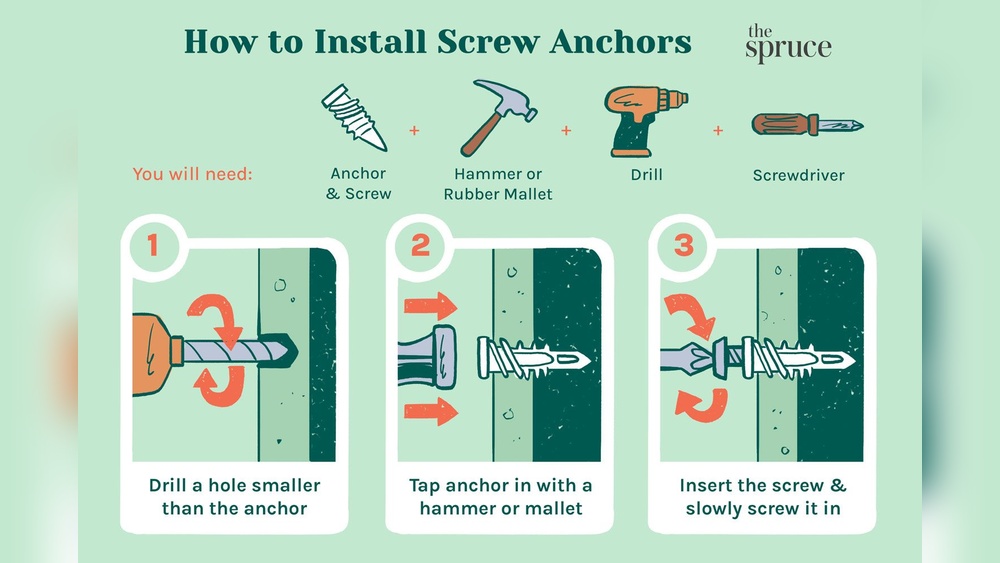
Plastic anchors are common for light loads. They expand inside the hole for grip. Metal anchors are stronger and good for heavy items. Sleeve anchors work well in solid brick. They expand as you tighten the bolt. Wedge anchors offer high strength for heavy duty jobs. Tapcon screws drill directly into brick without a plug. Each type fits different needs and wall conditions.
Factors To Consider
Check the weight of the item you want to hang. Heavy items need stronger anchors. Know if your brick is solid or hollow. Hollow bricks need special anchors to avoid breakage. Consider the weather if outside. Some anchors resist rust better than others. Size matters too. The anchor must fit the hole and the screw. Choose anchors that match your drill and tools. These factors help pick the best anchor for your project.

Credit: www.youtube.com
Tools And Materials Needed
Installing anchors in a brick wall requires specific tools and materials. Having the right items makes the job easier and safer. This guide lists all essentials you need before starting.
Essential Tools
Start with a hammer drill to make holes in the brick. Use a masonry drill bit that fits the anchor size. A hammer helps to tap the anchor into the hole. Use a screwdriver or wrench to tighten the anchor bolt. A tape measure ensures accurate placement. A pencil or marker helps mark drilling spots. A vacuum or brush cleans dust from the holes.
Recommended Safety Gear
Wear safety goggles to protect your eyes from dust and debris. Use ear protection to reduce noise from drilling. Gloves protect your hands from sharp edges and rough bricks. Wear a dust mask to avoid breathing brick dust. Proper shoes prevent slips and protect your feet on the worksite.
Preparing The Brick Wall
Preparing the brick wall is the first step to a strong anchor installation. The surface must be clean and solid. This ensures the anchor stays secure and lasts long. Proper preparation saves time and effort later. Follow these key steps to get ready.
Inspecting The Surface
Check the wall for cracks or loose bricks. These can weaken the anchor’s hold. Use a brush or cloth to clean dust and dirt. Make sure the wall is dry before drilling. A solid wall gives the best support for anchors.
Marking Anchor Points
Decide where each anchor will go. Use a pencil to mark spots on the brick. Measure carefully to keep anchors evenly spaced. Avoid placing anchors too close to edges. Clear marks help guide accurate drilling and installation.
Drilling The Hole
Drilling the hole is a key step when installing an anchor to a brick wall. This step ensures the anchor fits tightly and holds strong. Drilling requires the right tools and careful technique to avoid damaging the brick. A clean and accurate hole makes the installation safer and longer-lasting.
Selecting The Drill Bit
Choose a drill bit made for masonry or brick. These bits have a special tip to cut through hard materials. Pick a size that matches the anchor diameter exactly. A bit too small will block the anchor. A bit too large will make the anchor loose. Check the anchor package for the recommended drill bit size.
Drilling Techniques For Brick
Mark the exact spot on the brick where the hole is needed. Use a pencil or tape for accuracy. Start drilling at a slow speed to avoid cracking the brick. Hold the drill steady and straight. Apply light pressure; let the drill bit do the work. Occasionally pull the bit out to clear dust. Drill to the depth specified for the anchor length.
Inserting The Anchor
Inserting the anchor into a brick wall is a key step for a strong hold. It needs care and the right method. Follow these steps for a secure fit that lasts.
Cleaning The Hole
Start by removing dust and debris from the drilled hole. Use a brush or a blower to clear the space. A clean hole helps the anchor grip better and stay firm.
Blowing air into the hole is also effective. Avoid using water, as it can weaken the brick. Make sure no loose particles remain before moving on.
Placing The Anchor Properly
Insert the anchor gently into the cleaned hole. Push it until it fits flush with the wall surface. Use a hammer lightly if needed, but don’t force it hard.
The anchor should sit straight, not tilted. A crooked anchor can cause weak support and damage. Check the position before fixing your item to the wall.
Securing The Fixing
Securing the fixing is the key step for a safe and lasting anchor installation. This stage ensures the anchor stays firmly in the brick wall without slipping or loosening over time.
Proper securing protects your mounted items and prevents damage to the wall. Careful attention during this step guarantees a strong, stable hold for your project.
Tightening The Screw Or Bolt
Start by inserting the screw or bolt into the anchor. Turn it slowly using a screwdriver or wrench.
Apply steady pressure while tightening. Avoid forcing the screw too hard to prevent cracking the brick.
Stop once you feel firm resistance. Over-tightening can damage the anchor and reduce its grip.
Ensuring A Strong Hold
Check the anchor by gently pulling or wiggling the attached item. It should feel solid with no movement.
If the fixing feels loose, try tightening a little more. If still loose, remove and reinsert the anchor in a new hole.
Confirm the brick around the anchor is intact and not crumbling. A sound surface improves holding strength.
Common Mistakes To Avoid
Installing anchors into a brick wall may seem simple, but many make avoidable mistakes. These errors can weaken the hold and damage the wall. Knowing what to avoid helps achieve a strong, lasting fix.
Careless steps lead to wasted time and extra work. Avoiding common errors ensures safety and saves money. Here are frequent mistakes to watch out for during installation.
Using The Wrong Type Of Anchor
Not all anchors suit brick walls. Choosing the wrong type reduces strength and grip. Use anchors made specifically for masonry. Avoid plastic anchors designed for drywall.
Drilling Too Large Or Too Small Holes
Hole size must match the anchor size exactly. Too large makes the anchor loose. Too small can crack the brick or make insertion hard. Measure carefully before drilling.
Ignoring Brick Condition
Old or damaged bricks may not hold anchors well. Check the brick’s condition before starting. Avoid drilling into cracked or crumbly bricks. Choose a solid, healthy spot instead.
Not Cleaning The Drill Hole
Dust and debris reduce anchor grip. Always clean holes with a brush or air blower. Clear holes help anchors sit tightly and hold better over time.
Drilling At The Wrong Angle
Drill straight into the brick wall, not at an angle. Angled holes weaken anchor grip and wall strength. Keep the drill perpendicular for best results.
Over-tightening The Anchor
Tightening too much can crack the brick or damage the anchor. Stop turning once the anchor feels secure. Use steady, moderate pressure during installation.

Credit: www.amazon.com
Maintaining Your Fixing
Maintaining your fixing is key to keeping anchors secure on a brick wall. Over time, wear and weather can affect the strength of the anchor. Regular care helps avoid accidents and keeps your fixtures stable. Simple checks can extend the life of your anchors and save repair costs.
Regular Checks
Inspect your anchors often. Look for cracks or loose parts around the fixing. Test the anchor by gently pulling or pushing it. If it moves, it might be weak. Check for rust or corrosion on metal anchors. Clean the area to remove dirt and debris. Early detection of problems makes repairs easier.
When To Replace Anchors
Replace anchors if they show signs of damage. Cracks in the brick or anchor mean it no longer holds well. Rust or corrosion weakens metal parts and can cause failure. If the anchor shifts or falls out, replace it immediately. Old or worn anchors cannot support weight safely. Always use anchors suited for your wall type during replacement.
Frequently Asked Questions
What Tools Are Needed To Install Anchors In Brick Walls?
You need a drill with a masonry bit, anchors, screws, a hammer, and a screwdriver. Safety goggles and gloves are also recommended for protection during installation.
How Do You Choose The Right Anchor For Brick Walls?
Select anchors based on weight load and brick type. Expansion anchors work well for solid bricks, while sleeve anchors suit hollow bricks.
Can I Install Anchors Without Drilling Into Bricks?
Drilling is necessary for secure anchor installation in brick walls. Using adhesive anchors is an alternative but less reliable for heavy loads.
How Deep Should I Drill Holes For Brick Anchors?
Drill holes at least 1 inch deeper than the anchor length. This ensures proper anchor seating and secure fastening.
Conclusion
Installing an anchor to a brick wall is simple with the right steps. Start by choosing the correct anchor size for your task. Drill carefully to avoid damaging the bricks. Insert the anchor firmly and tighten the screw securely. This method ensures a strong hold for your items.
Practice patience and safety while working. With these tips, your project will be stable and lasting. Give it a try and see the difference yourself.