Are you ready to hang shelves, pictures, or decor but worried about your drywall cracking or falling apart? Knowing how to drill drywall anchors the right way can make all the difference.
With the right technique, you’ll secure your items firmly and avoid common mistakes that cause damage. In this guide, you’ll learn simple steps to drill drywall anchors quickly and confidently. By the end, you’ll have the skills to tackle your next project with ease and keep your walls looking great.
Let’s get started!
Credit: www.homedepot.com
Choosing The Right Anchor
Choosing the right drywall anchor is important for a secure hold. The correct anchor prevents damage and holds your items safely. Different anchors work best for different weights and wall types. Understanding your options helps you pick the best one for your project.
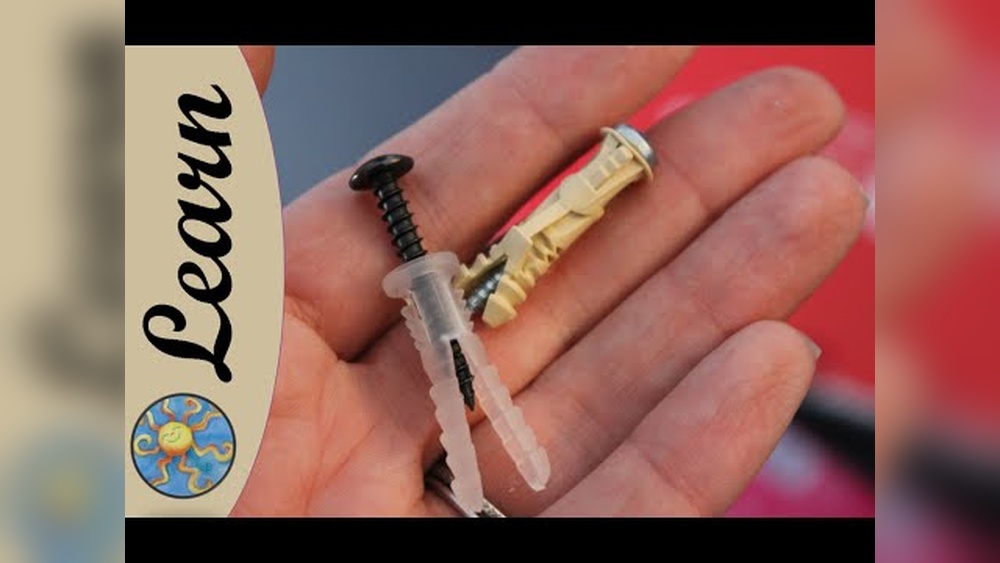
Types Of Drywall Anchors
Plastic expansion anchors are common and easy to use. They work for light loads like small pictures or clocks. Metal anchors, such as molly bolts, offer stronger support. They expand inside the wall for a firm grip. Toggle bolts are best for heavy items. They have wings that open behind the wall for extra strength.
Matching Anchors To Weight
Light anchors hold up to 20 pounds. Medium anchors support 20 to 50 pounds. Heavy anchors can hold over 50 pounds. Always check the weight rating on the package. Choose an anchor with a higher weight limit than your item. This ensures safety and prevents wall damage.
Tools Needed For Installation
You need a drill with the right bit size. A screwdriver or a drill with a screwdriver bit helps insert anchors. A hammer may be needed for plastic anchors. A level can keep your item straight. Measure carefully before drilling to avoid mistakes.
Preparing The Wall
Preparing the wall is the first step to drill drywall anchors safely and accurately. This stage ensures the wall is ready and prevents damage or mistakes. Taking time here saves effort later.
Locating Studs And Marking Spots
Find studs behind the drywall to avoid drilling into them. Use a stud finder for quick, accurate results. Mark spots lightly with a pencil where anchors will go. These marks guide your drilling.
Checking For Wires And Pipes
Walls often hide wires and pipes. Use a wire detector to check areas before drilling. Avoid spots with electrical wires or plumbing. This keeps you safe and prevents costly repairs.
Gathering Safety Equipment
Wear safety glasses to protect your eyes from dust and debris. Use a dust mask to avoid breathing in particles. Gloves protect your hands while handling tools. Safety gear is essential for a smooth job.
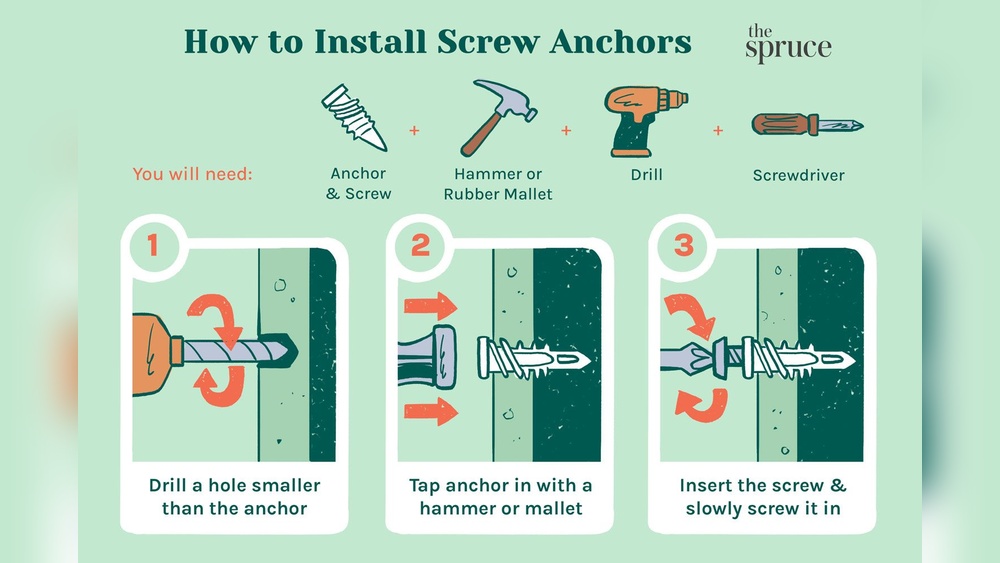
Drilling The Hole
Drilling the hole is a key step in installing drywall anchors. It sets the stage for a secure hold. Proper drilling ensures the anchor fits well and supports the weight. Careful technique prevents damage to your wall. Follow these simple guidelines to drill the perfect hole every time.
Selecting Drill Bit Size
Choose a drill bit that matches the anchor size. Too big, and the anchor won’t hold tight. Too small, and the anchor won’t fit. Check the anchor package for the right drill bit size. Using the correct bit keeps the anchor secure and the wall safe.
Drilling At The Correct Angle
Hold the drill straight, at a 90-degree angle to the wall. Angled holes can weaken the anchor’s grip. A straight hole helps the anchor sit flush against the wall. This angle also makes it easier to insert screws later.
Avoiding Wall Damage
Start drilling slowly to prevent cracking the drywall. Apply steady pressure without forcing the drill. Stop as soon as you reach the right depth. Avoid pushing too hard to keep the wall intact. Clean out dust from the hole before placing the anchor.
Installing The Anchor
Installing drywall anchors is a key step for strong wall support. This process makes sure your anchor holds tight and stays in place. Proper installation helps prevent damage and keeps items secure on your wall.
Inserting Plastic Anchors
After drilling the hole, gently push the plastic anchor inside. Use your fingers or a small tool to tap it lightly. The anchor should fit snugly without any wiggle. Avoid forcing it, or the wall may crack.
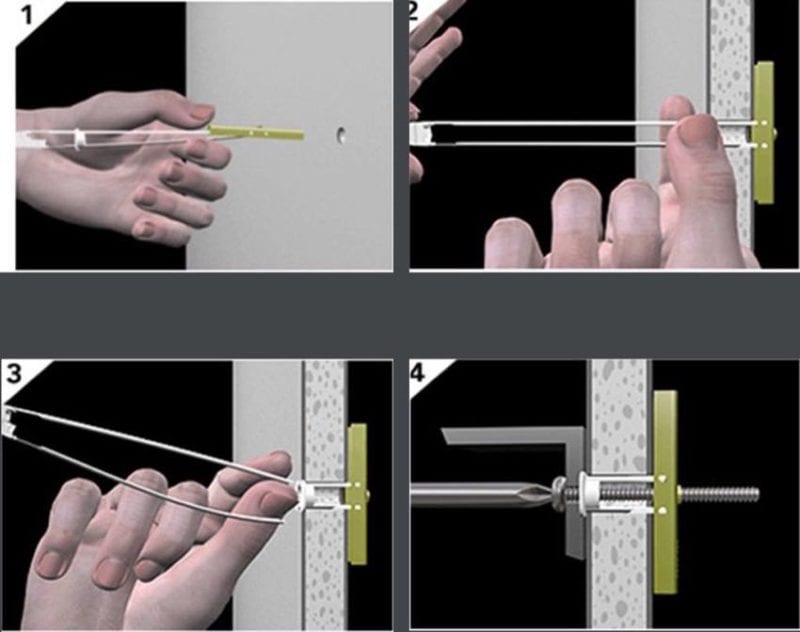
Using Metal Or Toggle Anchors
Metal anchors slide into the hole and expand as screws tighten. Toggle anchors open behind the drywall for extra hold. Fold the toggle wings before pushing through the hole. Make sure the toggle opens fully inside the wall cavity.
Securing The Anchor Firmly
Once the anchor is in place, insert the screw slowly. Turn the screw clockwise to tighten it gently. Stop when you feel resistance and the anchor feels firm. Over-tightening can strip the anchor or damage the drywall.
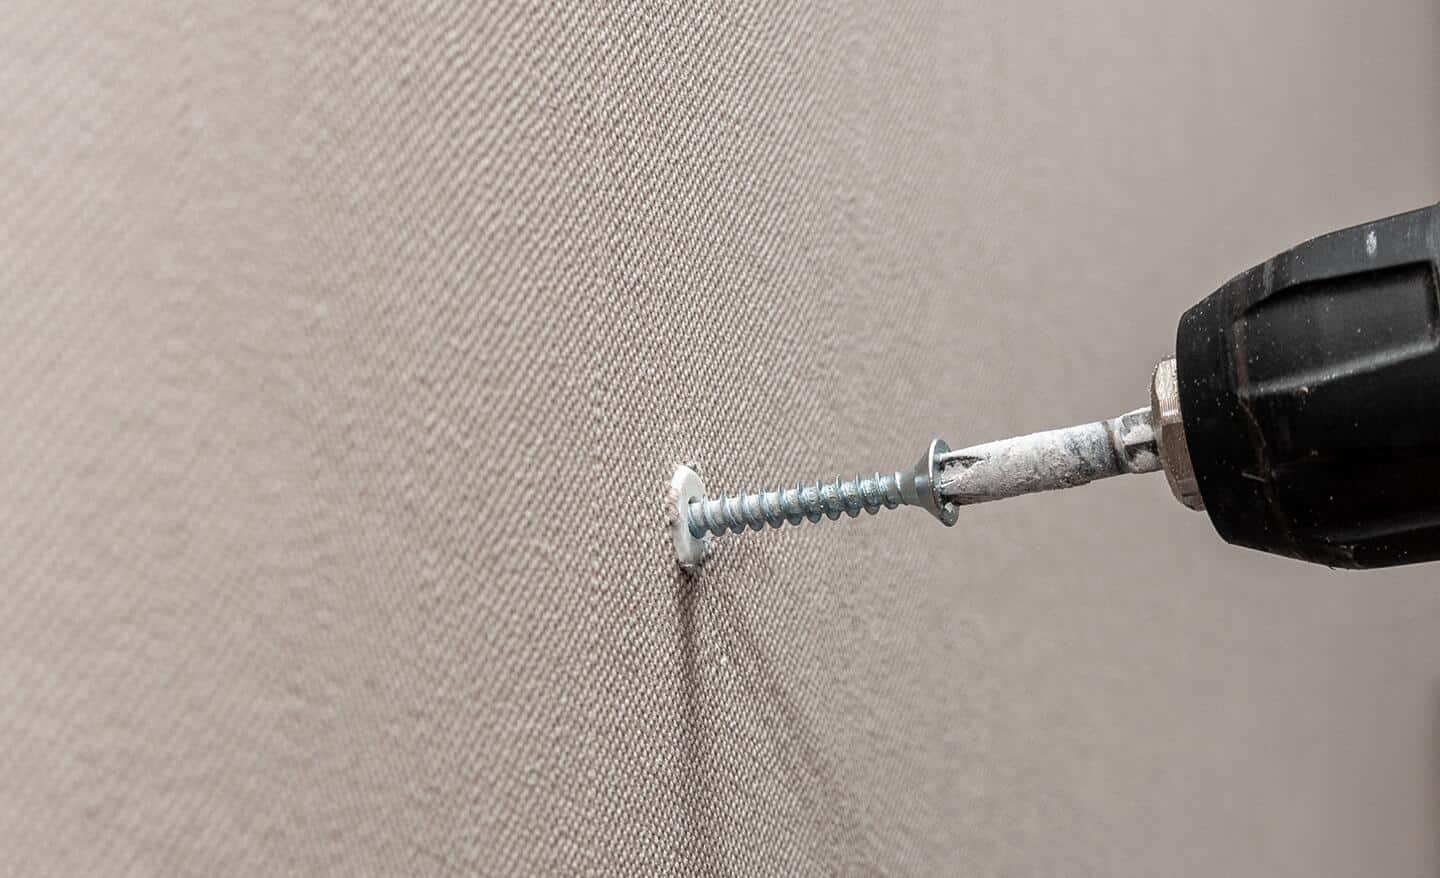
Mounting The Fixture
Mounting the fixture on drywall anchors is a crucial step. It ensures your item stays secure and looks neat. Take your time to position and fasten it properly. This process makes your wall strong enough to hold the weight safely.
Aligning The Fixture
Start by holding the fixture against the wall. Check that it lines up with the anchors. Use a level to keep it straight. Mark any spots that need adjusting. Precise alignment avoids crooked mounting and damage.
Using The Right Screws
Select screws that fit the drywall anchors perfectly. Screws too short won’t hold well. Screws too long may damage the wall. Tighten screws gently to avoid stripping the anchor. The right screws keep the fixture stable and secure.
Testing Stability
After mounting, gently push or pull the fixture. It should feel firm and not move. If it wobbles, tighten the screws a bit more. Check for any gaps between the fixture and wall. A stable fixture lasts longer and looks better.
Credit: mottogroupbuilders.com.au
Tips For Stronger Support
Strong support is essential for hanging items on drywall safely. Properly drilled anchors hold weight better and last longer. Follow these tips to improve the strength of your drywall anchors. These tips help avoid damage and keep your walls secure.
Choosing Quality Anchors
Pick anchors made from durable materials like metal or heavy-duty plastic. Cheap anchors may break or pull out easily. Match the anchor size to the weight of the item. Bigger anchors hold more weight. Check the packaging for weight limits to ensure safety.
Avoiding Over-tightening
Stop tightening as soon as the anchor feels snug. Over-tightening can strip the drywall or damage the anchor. This weakens the hold and may cause the anchor to fail. Use a screwdriver with steady pressure. Let the anchor grip the wall without forcing it.
Regular Maintenance Checks
Check anchors periodically for any signs of looseness or damage. Walls may shift or settle over time. Tighten screws gently if they become loose. Replace anchors if they look cracked or worn out. Regular checks prevent accidents and keep your items secure.

Credit: stonedesignbysantos.com
Frequently Asked Questions
What Tools Do I Need To Drill Drywall Anchors?
You need a drill, drill bits, drywall anchors, a screwdriver, and a pencil. These tools ensure accurate holes and secure anchor placement.
How Do I Choose The Right Drill Bit Size?
Match the drill bit size to the anchor’s diameter. This ensures a snug fit and prevents anchor damage.
Can I Drill Drywall Anchors Without Studs?
Yes, drywall anchors are designed for hollow walls without studs. They provide strong support for lightweight to medium objects.
How Deep Should I Drill For Drywall Anchors?
Drill a hole slightly deeper than the anchor’s length. This allows the anchor to fit completely inside the wall.
Conclusion
Drilling drywall anchors is easier than it seems. Choose the right drill bit size first. Mark the spot clearly before starting. Drill slowly to avoid damaging the wall. Insert the anchor firmly for a tight fit. These simple steps help secure your items safely.
Practice makes the process smoother every time. Now, you can hang pictures, shelves, or hooks with confidence. Keep your tools ready and work carefully. Small efforts lead to strong, lasting results.