Are you ready to hang shelves, pictures, or heavy decor without worrying about your walls cracking or falling apart? Knowing how to drill a wall anchor correctly is the key to making your projects strong and safe.
In this guide, you’ll discover simple steps that anyone can follow, even if you’ve never used a drill before. By the end, you’ll feel confident tackling your next home improvement task with ease. Keep reading, and let’s make your walls work for you!

Credit: thediyplaybook.com
Choosing The Right Anchor
Choosing the right wall anchor is important for a secure hold. Different anchors work best for different walls and weights. Picking the wrong anchor can lead to damage or failure. This guide helps you find the best anchor for your wall and project.
Types Of Wall Anchors
There are many types of wall anchors. Plastic expansion anchors are common and easy to use. They work well in drywall for light objects. Toggle bolts have metal wings that open behind the wall. They hold heavy items securely in hollow walls. Molly bolts expand inside the wall for a strong grip. Concrete anchors are made for solid surfaces like brick or concrete. Each anchor type has a specific use.
Matching Anchors To Wall Material
Drywall needs anchors that expand or grip inside hollow space. Plastic or toggle anchors work best here. For plaster walls, use anchors that won’t crack the surface. Molly bolts are a good choice. Brick or concrete walls need heavy-duty anchors. Use concrete anchors or sleeve anchors to hold weight. Match anchor type to wall material for safety and strength. Always check the weight rating on the anchor package.
Credit: www.homedepot.com
Tools Needed
Drilling a wall anchor needs the right tools for a strong hold. Choosing the correct tools makes the job easier and safer. Having everything ready saves time and avoids mistakes.
Drill Selection
Pick a drill with enough power for your wall type. A cordless drill is handy and easy to control. Use a drill with adjustable speed for better precision. Check the drill bit size matches your anchor size. A hammer drill helps if you drill into concrete or brick.
Additional Accessories
Gather drill bits in different sizes for various anchors. A pencil helps mark the exact drill spot on the wall. Use a level to keep anchors straight and even. Safety glasses protect your eyes from dust and debris. A vacuum or brush cleans dust for a neat hole.
Preparing The Wall
Preparing the wall is a key step before drilling a wall anchor. It helps ensure the anchor will hold securely and prevents damage to your wall. Taking time to prepare makes the task easier and safer.
Marking The Drill Spot
Start by choosing the exact place for the anchor. Use a pencil to mark the spot clearly. Measure carefully to keep the mark straight and level. This small step helps you avoid mistakes during drilling.
Double-check the mark before moving on. A clear, precise mark saves time and effort later.
Checking For Obstructions
Look inside the wall for pipes, wires, or studs. Use a stud finder or similar tool. Avoid drilling where there is wiring or plumbing. Damaging these can cause serious problems.
Listen for hollow sounds by tapping the wall. Solid spots often mean studs. Avoid these unless your anchor is designed for studs.
Drilling The Hole
Drilling the hole is a crucial step for installing a wall anchor. It ensures the anchor fits tightly and holds weight properly. A clean, well-placed hole prevents damage to the wall. The right technique helps you avoid cracks and weak spots.
Setting Drill Speed
Choose the correct drill speed before starting. Low speed works best for hard surfaces like concrete. High speed suits softer materials such as drywall. Adjust the speed gradually for better control. Avoid pushing too hard; let the drill do the work.
Drilling Technique
Hold the drill steady and straight to the wall. Begin drilling slowly to make a guide hole. Increase speed slightly while applying light pressure. Stop if you feel resistance or the drill slips. Clean out dust from the hole before inserting the anchor.
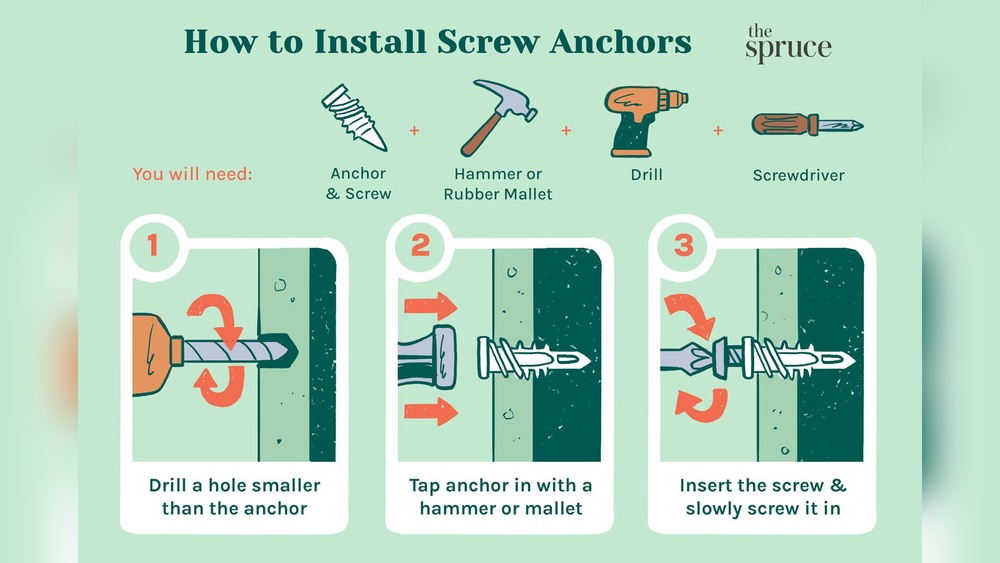
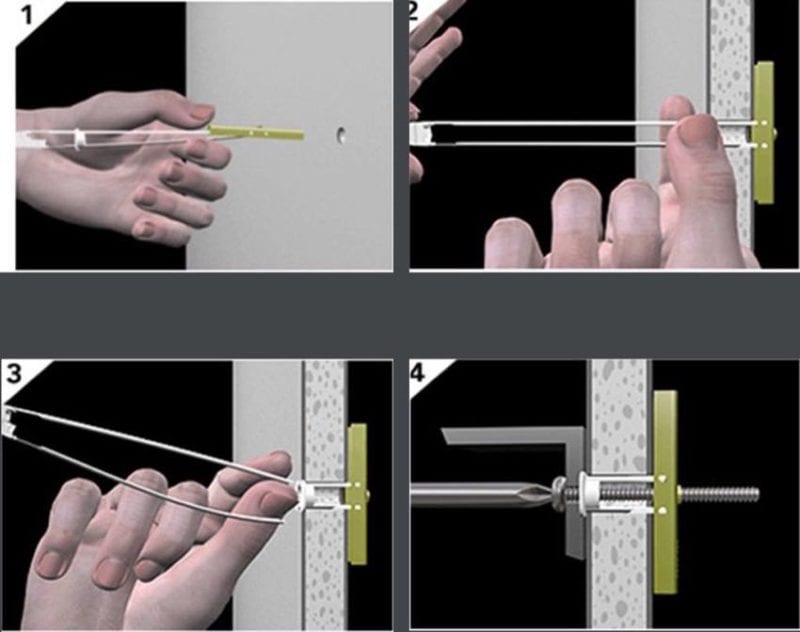
Installing The Anchor
Installing the wall anchor is a key step in securing items to your wall. It holds the screw tightly, giving strong support. Correct installation prevents damage and keeps your items safe.
Inserting The Anchor Properly
Push the anchor gently into the drilled hole. It should fit snugly, not loose or too tight. Tap lightly with a hammer if needed. Make sure the anchor sits flush with the wall surface. Avoid forcing it, which can break the anchor or wall.
Ensuring A Secure Fit
Check the anchor’s hold by pulling it slightly. It should not move or wiggle. If loose, remove and try a larger anchor or drill a bigger hole. Secure fit ensures the screw will hold weight safely. This step stops the wall from cracking or the anchor falling out.
Mounting Your Object
Mounting your object on the wall is the final step after drilling the wall anchor. This step requires care to ensure your item stays secure and looks straight. Proper mounting keeps your object safe and prevents damage to the wall.
Aligning The Item
Place the object near the drilled hole. Check if the holes on the object match the wall anchors. Use a level tool to keep the item straight. Adjust the position until it looks even. This step prevents crooked mounting and future problems.
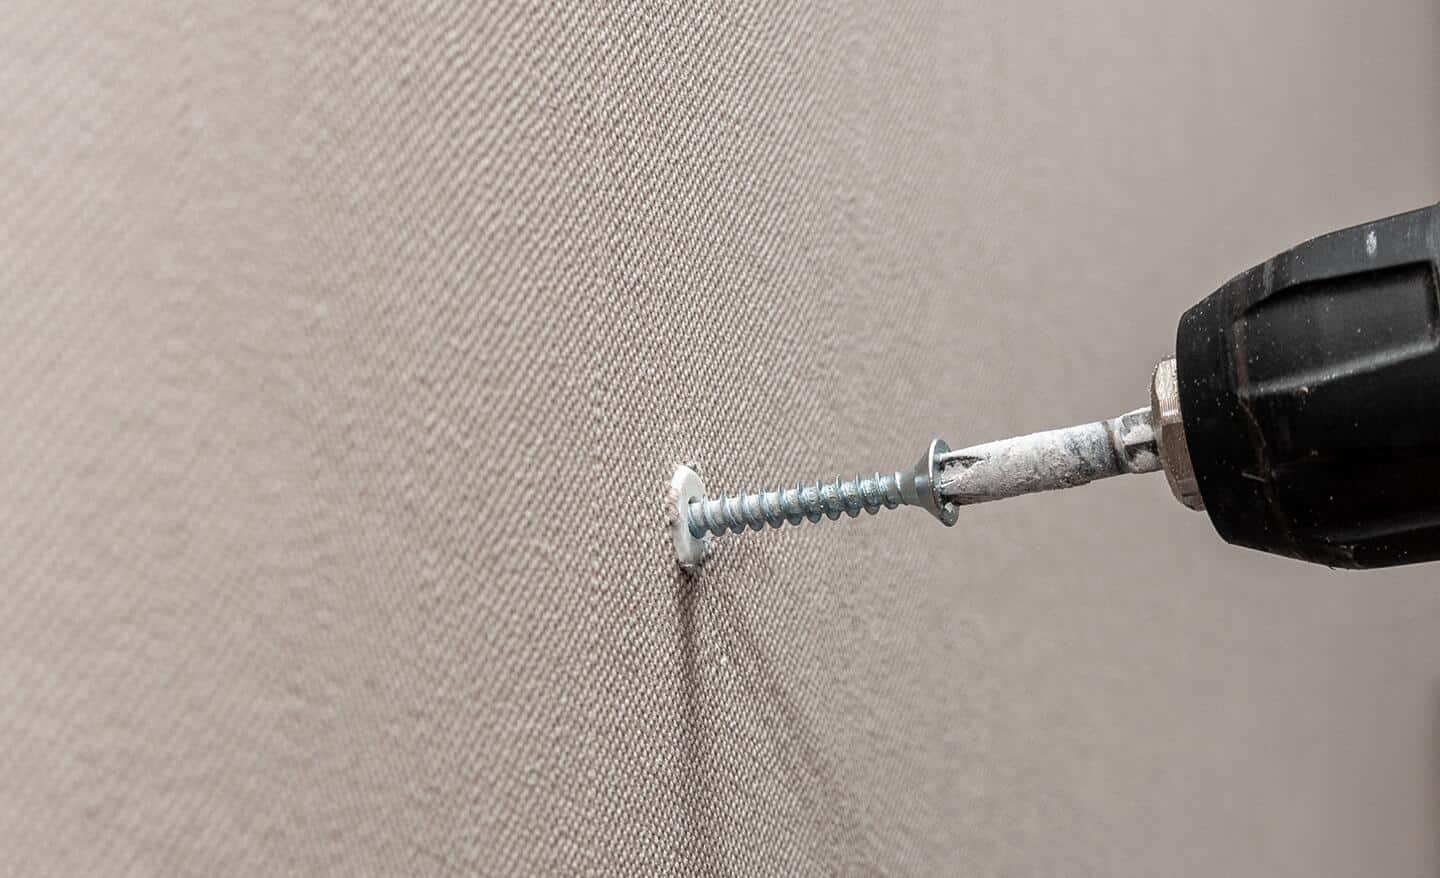
Tightening Screws Safely
Insert screws into the wall anchors carefully. Use a screwdriver to tighten them slowly. Avoid over-tightening to prevent cracking the wall or damaging the anchor. Tighten just enough to hold the object firmly in place. Check the object for stability before finishing.
Tips For Stronger Mounting
Drilling wall anchors correctly is key to a firm hold. Strong mounting keeps your items safe and your walls damage-free. Follow these tips for better results.
Small changes make a big difference. Use the right tools and techniques. This helps your anchors grip tightly and last long.
Avoiding Common Mistakes
Pick the right drill bit size for your anchor. Too big or too small weakens the hold. Drill straight into the wall. Angled holes reduce strength. Clean out dust after drilling. Dust stops the anchor from fitting well.
Maintaining Wall Integrity
Check what type of wall you have before drilling. Some walls need special anchors. Avoid drilling too close to edges. This can cause cracks or breaks. Use gentle pressure while drilling. Pushing too hard damages the wall. Let the drill do the work.
Credit: www.protoolreviews.com
Frequently Asked Questions
What Tools Do I Need To Drill Wall Anchors?
You need a drill, drill bits, wall anchors, a screwdriver, and a hammer. Choose the drill bit size matching the anchor diameter for a secure fit.
How Deep Should I Drill For Wall Anchors?
Drill the hole slightly deeper than the anchor length. This ensures the anchor fits fully and holds securely without damaging the wall.
Can I Drill Wall Anchors In Drywall Or Concrete?
Yes, use plastic anchors for drywall and metal or sleeve anchors for concrete. Choose anchors suitable for the wall material for proper support.
How Do I Avoid Damaging The Wall When Drilling?
Mark the spot, use a level, and start with a small drill bit. Drill slowly and steadily to prevent cracking or holes that are too large.
Conclusion
Drilling a wall anchor is simple with the right steps. Choose the correct drill bit size for your anchor. Mark the spot clearly before you start drilling. Drill straight to avoid damage and ensure a tight fit. Insert the anchor gently and secure your item firmly.
Take your time and work carefully for best results. Practice makes the task easier and builds confidence. Now, you can hang shelves, pictures, and more with ease. A little patience goes a long way in any project.