Are you looking to set up a clean and reliable network connection in your home or office? Knowing how to hook up an RJ45 wall plate can save you time and frustration, while giving you a neat, professional finish.
Whether you’re upgrading your internet setup or installing new Ethernet ports, this simple guide will walk you through each step. By the end, you’ll have the confidence to handle the wiring yourself and enjoy faster, more stable connections. Let’s dive in and make your network setup hassle-free!
Credit: www.legrand.ca
Tools And Materials Needed
Setting up an RJ45 wall plate requires the right tools and materials. Using proper items ensures a clean and secure connection. It also saves time and prevents errors during installation.
This section covers the types of RJ45 wall plates, essential tools, and how to choose the right cable. Understanding these basics helps you complete the job with ease.
Rj45 Wall Plate Types
RJ45 wall plates come in different styles. Some have a single port, while others support multiple connections. Choose one that fits your needs and space.
Look for plates with clear labeling. This helps identify the correct cable connections later. Some plates include built-in cable management features.
Essential Tools
Several tools are necessary for a proper setup. A punch-down tool is key for securing wires into the wall plate slots. It ensures a tight and reliable connection.
A wire stripper helps remove the outer jacket of the cable without damaging the wires inside. A cable tester confirms if the connections work correctly.
Other helpful tools include a screwdriver for mounting the plate and a cable cutter for trimming wires.
Choosing The Right Cable
Pick a cable that matches your network speed and distance needs. Cat5e and Cat6 are common choices for home and office use. Cat6 supports faster speeds and better performance.
Check the cable length to avoid signal loss. Use cables with solid copper conductors for better reliability. Avoid cheap cables with poor shielding.
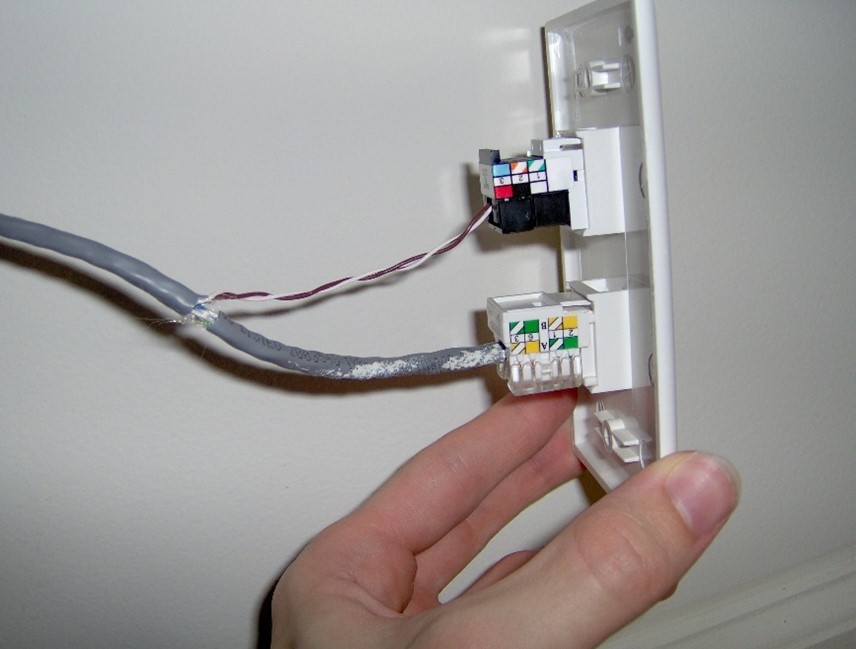
Credit: www.youtube.com
Preparing The Cable
Preparing the cable is the first important step to connect an RJ45 wall plate. Proper preparation ensures a strong and reliable network connection. Take time to handle the cable carefully and follow the steps below for the best results.
Measuring And Cutting
Measure the length of the cable needed for your setup. Leave a little extra length for flexibility. Use sharp cable cutters to make a clean, straight cut. Avoid crushing or damaging the cable during cutting.
Stripping The Cable Jacket
Remove about one inch of the outer jacket from the cable end. Use a cable stripper tool or a small knife. Be gentle to avoid cutting the inner wires. Expose the twisted pairs without nicking the insulation.
Untwisting And Aligning Wires
Untwist the wire pairs carefully. Straighten each wire for easy handling. Arrange the wires in the correct order according to your wiring standard. Keep the wires flat and neat before inserting them into the wall plate.
Wiring Standards
Understanding wiring standards is essential for connecting an RJ45 wall plate correctly. These standards ensure your network works well and avoids errors. Using the right wiring method helps keep your internet stable and fast. Two main standards exist for wiring RJ45 connectors. Knowing the difference helps you connect cables properly and safely.
T568a Vs T568b
T568A and T568B are the two main wiring standards. They define the order of colored wires inside the cable. Both standards work well for most networks. The main difference is the position of the green and orange pairs.
T568A places the green pair in pins 1 and 2. T568B swaps this with the orange pair in the same pins. Most home networks use T568B. Some government and older systems use T568A.
Consistency is key. Use the same standard on both ends of the cable. Mixing standards can cause connection problems and slow speeds.
Color Coding Guide
Wiring an RJ45 wall plate requires following a color code. Each wire color matches a specific pin number. This guide shows the sequence for each standard.
For T568A, the order is white/green, green, white/orange, blue, white/blue, orange, white/brown, brown. For T568B, it is white/orange, orange, white/green, blue, white/blue, green, white/brown, brown.
Keep wires straight and untwisted. Insert them fully into the slots on the wall plate. Proper color coding ensures strong, error-free connections.
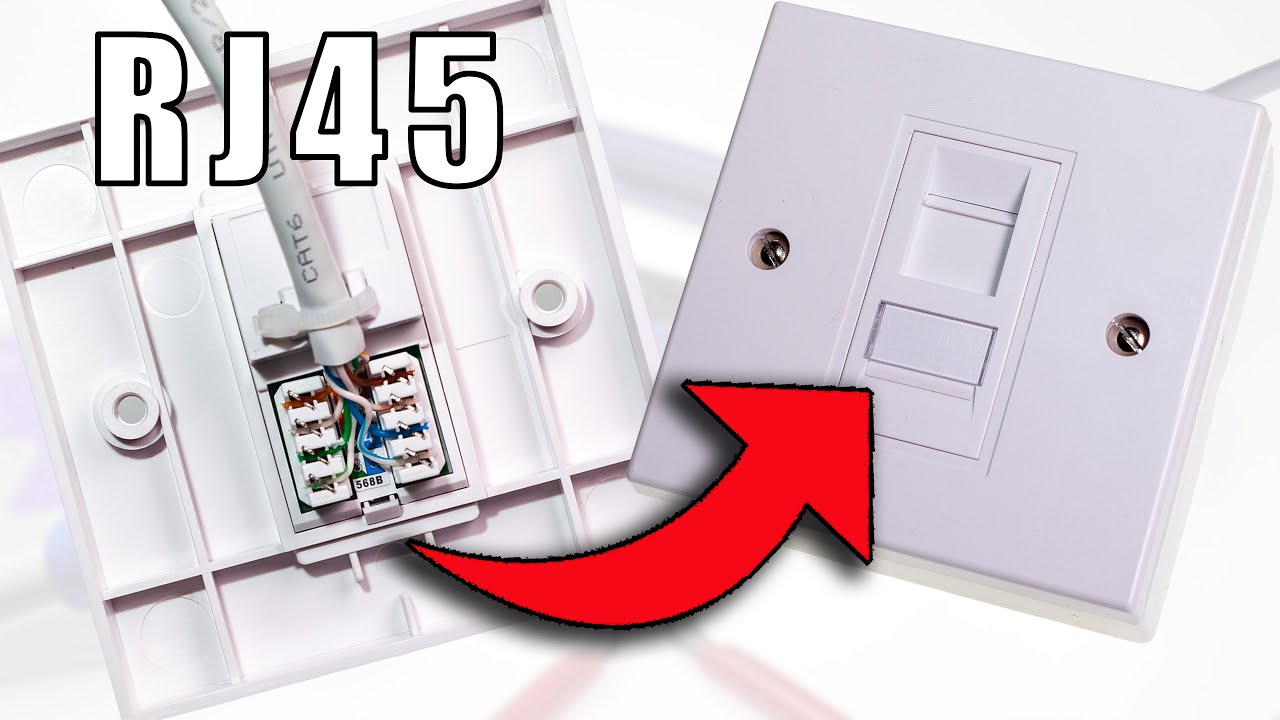
Connecting Wires To The Wall Plate
Connecting wires to the RJ45 wall plate is a key step in setting up a wired network. This process links your internet cables to the wall plate, allowing devices to connect easily. A proper connection ensures strong signal and less chance of network issues.
Wires must be placed correctly to maintain good data flow. Careful handling avoids damage and keeps connections stable over time. Follow clear steps to insert wires, secure them, and finish the setup efficiently.
Inserting Wires Into Idc Slots
Start by stripping about half an inch of the cable jacket. Separate the twisted pairs and straighten each wire. Match each wire to the color code on the wall plate. Insert each wire firmly into the correct IDC slot. Make sure wires sit fully inside the slots without crossing.
Using A Punch Down Tool
Use a punch down tool to press wires into the IDC slots. This tool pushes the wire into the metal contacts. It also cuts off extra wire length automatically. Press down evenly to avoid loose connections. The tool ensures a solid and lasting link between wire and plate.
Securing The Connections
After punching down, check each wire is tight. Tug gently to confirm no wires slip out. Arrange wires neatly to avoid stress or bending. Attach the wall plate to the wall box using screws. Tighten screws firmly to keep the plate stable on the wall.
Mounting The Wall Plate
Mounting the RJ45 wall plate is a key step in setting up your network connection. It holds the cable and connector firmly in place on the wall. Proper mounting keeps the connection stable and prevents damage.
Follow these steps carefully to mount the wall plate securely and neatly.
Attaching To The Wall Box
First, align the wall plate over the wall box. Make sure the connector fits through the hole in the plate. Use the screws that come with the plate. Insert each screw into the holes on the plate. Tighten the screws evenly to avoid tilting.
Do not overtighten. It can crack the plate or damage the wall box. Stop when the plate feels firm and flush against the wall.
Ensuring A Secure Fit
Check the wall plate for any wiggle or looseness. A loose plate can cause connection problems later. Press gently around the edges. If it moves, tighten the screws a little more.
Test the RJ45 jack by plugging in a cable. The connection should feel stable without any movement. A secure fit protects the cable and improves signal quality.
Testing The Connection
Testing the connection is a key step after hooking up an RJ45 wall plate. It ensures the cable works well and data flows without problems. Without testing, you might face slow internet or no connection at all. Testing saves time and frustration by catching issues early. Let’s explore how to check the connection properly.
Using A Cable Tester
A cable tester is a small device that checks if wires inside the cable are connected correctly. Plug one end of the cable into the tester’s main unit. Connect the other end to the remote unit. Turn on the tester. It will show if each wire is connected and working.
The tester can find broken wires or crossed connections. It also checks for shorts and open circuits. A good tester will have lights or a screen to show results clearly. Testing with this tool is fast and easy. It helps make sure your RJ45 wall plate is ready for use.
Troubleshooting Common Issues
Sometimes the tester shows problems. No light means no connection or bad wiring. Check that the cable is fully plugged in. Make sure the wires inside the wall plate are in the right order. Use the T568A or T568B wiring standard.
If the tester shows crossed wires, fix the order. Replace any damaged cables. For no signal, try a different cable or tester to rule out device failure. Recheck the connections at both ends. Fixing these issues improves your network’s speed and reliability.
Tips For A Neat Setup
Keeping your RJ45 wall plate setup neat makes a big difference. It helps your network run smoothly and looks tidy. A clean setup also makes future changes easier. Simple steps can keep cables organized and avoid connection problems. These tips focus on two key points: managing cables and avoiding interference.
Cable Management
Use cable ties to group wires together. This stops cables from tangling and cluttering the space. Label each cable near the wall plate. It helps identify connections fast. Avoid pulling cables too tight. Leave some slack for easy adjustments. Use cable clips to hold wires along walls. This keeps cables off the floor and prevents damage.
Avoiding Interference
Keep Ethernet cables away from power lines. Power cables can cause signal noise and slow speeds. Use shielded cables in areas with many electronic devices. This reduces signal loss and interference. Separate cables from devices like microwaves or cordless phones. These devices emit signals that disrupt data flow. A neat setup avoids these issues and keeps your network stable.

Credit: privacy.we-conect.com
Frequently Asked Questions
What Tools Do I Need To Hook Up Rj45 Wall Plate?
You need a punch-down tool, wire stripper, RJ45 connectors, and a screwdriver. These tools ensure a secure and neat installation. Using the right tools makes the process easier and reduces wiring errors.
How Do I Identify Rj45 Cable Wires?
RJ45 cables have eight color-coded wires. Follow the T568A or T568B wiring standard to arrange them correctly. Proper identification ensures the network connection works efficiently without interference or connection issues.
Can I Use Any Ethernet Cable With Rj45 Wall Plates?
Yes, but ensure the cable matches your network speed needs. Cat5e and Cat6 cables are common choices. Using the right cable improves data transmission and prevents connectivity problems.
How To Test Rj45 Wall Plate Connections?
Use a cable tester to check continuity and wiring accuracy. This device helps detect miswiring or faults in the connection. Testing ensures reliable network performance before finalizing the installation.
Conclusion
Hooking up an RJ45 wall plate is easier than it seems. Follow the steps carefully and take your time. Double-check your wiring to avoid connection problems. Use the right tools for a clean and secure fit. A properly connected wall plate improves your internet speed and reliability.
Practice makes perfect—don’t rush the process. Soon, your home or office will have a neat, professional network setup. Enjoy a stable and fast wired connection without hassle. Simple steps lead to great results.