Are you tired of struggling with loose screws and unstable shelves? Knowing how to install a wall anchor can change everything.
It’s a simple skill that makes your walls stronger and your hangings safer. Whether you want to hang a heavy mirror, mount a TV, or secure a shelf, the right wall anchor is your best friend. In this guide, you’ll learn step-by-step how to choose and install wall anchors like a pro.
Stick with me, and you’ll never worry about your wall hangings falling down again. Ready to make your space safer and more secure? Let’s dive in!

Credit: www.do-it-yourself-help.com
Types Of Wall Anchors
Wall anchors help hang items on walls safely. They hold screws tightly in drywall, plaster, or masonry. Different types of wall anchors fit different needs. Choosing the right anchor makes your job easier and safer.
Plastic Expansion Anchors
Plastic expansion anchors are common and easy to use. Drill a hole, insert the anchor, then screw in. The anchor expands inside the wall to hold tight. Best for light to medium loads on drywall.
Toggle Bolts
Toggle bolts have wings that open behind the wall. They spread the weight over a larger area. Good for heavy objects on hollow walls. Requires a larger hole for the wings to pass through.
Molly Bolts
Molly bolts are metal anchors that expand inside the wall. They provide strong support for medium to heavy loads. Insert and tighten the screw to expand the legs behind the wall. Ideal for drywall and plaster walls.
Self-drilling Anchors
Self-drilling anchors do not need a pre-drilled hole. Screw directly into drywall with a screwdriver or drill. They have sharp threads for easy installation. Suitable for light to medium loads and quick fixes.
Tools Needed For Installation
Installing wall anchors requires some basic tools. These tools help you make strong and secure anchor points. Having the right tools makes the job easier and faster. Here are the main tools you need for installation.
Drill And Drill Bits
A drill is essential for making holes in the wall. Choose a drill bit that matches the size of the wall anchor. Use a drill with variable speed for better control. Drilling a clean hole helps the anchor fit tightly.
Screwdriver
You need a screwdriver to insert screws into the anchors. Use the right type, like a flathead or Phillips, depending on the screw. A screwdriver helps you tighten screws securely without damaging the wall.
Hammer
A hammer is useful to tap anchors gently into the drilled holes. Light taps push the anchor in without cracking the wall. Avoid hitting too hard to keep the anchor and wall safe.
Measuring Tape
Measure the exact spot on the wall before drilling. Measuring tape helps place anchors evenly and at the right height. Accurate measuring prevents mistakes and keeps your installation neat.
Preparing The Wall
Preparing the wall is the first step for a strong anchor installation. This step ensures the anchor holds well and stays safe. A clean, well-planned wall surface helps the anchor work better. Take your time to prepare the wall correctly. It makes the whole process easier and more reliable.
Choosing The Right Location
Select a spot on the wall that fits your needs. Avoid areas with cracks or weak spots. Pick a place where the anchor can hold heavy weight. Walls made of drywall or plaster need special care. Choose a solid area, like near a stud, for better support.
Marking Drill Points
Use a pencil to mark where you will drill. Measure carefully to keep the mark straight and level. Double-check the spot before drilling. Clear and accurate marks help avoid mistakes. This step saves time and prevents damage to the wall.
Checking For Obstacles
Look inside the wall for pipes and wires. Use a stud finder or scanner to detect hidden objects. Avoid drilling where there are electrical cables or plumbing. This keeps you safe and prevents costly repairs. Always check twice before starting to drill.
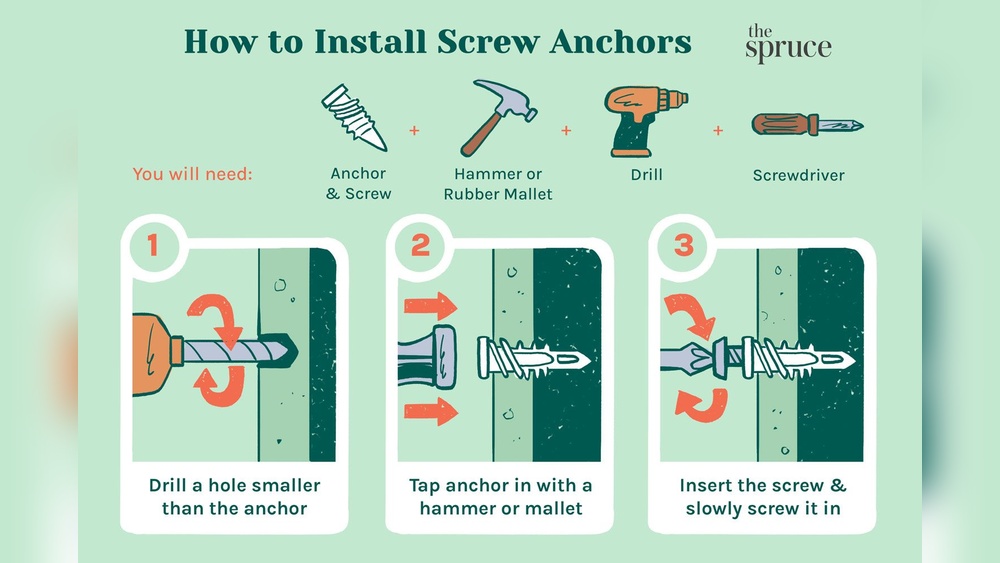
Step-by-step Installation
Installing a wall anchor is a simple process that helps hold screws firmly in place. Follow these steps carefully to ensure the anchor is secure and ready for use. Each step builds on the last, making the installation smooth and effective.
Drilling The Hole
Choose a drill bit that matches the anchor size. Drill a hole straight into the wall. Drill only as deep as the anchor requires. Clean the hole of dust and debris. A clean hole helps the anchor grip better.
Inserting The Anchor
Push the anchor gently into the hole. Use your fingers or a small hammer if needed. The anchor should fit snugly without bending. Make sure it sits flush with the wall surface. This keeps the screw aligned properly.
Securing The Anchor
Check the anchor for a tight fit by pressing lightly. If loose, remove and try a larger anchor. A loose anchor cannot hold weight well. Secure anchors give the best support and safety. Confirm the anchor does not move before screwing.
Installing The Screw
Insert the screw into the anchor carefully. Use a screwdriver or drill at low speed. Tighten the screw until it feels firm. Avoid over-tightening to prevent damage. The screw should hold the item securely against the wall.
Tips For Strong Support
Strong support is key when installing wall anchors. It keeps items safe and secure on the wall. Follow these simple tips to ensure your anchors hold tight and last long. Proper steps help avoid damage and keep your walls intact.
Selecting Proper Anchor Size
Choose an anchor size that fits your wall and item weight. Too small anchors can fail and cause damage. Large anchors fit better in thicker walls and carry more weight. Always check the packaging for weight limits and wall type.
Avoiding Over-tightening
Do not tighten the screws too much. Over-tightening can crack the wall or strip the anchor. Tighten screws until they feel firm but stop before they resist too much. This prevents damage and keeps the anchor secure.
Testing Stability
After installation, gently pull or push the item to test its hold. Small movements show if the anchor grips well. If it shifts or feels loose, remove and try a bigger anchor or different wall spot. Testing ensures safety and strong support.

Credit: www.wikihow.com
Common Mistakes To Avoid
Installing wall anchors seems simple, but many make avoidable mistakes. These errors cause weak holds and damage walls. Knowing what to avoid helps you install anchors correctly and safely.
Incorrect Hole Size
Drilling a hole too big or too small is common. A large hole makes the anchor loose. A small hole makes it hard to insert the anchor. Always match the drill bit size with the anchor size.
Using Wrong Anchor Type
Not all anchors work for every job. Plastic anchors fail under heavy weight. Metal anchors suit heavy items better. Choose the right anchor for your wall and load type.
Ignoring Wall Material
Wall material affects anchor choice and installation. Drywall, concrete, and brick need different anchors. Using wrong anchors damages walls or causes failure. Identify wall type before starting your project.

Credit: www.picturehangsolutions.com
Frequently Asked Questions
What Tools Do I Need To Install A Wall Anchor?
You need a drill, screwdriver, wall anchor, and appropriate drill bit. A pencil helps mark the spot. Safety goggles are also recommended for eye protection during drilling.
How Do I Choose The Right Wall Anchor Type?
Select anchors based on wall material and load weight. Plastic anchors suit light loads; metal or toggle anchors support heavier items. Always check the anchor’s packaging for weight limits and wall compatibility.
Can I Install Wall Anchors In Drywall Without Studs?
Yes, drywall anchors are designed for this. They spread the load across a wider area in drywall. Avoid heavy items unless using heavy-duty anchors or securing into studs for stability.
How Deep Should I Drill For A Wall Anchor?
Drill a hole slightly deeper than the anchor length. This ensures the anchor fits fully and grips the wall properly. Avoid drilling too deep to prevent wall damage.
Conclusion
Installing wall anchors is simple with the right steps. Choose the correct anchor for your wall type. Drill a hole carefully and insert the anchor firmly. Tighten the screw to secure your item safely. Take your time and follow each step clearly.
This way, your wall mount will hold strong. Practice makes perfect, so don’t rush. Soon, you will handle wall anchors with ease.