Looking to boost your home’s security quickly and easily? Installing a single sided deadbolt might be the perfect solution for you.
It’s a simple upgrade that can make a big difference in protecting your space. Whether you’re new to DIY projects or just want clear, step-by-step instructions, this guide will walk you through everything you need to know. By the end, you’ll have the confidence to install your deadbolt yourself and enjoy greater peace of mind.
Ready to get started? Let’s dive in!
Choose The Right Deadbolt
Choosing the right deadbolt is very important for your door’s safety. The right choice gives strong protection and fits well with your door. It also makes sure you can use the lock easily every day. Take time to compare different deadbolts before buying.
Consider how the lock works, the material it is made from, and the safety features it offers. Each factor affects how well the deadbolt will protect your home. Learn about the key points to pick the best deadbolt for your needs.
Single Sided Vs Double Sided
Single sided deadbolts lock from one side only. They have a thumb turn inside and a keyhole outside. Double sided deadbolts need a key on both sides to lock or unlock. Single sided locks are easier to use from inside. Double sided locks add extra security but may slow you down in emergencies.
Choose single sided deadbolts for convenience and quick exit. Pick double sided if you want more control over who opens the door.
Materials And Finishes
Deadbolts come in many materials like brass, steel, and zinc. Steel is very strong and lasts long. Brass resists rust and looks nice. Zinc is less expensive and works well inside.
Finishes protect the lock and match your door style. Common finishes are satin nickel, bronze, and chrome. Pick a finish that resists weather and fits your home’s look.
Security Features
Look for deadbolts with strong locking bolts. A bolt at least one inch long stops forced entry better. Some deadbolts have anti-drill plates to block drilling. Others have anti-pick pins inside the lock cylinder.
Choose deadbolts that meet safety standards and have good reviews. These features help keep your door secure and give peace of mind.
Credit: www.youtube.com
Gather Necessary Tools
Gathering the right tools is the first step to install a single sided deadbolt. Having everything ready saves time and avoids frustration. Each tool helps with a specific part of the installation process. Knowing what you need makes the job easier and faster.
Drill And Drill Bits
A drill is essential for making holes in the door. Use drill bits that match the size of the deadbolt components. A sharp drill bit makes clean holes without damaging the door. Choose a cordless drill for better control and ease.
Screwdrivers
Screwdrivers help tighten screws securely. Both Phillips and flathead screwdrivers are often needed. Use the right size screwdriver to avoid stripping screws. A magnetic screwdriver can hold screws in place while working.
Measuring Tape And Pencil
Measuring tape ensures accurate placement of the deadbolt. Measure twice to avoid mistakes. Use a pencil to mark drill points clearly. Light pencil marks are easy to erase later.
Chisel And Hammer
A chisel and hammer help create space for the deadbolt plate. Use the chisel carefully to avoid splitting the wood. Tap gently with the hammer to make precise cuts. This step ensures the deadbolt fits flush with the door.
Prepare The Door
Preparing the door is an important first step to install a single sided deadbolt. It ensures the lock fits well and works properly. Taking time here saves problems later. Follow these clear steps to get started.
Measure And Mark Placement
Start by measuring the height where the deadbolt will go. Usually, it is about 6 to 12 inches above the doorknob. Use a tape measure and pencil to mark the exact spot on the door edge and face. Check that the marks align on both sides of the door. This helps the lock fit perfectly.
Drill The Hole For The Deadbolt
Next, drill the hole for the deadbolt cylinder. Use a drill with the size recommended by the lock instructions. Drill straight through the door at the marked spot. Take your time and keep the drill steady. Clean out any wood dust from the hole. This hole will hold the lock mechanism securely.
Create The Strike Plate Area
The strike plate goes on the door frame to catch the bolt. Mark its position by closing the door and noting where the bolt hits. Use a chisel to make a shallow recess in the frame for the strike plate. It should sit flush with the wood surface. This step helps the door lock tight and stay secure.
Install The Deadbolt Mechanism
Installing the deadbolt mechanism is a key step in securing your door. This process ensures the lock fits well and works smoothly. Careful installation helps the deadbolt protect your home effectively.
Insert The Deadbolt Into Door
Start by sliding the deadbolt into the hole on the door edge. The bolt should fit snugly without forcing. Make sure the bolt faces the correct direction. Check that the bolt moves freely when you push it.
Attach The Exterior Side
Place the exterior part of the lock on the outside of the door. Align the spindle with the deadbolt mechanism inside. Hold it steady and insert the screws. Tighten screws just enough to hold the lock firmly.
Secure The Interior Side
Fix the interior side of the lock onto the door’s inside. Connect the spindle through the mechanism carefully. Insert and tighten the screws to secure the lock in place. Test the lock by turning the knob or thumb turn. The deadbolt should slide in and out smoothly.
Install The Strike Plate
Installing the strike plate is a key step for securing your deadbolt. The strike plate holds the bolt in place when locked. It must be set correctly for smooth locking and strong security.
Align The Strike Plate
Place the strike plate on the door frame. Make sure the bolt lines up with the hole. Check that the plate sits flat and straight. Mark the screw holes with a pencil for easy drilling.
Chisel The Door Frame
Use a chisel to create a shallow recess on the door frame. This allows the strike plate to sit flush with the frame. Work slowly and carefully to avoid damage. Test fit the plate often during chiseling.
Screw In The Strike Plate
Hold the strike plate in place. Use a screwdriver to fasten the screws tightly. Secure each screw to keep the plate from moving. Double-check the alignment by locking the deadbolt gently.
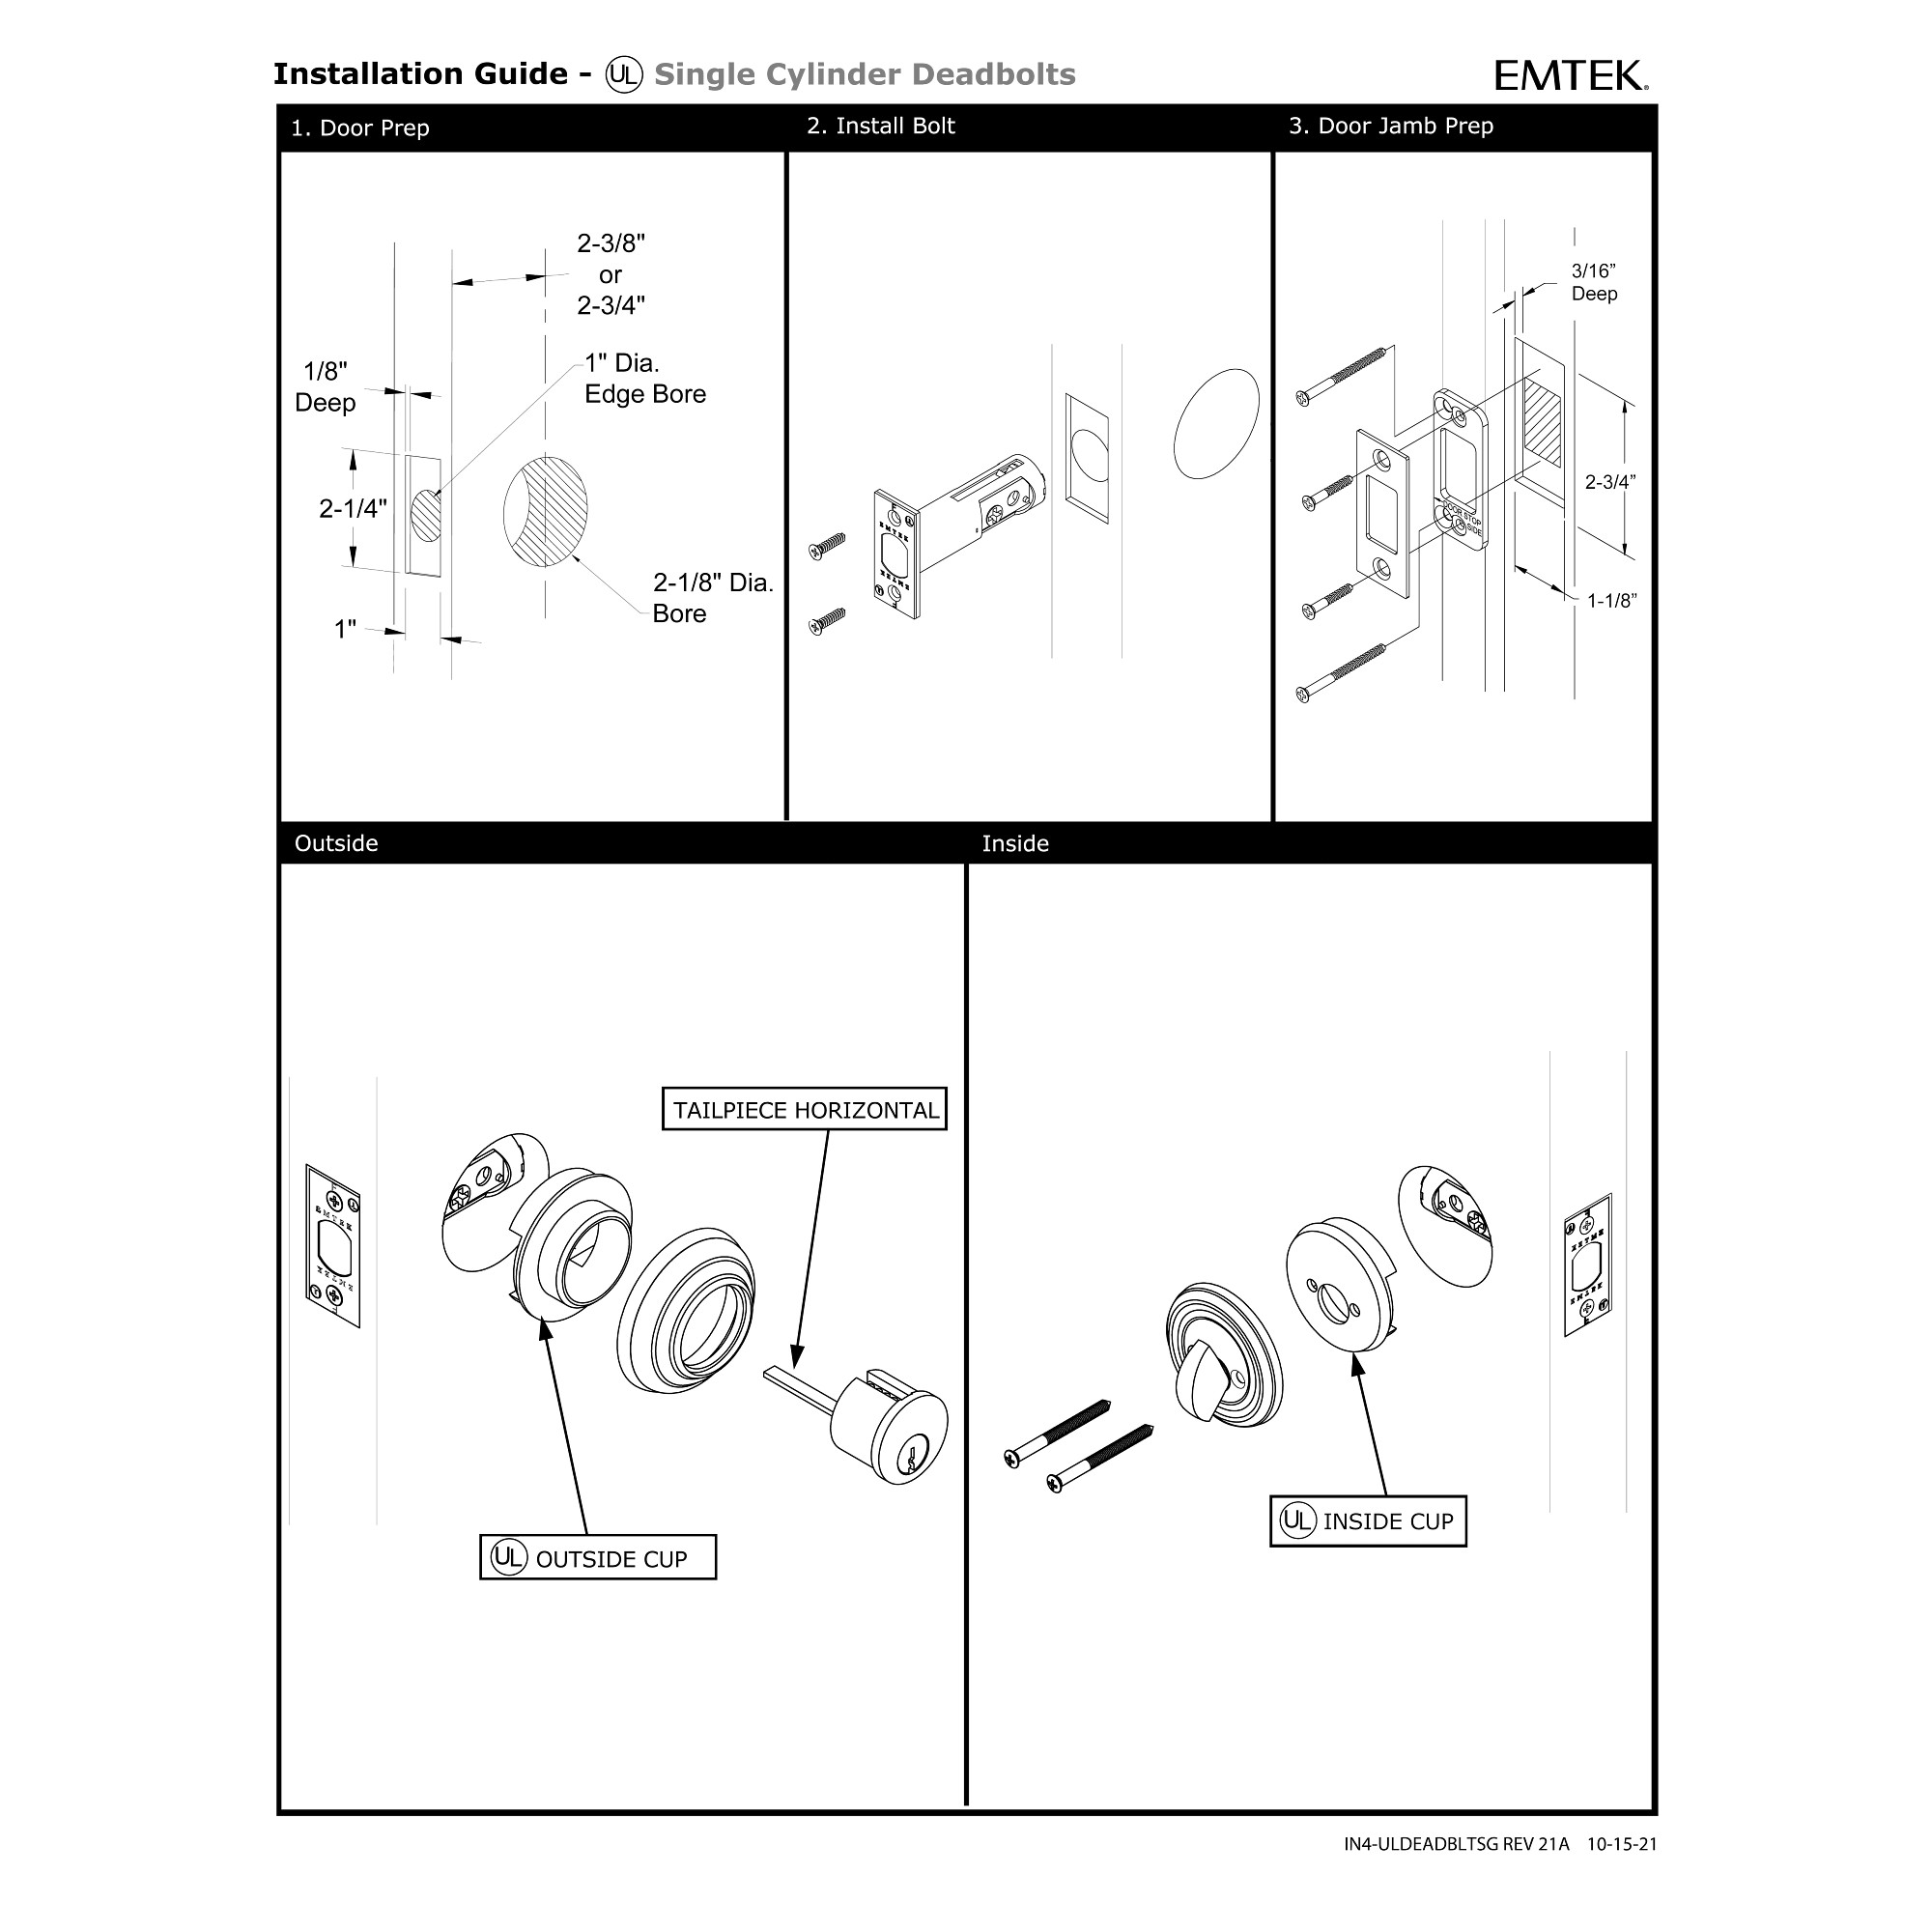
Credit: www.emtek.com
Test The Deadbolt
Testing the deadbolt is a key step after installation. It ensures your lock works properly and keeps your door secure. Take your time to test every part of the deadbolt carefully. This helps avoid problems later.
Check Smooth Operation
Turn the thumb turn on the inside to extend the bolt. It should move smoothly without sticking or jamming. Push the door gently to see if the bolt fits well in the strike plate. The lock should slide in and out easily.
Try locking and unlocking several times. Make sure the deadbolt moves freely every time. Listen for any strange sounds like grinding or scraping. These can mean the lock is not aligned properly.
Adjust If Necessary
If the bolt does not move smoothly, check the alignment of the strike plate. Loosen the screws and adjust its position slightly. Tighten the screws and test the bolt again. Repeat this until the bolt fits perfectly.
Also, check that the door closes fully without pushing hard. If the door is too tight, the deadbolt may not work well. You may need to sand the door edge or reposition the strike plate for a better fit.
Maintenance Tips
Maintaining your single sided deadbolt is key to keeping it working well. Simple care can stop problems and make your lock last longer. Follow these easy tips to keep your deadbolt smooth and secure.
Lubricate Moving Parts
Lubricate the lock’s moving parts every six months. Use a graphite or silicone-based lubricant for best results. Avoid oil sprays; they can attract dust and dirt. Apply a small amount inside the keyhole and on the bolt. This keeps the lock turning smoothly and reduces wear.
Regular Inspection
Check your deadbolt regularly for any signs of damage or wear. Look for loose screws and tighten them if needed. Test the lock by turning the key and thumb turn several times. Make sure the bolt slides fully without sticking. Early fixes prevent bigger problems later.

Credit: support.shopyalehome.com
Frequently Asked Questions
What Tools Do I Need To Install A Single Sided Deadbolt?
You need a drill, screwdriver, measuring tape, pencil, hole saw, and the deadbolt kit. These tools help ensure precise and secure installation.
How Long Does It Take To Install A Single Sided Deadbolt?
Installation typically takes 30 to 60 minutes. Time varies based on skill level and door type.
Can I Install A Single Sided Deadbolt On Any Door?
Most wooden and metal doors work well. Ensure your door is at least 1 3/8 inches thick for proper fitting.
Is A Single Sided Deadbolt More Secure Than Standard Locks?
Yes, it offers enhanced security by requiring a key on one side only, reducing forced entry risks.
Conclusion
Installing a single sided deadbolt adds extra security to your door. The steps are simple and can be done with basic tools. Take your time to measure and align parts correctly. This ensures the lock works smoothly and lasts longer.
Always double-check your work before finishing. A well-installed deadbolt gives peace of mind and protects your home. Keep instructions handy for future reference or adjustments. Safety starts with small actions like this. You can do it!