Have you ever taken apart your Schlage deadbolt and then felt stuck trying to put it back together? It can be frustrating when your lock doesn’t click into place just right, leaving you worried about your home’s security.
But don’t worry—reassembling your deadbolt is easier than you think. In this guide, you’ll get clear, step-by-step instructions that anyone can follow. By the end, you’ll have your Schlage deadbolt working smoothly again, giving you peace of mind and saving you a call to the locksmith.
Keep reading, and let’s get your lock back in perfect shape.
Tools You’ll Need
Reassembling a Schlage deadbolt requires the right tools. Having them ready makes the process smoother and faster. Each tool plays a specific role in ensuring the lock fits and works properly. This section lists all the essential tools needed for the job.
Screwdriver
A screwdriver is the most important tool. Most Schlage deadbolts use Phillips head screws. A medium-sized Phillips screwdriver works best. It helps remove and tighten screws without stripping them.
Needle-nose Pliers
Needle-nose pliers help hold small parts firmly. They are useful for positioning springs or clips inside the lock. Their slim shape fits into tight spaces easily.
Flathead Screwdriver
A flathead screwdriver helps pry apart pieces gently. It also helps push or lift small components during assembly. Choose a small flathead for precision work.
Tweezers
Tweezers are handy for handling tiny screws and pins. They prevent dropping or losing small parts. Using tweezers makes the assembly less frustrating.
Lubricant
Lubricant keeps the deadbolt moving smoothly after assembly. Use a graphite or silicone-based lubricant. Avoid oily lubricants as they attract dirt.
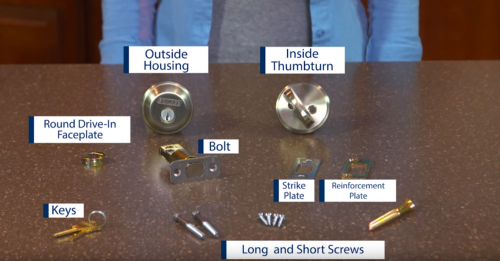
Identify Deadbolt Parts
Knowing the parts of a Schlage deadbolt helps make reassembly easy. Each piece has a clear role in how the lock works. Identifying these parts lets you avoid mistakes during putting the deadbolt back together.
This section breaks down the main components. Understanding their names and functions makes your task simple and quick.
Deadbolt Latch
The latch is the metal piece that slides into the door frame. It locks and unlocks the door by moving in and out. This part is attached to the door edge.
Exterior Key Cylinder
This is where you insert the key outside the door. It connects to the internal mechanism to move the latch. The cylinder has a keyhole and turns the lock.
Interior Thumb Turn
The thumb turn is inside the door. You use it to lock or unlock without a key. It is easy to turn by hand and controls the latch.
Mounting Plate
The mounting plate holds the lock parts on the door. It fits behind the interior thumb turn or exterior cylinder. Screws secure the plate tightly to the door.
Screws And Spacers
These small parts keep everything together. Screws fasten the lock components to the door. Spacers help align the pieces so they work smoothly.
Prepare The Deadbolt Components
Preparing the deadbolt components is the first step to putting your Schlage deadbolt back together. It ensures the lock works smoothly and lasts longer. Having all parts ready helps avoid mistakes and saves time during assembly.
Start by cleaning each piece. Remove dust, dirt, and old grease. Clean parts fit better and prevent damage inside the lock.
Gather All Deadbolt Parts
Collect every piece removed from the door. This includes the exterior and interior assemblies, screws, latch, strike plate, and tailpiece. Missing parts stop the lock from working correctly.
Inspect For Damage Or Wear
Look closely at each component. Check for cracks, rust, or broken pieces. Damaged parts can cause the lock to jam or fail. Replace any part that looks worn out.
Lubricate Moving Parts
Apply a small amount of graphite or silicone lubricant to the latch and bolt. Avoid oil-based lubricants as they attract dust. Proper lubrication makes the deadbolt slide smoothly.
Organize Parts For Easy Access
Lay the parts on a clean surface in the order you will assemble them. Use a tray or container to keep screws and small pieces together. This keeps everything neat and easy to find.
Assemble The Interior Side
Assembling the interior side of a Schlage deadbolt is a key step in putting it back together. This part controls the locking mechanism from inside your door. Careful assembly ensures smooth operation and security.
Follow clear steps to align all parts correctly. Small mistakes can cause the lock to jam or not work at all. Take your time and handle each piece gently.
Install The Interior Plate
Start by placing the interior plate onto the door’s inner surface. Make sure it fits snugly around the spindle hole. This plate holds the lock parts in place and gives a clean finish.
Attach The Thumb Turn
Next, slide the thumb turn onto the spindle. This knob turns the bolt inside the door. Press it firmly until it clicks or fits tightly. It should turn freely without wobbling.
Secure With Screws
Use the provided screws to attach the interior plate and thumb turn. Tighten screws evenly to avoid misalignment. Do not over-tighten, or you might strip the threads.
Check The Bolt Operation
Turn the thumb turn several times. The deadbolt should move smoothly in and out of the door frame. If it feels stuck, loosen screws and adjust the parts slightly.
Attach The Exterior Side
Attaching the exterior side of your Schlage deadbolt is a key step. This part holds the lock cylinder and keyhole. It must align perfectly with the interior side for smooth operation.
Take your time to position it correctly. A loose or misaligned exterior side can cause the lock to jam or not turn.
Align The Exterior Plate
First, place the exterior plate on the door. Match the tailpiece through the hole in the door. The tailpiece must fit into the lock mechanism inside.
Check that the plate sits flush against the door surface. It should not tilt or stick out.
Insert The Exterior Screws
Next, use the provided screws to secure the exterior side. Insert screws through the holes in the plate. Tighten gently to hold it firmly.
Do not overtighten. Screws that are too tight can strip or break the threads.
Test The Exterior Cylinder
After securing, test the key in the exterior cylinder. It should turn smoothly without resistance. If it sticks, adjust the alignment or screws.
Ensure the tailpiece moves freely inside the lock mechanism.

Credit: www.youtube.com
Secure The Deadbolt With Screws
Secure the deadbolt with screws to keep it strong and safe. This step holds all parts together tightly. Without screws, the lock can come loose or stop working.
Use the correct screws for your Schlage deadbolt. They fit the holes perfectly and keep the lock steady. Tighten each screw carefully by hand first. Then use a screwdriver to make them firm.
Align The Deadbolt Parts
Before screwing, check the deadbolt parts line up well. The lock and plate must fit flush against the door. Proper alignment stops the deadbolt from jamming later.
Choose The Right Screws
Use screws that came with your deadbolt kit. They are the right length and thickness. Using wrong screws can damage the lock or door.
Tighten Screws Evenly
Screw in all screws a little at a time. Tighten them evenly to avoid twisting the lock. Use a screwdriver that fits the screw head well.
Check For Firmness
After tightening, check if the deadbolt is firm. Wiggle the lock gently to feel any looseness. Tighten screws more if needed.
Test The Lock Functionality
Testing the lock functionality is a key step after reassembling a Schlage deadbolt. It ensures the lock works smoothly and keeps your door secure.
Check every part of the lock to confirm it operates correctly. This simple test prevents future problems and saves time.
Check The Key Operation
Insert the key into the lock cylinder. Turn it gently in both directions. The key should rotate smoothly without sticking. It should lock and unlock the deadbolt easily.
Test The Thumbturn
Use the thumbturn inside the door. Turn it back and forth. The deadbolt should move freely and lock securely. No resistance or jamming is allowed.
Verify Deadbolt Movement
Close the door and test the deadbolt by locking and unlocking. The bolt must slide in and out completely. If it sticks or is hard to move, adjust the lock parts.
Listen For Unusual Sounds
Pay attention to clicks or grinding noises. Smooth, quiet operation means the lock is assembled properly. Strange sounds suggest misalignment or loose parts.
Test With The Door Open And Closed
Operate the lock with the door open first. Then test with the door closed. Both should work without force. The lock needs to secure the door firmly.
Troubleshooting Common Issues
Troubleshooting common issues helps fix problems fast. It saves time and keeps your Schlage deadbolt working well. Knowing what to check makes reassembling easier and less frustrating.
Many people face similar problems with deadbolts. Understanding these issues helps you avoid mistakes. Below are some usual problems and how to solve them step by step.
Checking The Alignment Of The Deadbolt
Misalignment stops the deadbolt from moving smoothly. Check if the bolt lines up with the strike plate. Adjust the plate or bolt until they fit perfectly. Test the lock several times to confirm smooth action.
Ensuring The Lock Cylinder Fits Properly
The lock cylinder must sit flush inside the door. Too tight or loose causes problems. Remove and reinsert the cylinder carefully. Use the correct screws to hold it steady without extra pressure.
Tightening Loose Screws Correctly
Loose screws cause parts to wobble or misalign. Tighten all screws firmly but do not overtighten. Over-tightening can damage the lock or door. Check every screw on the interior and exterior sides.
Fixing The Turn Piece Or Thumb Turn Issues
The thumb turn might stick or not turn smoothly. Check for dirt or debris blocking the parts. Clean gently with a soft cloth. Lubricate the mechanism with a dry graphite spray for smooth movement.
Testing The Lock’s Function Before Final Assembly
Always test the lock before full reassembly. Insert the key and turn the lock several times. Make sure the deadbolt moves freely and locks securely. Adjust parts again if needed before finishing.
Maintenance Tips For Longevity
Proper maintenance helps your Schlage deadbolt last longer. It keeps the lock working smoothly and prevents damage. Small efforts now save big repair costs later. Follow these simple tips to keep your deadbolt in great shape.
Clean The Lock Regularly
Dirt and dust can build up inside the lock. Wipe the exterior with a soft cloth. Use compressed air to clear dust from keyholes. Avoid using water or harsh chemicals that harm the lock.
Lubricate The Deadbolt
Use graphite powder or a silicone-based lubricant. Apply it inside the keyhole and on moving parts. This reduces friction and stops the lock from sticking. Do this twice a year for best results.
Check For Loose Screws
Loose screws make the lock unstable. Tighten all screws on the faceplate and strike plate. Make sure the deadbolt moves freely without resistance. This keeps your lock secure and reliable.
Inspect The Door Alignment
Misaligned doors stress the deadbolt mechanism. Check if the door closes smoothly. Adjust hinges or strike plate if needed. Proper alignment prevents wear and tear on the lock.
Avoid Using Excessive Force
Forcing the key or deadbolt causes damage. Turn the key gently and avoid pushing hard on the lock. Smooth operation extends the life of your deadbolt. Treat it with care every time.
Credit: www.schlage.com

Credit: forums.wyze.com
Frequently Asked Questions
How Do I Reassemble A Schlage Deadbolt Correctly?
To reassemble a Schlage deadbolt, align the internal components carefully. Insert the latch into the door, attach the exterior and interior parts, and tighten screws securely. Ensure the lock mechanism moves smoothly before finishing installation.
What Tools Are Needed To Put A Schlage Deadbolt Back Together?
You need a Phillips screwdriver, a flathead screwdriver, and possibly pliers. These tools help tighten screws, position the latch, and align the lock components accurately.
How Can I Avoid Mistakes When Reassembling A Schlage Deadbolt?
Follow the manufacturer’s instructions step-by-step. Keep track of all parts and screws. Test the lock’s function before finalizing to ensure smooth operation without forcing any component.
How Long Does It Take To Reassemble A Schlage Deadbolt?
Reassembling a Schlage deadbolt typically takes 15 to 30 minutes. This depends on your familiarity with the lock and having the right tools ready.
Conclusion
Putting a Schlage deadbolt back together is simple with the right steps. Take your time and follow each part carefully. Check that all pieces fit snugly before tightening screws. Test the lock to ensure it works smoothly. A well-assembled deadbolt keeps your home safe and secure.
Practice makes perfect, so don’t worry if it takes a few tries. Keep tools and instructions handy for future repairs. You now have the confidence to fix this lock yourself.