Are you ready to make your floor lifting projects easier and safer? Installing a floor lift jack might sound tricky, but with the right steps, you can do it yourself without hassle.
Imagine lifting heavy floors smoothly and confidently, saving time and avoiding strain. In this guide, you’ll discover simple, clear instructions that anyone can follow. Keep reading, and you’ll gain the skills to handle your floor lift jack like a pro—making your work faster and more efficient than ever before.
Choosing The Right Floor Lift Jack
Choosing the right floor lift jack is a key step before installation. The right jack ensures safety and efficiency during use. It depends on your specific needs and the type of work you plan to do. Consider the load weight, jack type, and safety features. These factors help you pick the best floor lift jack for your tasks.
Types Of Floor Lift Jacks
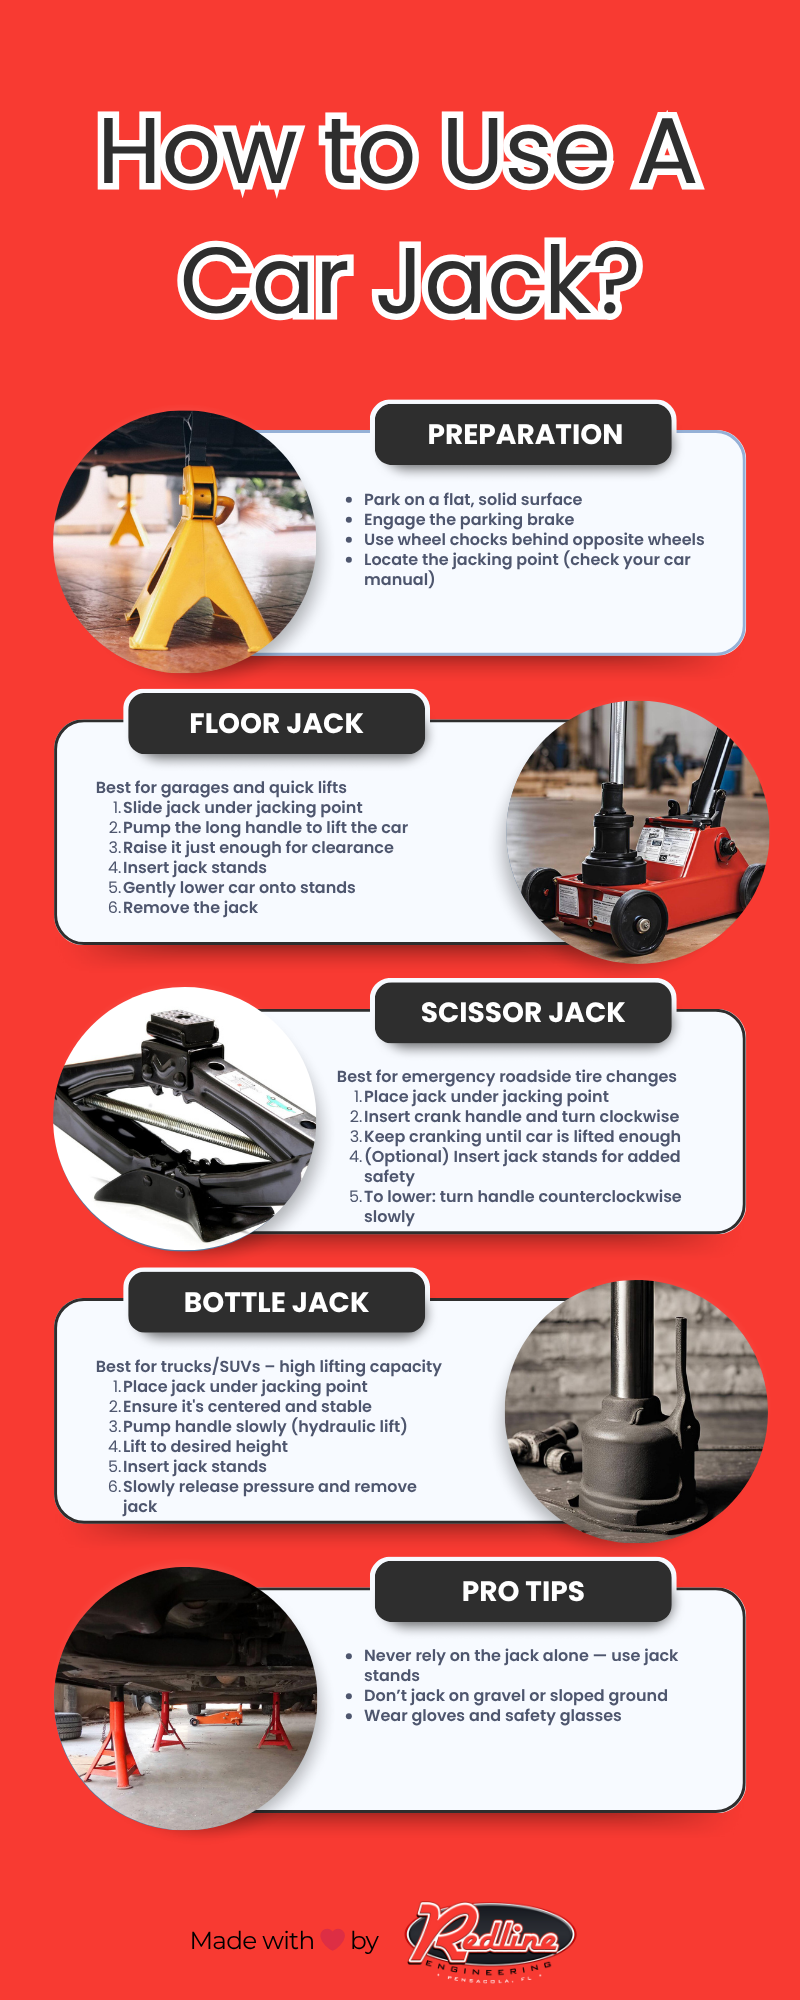
There are several types of floor lift jacks. Hydraulic jacks use fluid pressure to lift heavy loads. Bottle jacks are compact and good for tight spaces. Scissor jacks are lightweight and easy to carry. Each type suits different jobs and vehicle sizes. Choose a type that fits your work environment and lifting needs.
Weight Capacity Considerations
Check the weight capacity before choosing a floor lift jack. The jack must handle the heaviest load you plan to lift. Overloading a jack can cause failure and accidents. Always select a jack with a higher capacity than your heaviest load. This provides a safety margin and ensures reliable performance.
Safety Features To Look For
Safety is crucial when using a floor lift jack. Look for features like a wide base for stability. A strong locking mechanism prevents the jack from slipping. Some jacks have overload valves to stop lifting too much weight. Non-slip handles improve control and reduce accidents. These features protect you and your vehicle.

Credit: www.amazon.com
Preparing For Installation
Preparing for the installation of a floor lift jack is a crucial step. It sets the stage for a smooth and safe process. Taking time to prepare helps avoid mistakes and saves effort later. This section guides you through the key tasks before starting.
Gathering Necessary Tools
Start by collecting all tools needed for the job. This usually includes wrenches, screwdrivers, and a measuring tape. Check the lift jack manual for specific tools. Having tools ready prevents interruptions. Organize them in one place for easy access.
Selecting The Installation Location
Choose a flat and sturdy surface for the floor lift jack. The area must support heavy weight without shifting. Avoid uneven floors or soft ground. Ensure there is enough space to work around the jack safely. Good lighting helps during installation and use.
Clearing The Workspace
Remove all obstacles from the installation area. Clear tools, debris, or loose items from the floor. A clean space reduces trip hazards. It also allows better movement and equipment handling. Sweep the floor if necessary to remove dust or small particles.
Installing The Floor Lift Jack
Installing a floor lift jack requires careful steps to ensure safety and efficiency. Follow each step closely to set up the jack correctly. Proper installation helps the lift work smoothly and last longer.
Positioning The Jack
Start by placing the jack on a flat, solid surface. The spot should be near the vehicle’s lifting points. Check that the jack sits firmly without wobbling. Correct positioning prevents accidents and damage.
Securing The Base
Secure the base of the jack to the floor using bolts or screws. Use the holes on the base plate as guides. Tighten the bolts firmly but avoid over-tightening. A stable base keeps the jack steady under heavy loads.
Connecting Hydraulic Lines
Attach the hydraulic lines to the jack’s ports carefully. Match each line with the correct fitting. Tighten connections to avoid leaks, but do not force them. Test the hydraulic system before use to ensure proper flow.
Credit: www.redlinestands.com
Testing And Adjusting
Testing and adjusting a floor lift jack is crucial for safe and efficient use. This step ensures the jack works correctly before lifting any heavy load. Careful checks prevent accidents and extend the jack’s life. Follow each test to confirm the jack functions as expected.
Initial Function Test
Start by raising the jack slowly without any load. Watch the movement for smooth operation. The jack should lift evenly without jerks or strange noises. Lower the jack fully and check if it moves back smoothly. If it feels stiff or uneven, stop and inspect the parts.
Adjusting Pressure Settings
Find the pressure adjustment valve on the jack. Turn the valve in small steps to change the pressure. Higher pressure lifts heavier loads but needs more force. Lower pressure makes the jack easier to pump. Test the jack after each adjustment to find the right balance.
Checking For Leaks
Look closely around all seals and hoses. Use a dry cloth to detect oil spots or wet areas. Small leaks can cause the jack to lose pressure quickly. Tighten loose fittings or replace damaged parts immediately. A leak-free jack keeps the pressure steady and safe.
Maintenance Tips
Maintaining a floor lift jack ensures safe and smooth operation. Proper care extends its life and prevents accidents. Follow these tips to keep your lift jack in top shape.
Regular Inspection Routines
Check the jack before each use. Look for cracks, rust, or loose parts. Ensure the wheels roll smoothly. Test the lifting mechanism for any unusual sounds. Replace worn or damaged parts immediately.
Lubrication Guidelines
Apply lubricant to moving parts monthly. Use light machine oil or grease made for tools. Avoid over-lubricating to prevent dirt buildup. Wipe off excess oil after application. Lubrication reduces friction and wear.
Troubleshooting Common Issues
If the jack won’t lift, check the hydraulic fluid level. Look for leaks around seals and cylinders. Tighten any loose bolts or screws. If the jack lowers slowly, bleed air from the system. Contact a professional for complex repairs.

Credit: www.youtube.com
Frequently Asked Questions
What Tools Are Needed To Install A Floor Lift Jack?
You need a wrench set, screwdrivers, and a jack stand. These tools ensure secure and proper installation of the floor lift jack.
How Do I Position The Floor Lift Jack Correctly?
Place the jack under the vehicle’s lifting point. Align it with the manufacturer’s recommended spots for safety and stability.
How To Ensure Safety During Floor Lift Jack Installation?
Wear protective gear and work on a flat surface. Use wheel chocks and never rely solely on the jack for support.
Can I Install A Floor Lift Jack Myself?
Yes, with basic mechanical skills and proper tools, you can install it safely. Follow the instructions carefully to avoid accidents.
Conclusion
Installing a floor lift jack is easier than it seems. Follow each step carefully for safety and success. Use the right tools and check the jack’s stability. Always work on a flat surface to avoid accidents. Regular maintenance keeps the lift jack working well.
Take your time and double-check your work. This guide helps you lift heavy objects with confidence. Practice makes the process smoother and safer. Stay patient and keep safety as your top priority.