Are you struggling to hang heavy items on your walls without worrying they might fall? Knowing how to use anchors in walls can make all the difference.
Whether you’re mounting shelves, mirrors, or artwork, the right anchors will keep everything secure and safe. You’ll discover simple, step-by-step tips that anyone can follow—even if you’ve never done it before. By the end, you’ll feel confident tackling your next wall project like a pro.
Ready to learn the secrets to strong, reliable wall anchors? Let’s get started!
Credit: bona-store.com
Types Of Wall Anchors
Wall anchors hold screws tightly in different wall materials. Choosing the right anchor keeps your items secure and stable. Various types of anchors fit different walls and weights. Knowing each type helps you pick the best one.
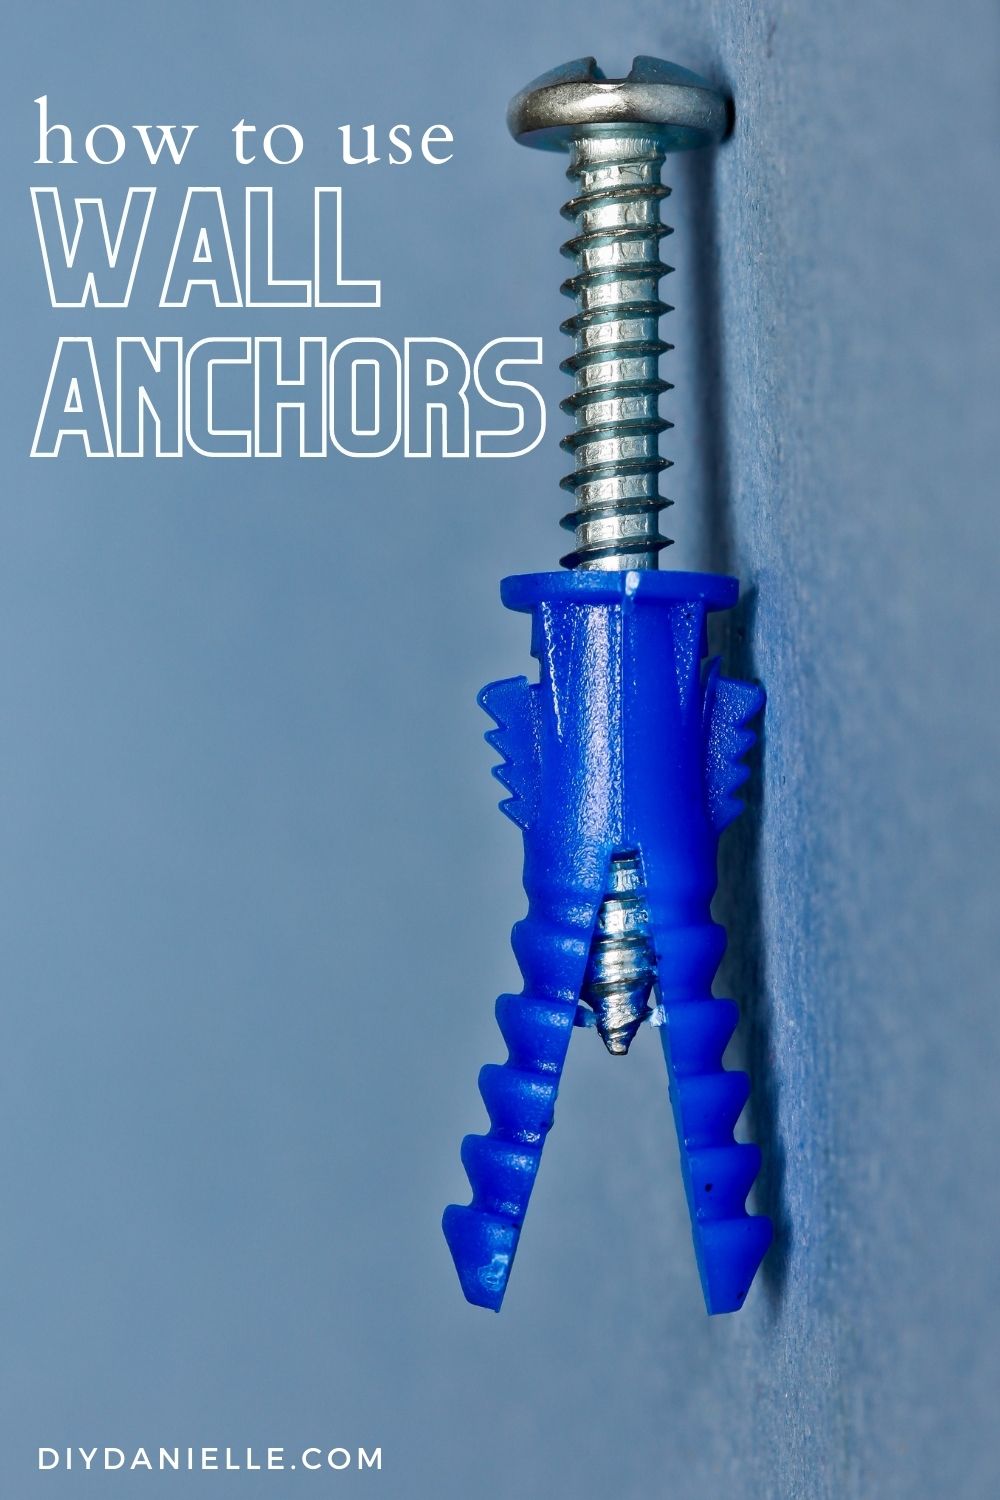
Plastic Expansion Anchors
Plastic expansion anchors fit drywall and plaster walls. Insert the anchor into a drilled hole. The screw expands the plastic, gripping the wall firmly. These anchors work well for light to medium loads.
Toggle Bolts
Toggle bolts support heavy items on hollow walls. They have metal wings that open behind the wall. This spreads the load over a large area. Use toggle bolts for shelves or heavy mirrors.
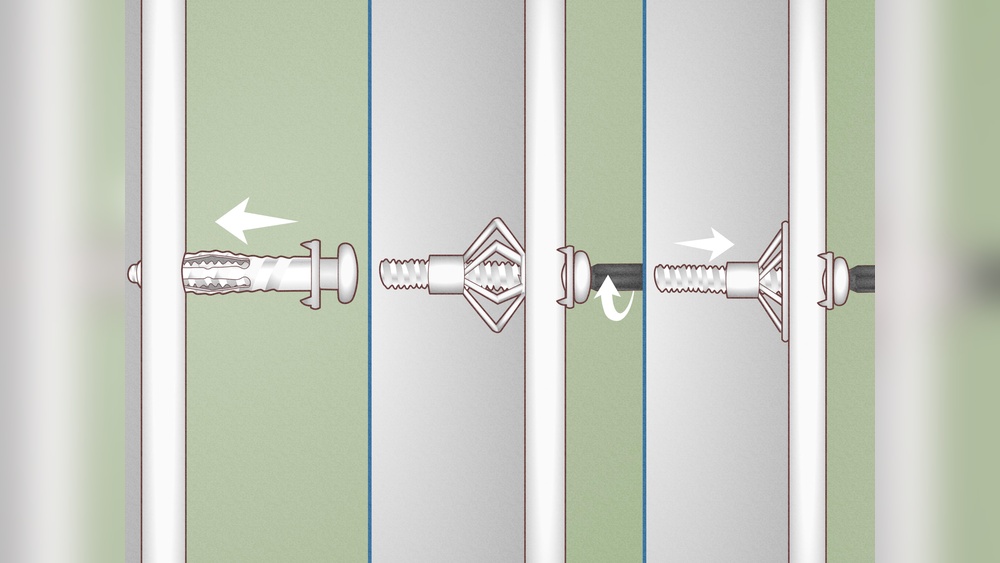
Molly Bolts
Molly bolts are metal anchors for drywall or plaster. Insert and tighten the screw to expand the anchor inside the wall. This creates a strong hold for medium to heavy items. They work well for cabinets or towel racks.
Self-drilling Anchors
Self-drilling anchors do not need pre-drilling. Screw them directly into drywall. They have sharp tips and threads to grip the wall. Suitable for light to medium weight objects.
Sleeve Anchors
Sleeve anchors fit concrete or brick walls. Drill a hole, insert the anchor, then tighten the bolt. The sleeve expands against the wall for a strong grip. Use sleeve anchors for heavy fixtures on masonry surfaces.
Choosing The Right Anchor
Choosing the right anchor is important for a strong and safe hold in your wall. Different walls need different anchors. The right choice keeps items secure and avoids damage. Consider the wall type, weight of the item, and anchor size. These factors help you pick the best anchor for your project.
Assessing Wall Material
Check the wall material before selecting an anchor. Drywall, concrete, brick, and plaster all need different anchors. Drywall anchors are light and easy to install. Concrete or brick requires heavy-duty anchors. Knowing your wall type prevents anchor failure and damage.
Weight Capacity Considerations
Think about how much weight the anchor must hold. Light items need small anchors. Heavy items need stronger, larger anchors. Check the anchor’s weight limit on the package. Use an anchor that supports more weight than your item. This keeps your items safe and secure.
Anchor Size And Length
Choose the right size and length of the anchor. The anchor must fit the hole tightly. A longer anchor offers more grip inside the wall. Too small or short anchors can fail. Match the anchor size to the screw and wall thickness. Proper fit ensures strong support.
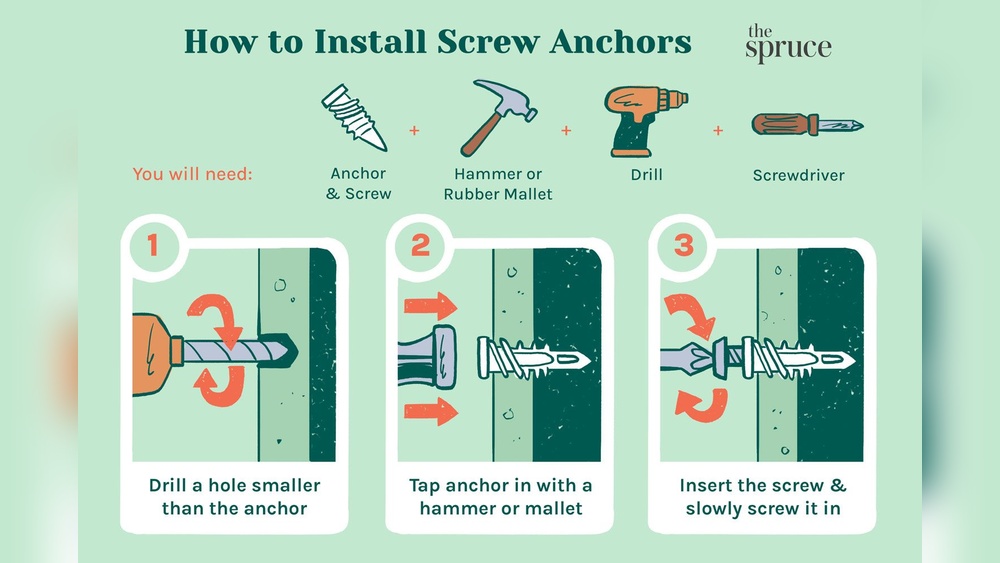
Tools Needed For Installation
Using anchors in walls requires some basic tools. These tools help make the installation safe and strong. Having the right tools saves time and effort. Here are the main tools needed to install wall anchors properly.
Drill And Drill Bits
A drill is essential for making holes in the wall. Choose drill bits that match the size of the anchor. Using the correct drill bit ensures a tight fit. A cordless drill works well for most jobs. Drill slowly to avoid cracking the wall.
Screwdrivers
Screwdrivers help to insert screws into anchors. Use the right type, such as a flathead or Phillips. A screwdriver with a comfortable grip makes the job easier. Manual or electric screwdrivers both work fine. Turn screws gently to avoid stripping.
Measuring Tools
Measure carefully before drilling. A tape measure helps find the exact spot for anchors. Mark the position with a pencil. Accurate measurement prevents mistakes and uneven hanging. Measure twice, drill once.
Leveling Devices
A level ensures anchors are straight. Hang items evenly on the wall. Small bubble levels or laser levels work well. Using a level avoids crooked or tilted installations. Check the level before drilling holes.
Step-by-step Installation Process
Installing anchors in walls makes hanging heavy objects safe and secure. Follow these simple steps to do it right. Each step is important for a strong hold. Read carefully and take your time.
Marking The Spot
Choose the exact spot where you want to place the anchor. Use a pencil to mark the wall. Make sure the mark is clear and visible. Check the level to keep things straight.
Drilling The Hole
Select a drill bit that matches the anchor size. Drill a hole at the marked spot. Drill straight and steady to avoid damage. Clean out dust from the hole before proceeding.
Inserting The Anchor
Push the anchor gently into the hole. Tap it lightly with a hammer if needed. The anchor should fit snugly without forcing. It must sit flush with the wall surface.
Securing The Screw
Place the screw into the anchor’s center. Tighten it slowly using a screwdriver. Stop when the screw is secure but not too tight. Check the hold by gently pulling the screw.
Common Installation Mistakes
Installing anchors in walls seems simple but many make basic mistakes. These errors can cause weak holds or damage to walls. Understanding common mistakes helps you avoid problems and get strong, lasting results.
Incorrect Anchor Selection
Choosing the wrong anchor weakens the hold. Use plastic anchors for light items only. Heavy objects need metal or toggle anchors. Match the anchor to the wall type, such as drywall or concrete. Wrong anchors can pull out or crack the wall.
Overdrilling Or Underdrilling
Drilling the wrong hole size is a common error. A hole too big makes the anchor loose. A hole too small can split or bend the anchor. Measure drill bits carefully. Drill only as deep as the anchor length. Proper hole size ensures the anchor fits tight.
Improper Screw Tightening
Screws must be tight but not too tight. Over-tightening strips the anchor or breaks the wall. Under-tightening leaves the anchor loose and weak. Turn screws slowly and feel resistance. Stop once the screw is snug and firm.
Tips For Heavy-duty Mounting
Heavy-duty mounting needs strong support to hold weight safely. Use the right methods and materials to avoid damage or accidents. Follow these tips to ensure your mounts stay secure and stable.
Using Multiple Anchors
Spread the load by using several anchors instead of one. This reduces stress on the wall and increases strength. Space anchors evenly to balance the weight well. Multiple anchors also provide backup if one fails.
Reinforcing Wall Areas
Strengthen the mounting area with extra support. Add wooden backing behind drywall for better hold. Use metal plates or brackets for added stability. Reinforcement stops the wall from cracking or breaking under pressure.
Selecting High-strength Anchors
Choose anchors designed for heavy loads. Metal anchors or toggle bolts offer more strength than plastic ones. Check the weight rating on the package before buying. Pick anchors that fit your wall type for best results.
Removing Wall Anchors Safely
Removing wall anchors safely is important to avoid damage to your walls. It also helps keep your space clean and ready for new decorations. Different types of anchors need different removal methods. Knowing the right way protects your walls and saves time.
Techniques For Different Anchors
Plastic expansion anchors can be pulled out with pliers. Grip them firmly and pull straight. For metal anchors, use needle-nose pliers or a screwdriver to twist and remove them. Toggle bolts need extra care. Open the wings inside the wall and gently pull the bolt out. Drywall anchors may need you to push them through the wall or twist them out carefully.
Repairing Wall Damage
Small holes left by anchors can be fixed with spackle or wall filler. Apply a small amount, smooth it out, and let it dry. Sand the area gently to make it flat. For bigger holes, use a patch kit. Paint over the repaired spot to match your wall color. This keeps your wall looking neat and fresh.
Preventing Future Issues
Choose the right anchor for your wall type. Avoid heavy loads on weak anchors. Always drill the correct size hole before inserting anchors. Check the weight limits on packaging. Regularly inspect mounted items to ensure they are secure. These steps help avoid wall damage and keep your anchors strong.

Credit: www.do-it-yourself-help.com

Credit: www.wikihow.com
Frequently Asked Questions
What Types Of Anchors Are Best For Wall Use?
Plastic expansion anchors, toggle bolts, and molly bolts work well for walls. Choose based on wall material and weight needs.
How Do I Install Wall Anchors Correctly?
Drill a hole matching the anchor size. Insert the anchor fully, then screw in the fastener securely.
Can Anchors Hold Heavy Items On Drywall?
Yes, heavy-duty anchors like toggle bolts can support substantial weight on drywall when installed properly.
When Should I Use Wall Anchors Instead Of Screws?
Use anchors when fastening into drywall, plaster, or hollow walls where screws alone won’t hold firmly.
Conclusion
Using anchors in walls makes hanging items safer and stronger. Choose the right anchor for your wall type. Drill carefully and insert anchors fully. Tighten screws without forcing them. This keeps your items secure and prevents wall damage. With practice, anchoring becomes quick and easy.
Start small, then try bigger projects. Proper use of anchors helps your home look neat and sturdy. Keep these tips in mind for better results every time.