Are you struggling to hang heavy items on your walls without worrying they might fall? Installing metal wall anchors is the simple solution you need.
These small but powerful tools can hold up shelves, mirrors, and more with confidence. In this guide, you’ll learn exactly how to install metal wall anchors step by step, so your walls stay strong and secure. Keep reading to discover easy tips that will save you time and give your projects a professional touch.
Types Of Metal Wall Anchors
Metal wall anchors come in different types. Each type fits specific wall materials and weight needs. Choosing the right anchor helps keep items secure and prevents wall damage.
Here are the most common metal wall anchors used for various projects and surfaces.
Toggle Bolts
Toggle bolts have a spring-loaded wing that opens behind the wall. This wing spreads the load over a larger area. They work well in hollow walls like drywall. Toggle bolts hold heavy items tightly without pulling out.
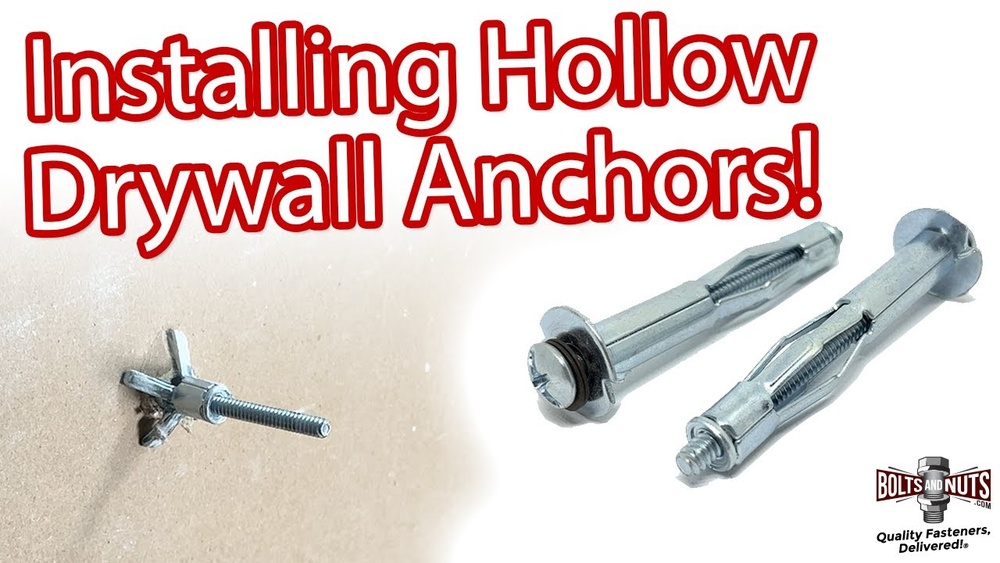
Molly Bolts
Molly bolts are metal sleeves with expandable legs. When you tighten the screw, the legs spread inside the wall. This creates a strong grip in drywall or plaster. Molly bolts are good for medium-weight objects and offer a stable hold.
Sleeve Anchors
Sleeve anchors have a metal sleeve that expands inside solid walls. They fit well in concrete, brick, or stone walls. When the bolt tightens, the sleeve presses against the wall’s inside. Sleeve anchors provide a strong and lasting hold for heavy loads.
Tools And Materials Needed
Installing metal wall anchors requires some basic tools and materials. Having the right tools makes the job easier and safer. It helps to prepare everything before starting. This way, the process goes smoothly and fast.
Drill And Drill Bits
A drill is essential for making holes in the wall. Choose a drill with enough power for your wall type. Use the right drill bit size to match the anchor. Too big or too small can cause problems. Keep drill bits sharp for clean holes.
Screwdriver
You need a screwdriver to insert screws into the anchors. Use the correct type, either flathead or Phillips. A manual or electric screwdriver works well. It helps to have one with a comfortable grip. This tool controls screw tightness and prevents damage.
Measuring Tape
Measure the exact spot for your anchors with a tape. Accurate measurement ensures correct anchor placement. Mark the spot lightly with a pencil. Use the tape to check spacing between anchors. This tool helps keep your installation neat and even.
Pencil
A pencil marks the wall before drilling. It guides where to place holes. Use a sharp pencil for clear marks. Avoid permanent markers that stain the wall. Light marks are easy to erase later. Mark carefully to avoid mistakes.
Choosing The Right Anchor
Choosing the right metal wall anchor is key to a secure hold. Different anchors suit different tasks. Picking the correct one prevents damage and ensures safety. Consider factors like weight, wall type, and size before buying anchors.
Weight Capacity
Check the weight your anchor must support. Each anchor has a weight limit. Use anchors rated for heavier loads for safety. Overloading an anchor can cause it to fail. Always choose anchors with some extra capacity for peace of mind.
Wall Material
Identify your wall type before selecting an anchor. Drywall, concrete, and brick need different anchors. Metal anchors work well in drywall and masonry. Use anchors designed for your wall’s material. This ensures the anchor grips tightly and lasts long.
Anchor Size
Match the anchor size to your screw and hole. Too small anchors may not hold the screw firmly. Too large anchors can damage the wall. Measure carefully to pick the right size. Proper fit keeps the anchor stable and secure.

Credit: www.do-it-yourself-help.com
Preparing The Wall
Preparing the wall is an important first step before installing metal wall anchors. It ensures the anchors hold firmly and safely. Taking time to prepare helps avoid mistakes and damage.
This section covers how to mark drill points and check for obstructions. These steps make the installation easier and more secure.
Marking Drill Points
Start by deciding where to place the anchors. Use a pencil to mark exact spots on the wall. Measure carefully to keep marks level and evenly spaced. Use a level tool to check straight lines. Clear marks guide the drilling and prevent errors.
Checking For Obstructions
Before drilling, check inside the wall for pipes or wires. Use a stud finder or an electronic detector. Avoid hitting electrical wires or plumbing. This keeps the installation safe and avoids costly repairs. Mark safe spots clearly before drilling.
Drilling The Hole
Drilling the hole is a crucial step in installing metal wall anchors. The hole must be precise to hold the anchor firmly. A well-drilled hole ensures the anchor fits snugly and supports weight effectively. Careful attention to drill bit size and depth improves the strength and durability of the anchor installation.
Selecting Drill Bit Size
Choose a drill bit that matches the size of the metal anchor. Check the anchor packaging for recommended drill bit size. Using a smaller bit makes the hole too tight, risking damage to the wall. A larger bit creates a loose fit, reducing the anchor’s holding power. Match the bit size exactly for a secure fit.
Drilling At Correct Depth
Drill the hole to the depth specified for the anchor. Measure the anchor length before drilling. Mark the drill bit with tape to avoid drilling too deep. A shallow hole prevents the anchor from sitting fully inside the wall. A deep hole weakens wall support. Correct depth ensures strong, lasting anchor installation.

Credit: www.picturehangsolutions.com
Installing The Anchor
Installing the metal wall anchor correctly is key for a strong hold. This step ensures the anchor grips the wall firmly. Follow these simple actions to set the anchor in place.
Inserting The Anchor
Begin by pushing the metal anchor into the drilled hole. The hole must be clean and the right size. Gently tap with a hammer if needed. Stop when the anchor is flush with the wall surface.
Expanding The Anchor
Next, expand the anchor to lock it inside the wall. Use a screwdriver to turn the anchor’s screw. This action spreads the anchor’s legs behind the wall. It creates a strong hold that prevents pull-out.
Securing With Screws
Finally, insert the screw into the anchor. Tighten it slowly with a screwdriver. Do not over-tighten to avoid damage. The screw holds your item firmly on the wall.
Testing The Support
Testing the support of metal wall anchors is a crucial step. It ensures the anchors hold firmly before hanging heavy items. This process helps avoid accidents and damage to walls. Proper testing gives confidence in the installation.
Applying Load Gradually
Start by adding a small weight to the anchor. Wait a few minutes to see if it holds steady. Increase the weight slowly in small steps. This avoids sudden stress on the anchor. Watch for any movement or slipping with each step. Gradual loading helps confirm the anchor’s strength.
Checking Stability
After applying the full load, check the anchor’s position carefully. Push or pull gently to test firmness. The anchor should not wiggle or shift. Look for cracks or damage around the anchor site. Stability means the anchor is secure and ready for use. If anything feels loose, remove and reinstall the anchor.
Common Mistakes To Avoid
Installing metal wall anchors seems simple but can be tricky. Small mistakes can cause big problems. Avoid these common errors to ensure strong and safe anchor installation. Proper steps will save time and effort.
Wrong Anchor Type
Choosing the wrong anchor weakens the hold. Different walls need different anchors. Drywall anchors fail on concrete walls. Metal anchors need metal or solid surfaces. Match the anchor type to your wall material.
Incorrect Drill Size
Drilling too big or too small holes causes issues. A hole too large makes the anchor loose. Too small, and the anchor won’t fit. Use the drill bit size that matches the anchor instructions. This ensures a tight, secure fit.
Overtightening Screws
Too much force breaks the anchor or wall. Tighten screws until firm, not forced. Over-tightening strips the threads or cracks the wall. Stop when the anchor feels secure and holds the object well.

Credit: www.youtube.com
Frequently Asked Questions
What Tools Are Needed To Install Metal Wall Anchors?
You need a drill, drill bits, a screwdriver, a hammer, and the metal wall anchors themselves. Safety glasses and a level can also help for precise installation.
How Do Metal Wall Anchors Work?
Metal wall anchors expand inside the wall cavity when a screw is inserted. This expansion creates a strong grip in drywall, plaster, or masonry, providing secure support for hanging objects.
Can Metal Wall Anchors Hold Heavy Items?
Yes, metal wall anchors can support heavy items when installed correctly. They distribute weight evenly and are suitable for shelves, mirrors, and TVs, depending on the anchor type and wall material.
Are Metal Wall Anchors Reusable?
Generally, metal wall anchors are not reusable. Once expanded and installed, removing them often damages the anchor or wall, requiring replacement for future use.
Conclusion
Installing metal wall anchors is simple with the right steps. Start by choosing the correct anchor for your wall type. Drill a hole that fits the anchor snugly. Push the anchor into the hole until it sits flush. Tighten the screw carefully to hold your item securely.
Always check the weight limit of the anchor before use. Following these tips helps ensure a strong and safe hold. Now, your wall can support shelves, pictures, or other items easily. Practice makes perfect—soon, you’ll install anchors with confidence.


