Have you ever struggled with a deadbolt hole that just won’t fit right or looks damaged? Fixing it might seem tricky, but you don’t need to be an expert to get it done.
Imagine securing your door with a perfectly aligned deadbolt that works smoothly every time. In this guide, you’ll discover simple, step-by-step tips to repair your deadbolt hole quickly and confidently. Keep reading, and you’ll learn how to restore your door’s security without stress or expensive tools.

Credit: www.youtube.com
Assess The Damage
Before fixing a deadbolt hole, you must assess the damage carefully. This step helps you understand the problem fully. You can then choose the best repair method. Take your time to inspect every part of the hole and the surrounding area.
Inspect The Deadbolt Hole
Start by looking closely at the deadbolt hole. Check for cracks, chips, or broken wood around the hole. See if the hole is too big or misshaped. Notice any signs of wear or damage from force.
Identify Material Type
Knowing the material around the hole is important. Deadbolt holes are often in wood, metal, or fiberglass doors. Each material needs different repair tools and fillers. Wood may need wood putty, metal might require welding or filler, and fiberglass might need special resin.
Check For Structural Issues
Look beyond the hole for any structural problems. Check if the door feels weak or if the frame is loose. Weak structures can make repairs fail quickly. Ensure the door and frame are solid before fixing the hole.
Gather Repair Materials
Before fixing a deadbolt hole, gather all the needed materials. Having the right tools and supplies makes the repair faster and cleaner. Preparation helps avoid interruptions while working. This section guides you through what to collect for a smooth repair process.
Essential Tools Needed
Start with basic tools for the repair. A screwdriver helps remove the deadbolt plate. Sandpaper smooths rough edges around the hole. A putty knife spreads filler neatly. Measuring tape checks hole size. Clean cloth wipes dust and debris. These tools create a good base for repair.
Choosing The Right Filler
Select a filler that matches your wall type. Wood filler works best for wooden doors. For metal or composite doors, use epoxy putty. Choose a filler that dries hard and sands easily. Check drying time to plan your work. Proper filler ensures a strong and lasting repair.
Safety Gear Recommendations
Wear gloves to protect your hands from sharp edges. Safety glasses shield your eyes from dust and debris. A dust mask prevents inhaling fine particles. Use old clothes to avoid stains from filler or paint. Safety gear keeps you safe and comfortable during repairs.
Prepare The Area
Preparing the area before fixing a deadbolt hole is important. It helps the repair material stick better and lasts longer. Take time to get the surface ready. This step makes the whole process easier and cleaner.
Clean The Hole
Start by cleaning the hole thoroughly. Use a brush or cloth to remove dust and dirt. A clean hole helps the filler stick properly. Avoid using water as it can make the area wet.
Remove Loose Debris
Check the hole for loose wood or material. Pull out any pieces that are weak or broken. Loose debris can cause the repair to fail. Use a small tool or tweezers for this task.
Sand The Surface
Lightly sand the inside edges of the hole. Sanding smooths the surface and removes rough spots. Use fine-grit sandpaper for best results. Wipe away dust after sanding to keep the area clean.

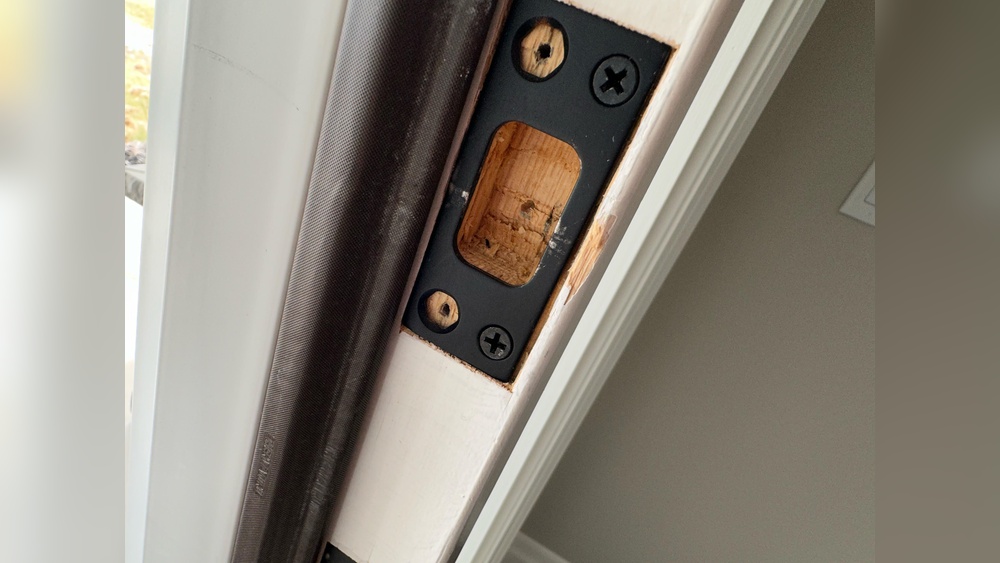
Credit: www.reddit.com
Fill The Deadbolt Hole
Filling the deadbolt hole is a key step in fixing it. This step makes the area strong and smooth. A proper fill helps the deadbolt fit well later. It also stops damage from spreading. Use the right materials and methods for the best results.
Apply Wood Filler Or Epoxy
Choose wood filler for small holes or light damage. Epoxy works better for bigger holes or deep cracks. Press the filler or epoxy into the hole firmly. Use a putty knife to smooth the surface. Remove any extra material around the hole. This creates a flat, even surface for later steps.
Use Toothpicks Or Dowels For Support
Fill large holes with toothpicks or wooden dowels first. Dip them in glue to hold them in place. Push them into the hole tightly. Cut off any parts that stick out. This gives the filler something to hold on to. It keeps the repair strong and lasting.
Allow Proper Drying Time
Let the filler or epoxy dry completely before doing more work. Check the product label for the drying time. Usually, it takes several hours or overnight. Avoid touching or sanding the area too soon. Drying fully ensures a solid and smooth repair.
Sand And Smooth The Surface
After filling the deadbolt hole, sanding and smoothing the surface is crucial. This step helps remove rough edges and uneven patches. A smooth surface ensures the lock fits well and looks neat. Take your time to get the best finish.
Select The Right Sandpaper
Choose sandpaper with a medium grit, like 120 to 150. This grit works well to smooth out filler or wood without causing damage. Avoid very coarse sandpaper that can leave deep scratches. Use finer grit sandpaper for the final touch, around 220 grit.
Achieve A Flush Finish
Sand the surface gently in small, circular motions. Focus on blending the filled area with the surrounding wood. Check often to see if the surface feels even. Stop sanding once the patch is flush and smooth with the door.
Clean The Dust
Remove all sanding dust with a clean cloth or brush. Dust can prevent paint or stain from sticking properly. Wipe the area well before applying any finish. Clean surfaces help the repair last longer and look better.
Reinstall Or Replace The Deadbolt
Reinstalling or replacing a deadbolt is a key step in fixing a deadbolt hole. This step restores security and ensures the lock works smoothly. Whether reusing the old deadbolt or installing a new one, careful handling is important. Follow simple steps to align, secure, and test the lock for best results.
Align The Deadbolt Properly
Place the deadbolt into the hole carefully. Check if the bolt lines up with the strike plate on the door frame. Adjust the position so the bolt moves freely without sticking. Proper alignment prevents jamming and makes locking easy.
Secure With Screws
Use the screws that come with the deadbolt. Tighten them firmly but avoid over-tightening. Screws hold the deadbolt in place and keep it steady. Loose screws can cause the lock to wobble or fail.
Test The Lock Mechanism
Turn the key or thumb turn several times. Make sure the deadbolt slides smoothly in and out. Check both sides of the door. Testing confirms the lock is working and secure before use.
Prevent Future Damage
Preventing future damage to your deadbolt hole is key for lasting security and smooth door function. Taking simple steps can stop wear and tear early. Protecting the area ensures your lock stays strong and reliable.
Small fixes now save you from bigger repairs later. Follow practical tips to keep your deadbolt hole in good shape over time.
Use Reinforcement Plates
Reinforcement plates add extra strength around the deadbolt hole. They spread the force from locks and knocks. This stops wood from cracking or splintering.
Choose metal plates designed for door frames. Install them behind the strike plate for better support. This simple upgrade makes your door much tougher.
Regular Maintenance Tips
Check your deadbolt hole and lock often for signs of damage. Tighten loose screws and clean dirt or dust from the area. Lubricate the lock to keep it smooth.
Fix small cracks or chips right away. This prevents them from growing bigger. Regular care keeps your door safe and working well.
Avoid Common Mistakes
Do not force the key or lock if it sticks. This can damage the hole and the lock parts. Use proper keys and avoid rough handling.
Avoid drilling too large or uneven holes. This weakens the door structure. Measure carefully before any installation or repair.

Credit: www.youtube.com
Frequently Asked Questions
How Do I Repair A Damaged Deadbolt Hole?
To repair a damaged deadbolt hole, fill it with wood filler or epoxy. Sand it smooth once dry. Re-drill the hole carefully to fit the deadbolt properly. This restores the door’s integrity and ensures secure lock installation.
What Tools Are Needed To Fix A Deadbolt Hole?
You’ll need wood filler or epoxy, sandpaper, a drill with a hole saw bit, a screwdriver, and a chisel. These tools help fill, smooth, and correctly size the hole for a secure deadbolt installation.
Can I Fix A Deadbolt Hole Without Replacing The Door?
Yes, you can repair a deadbolt hole without replacing the door. Use wood filler or epoxy to fill the hole. After it hardens, sand and re-drill the hole to fit the deadbolt. This saves cost and maintains door function.
How Long Does It Take To Fix A Deadbolt Hole?
Fixing a deadbolt hole typically takes 1 to 2 hours. This includes filling the hole, waiting for the filler to dry, sanding, and re-drilling. Drying times may vary based on the filler used.
Conclusion
Fixing a deadbolt hole is easier than it seems. Use the right tools and follow steps carefully. Taking time and working slowly helps avoid mistakes. A well-fixed hole keeps your door strong and safe. Practice makes the job quicker next time.
You can save money by doing it yourself. Stay patient and focused throughout the process. Small repairs like this improve home security a lot. Keep your tools ready for future fixes. Now, you can handle deadbolt holes with confidence.