Are you struggling to hang something heavy on your wall but worried it won’t hold? Hollow wall anchors might be the simple solution you need.
They give you a strong grip in drywall or plaster without needing a stud. But if you’ve never used them before, the process can seem tricky. Don’t worry—this guide will walk you through every step, making it easy for you to install hollow wall anchors like a pro.
Keep reading to learn how to secure your shelves, mirrors, or decorations safely and confidently.
Types Of Hollow Wall Anchors
Hollow wall anchors come in several types. Each type works best for specific tasks. Choosing the right anchor ensures a strong hold in hollow walls like drywall or plaster. Understanding these types helps you pick the correct one for your project.
Toggle Bolts
Toggle bolts are strong anchors for heavy items. They have wings that open inside the wall. These wings spread the load over a large area. This stops the wall from breaking. You drill a hole, push the bolt through, and the wings open behind the wall. Tighten the bolt to secure the item.
Molly Bolts
Molly bolts expand inside the wall for a firm grip. Insert the bolt into a drilled hole. Tightening the bolt expands the sleeve behind the wall. This anchors the bolt securely. Molly bolts work well for medium-weight items. They provide good support and hold tightly.
Plastic Anchors
Plastic anchors are simple and common. Push or tap them into a pre-drilled hole. When you drive the screw in, the plastic expands inside the wall. This holds the screw tightly. Plastic anchors suit light items. They are easy to use and cost-effective.

Credit: www.do-it-yourself-help.com
Tools Needed
To install hollow wall anchors correctly, having the right tools is essential. These tools help you work safely and make the process easier. A few basic tools cover most needs.
Each tool has a specific role. Knowing what each one does will help you use the anchors well and keep your wall damage-free.
Drill And Drill Bits
A drill is necessary to make holes in the wall. Choose the right drill bit size for the anchor. The hole must fit the anchor snugly. Using the wrong size can cause weak support or wall damage.
Screwdriver
You need a screwdriver to tighten the anchor’s screw. Match the screwdriver to the screw head type, like Phillips or flathead. This prevents slipping and damage to the screw or wall.
Measuring Tape
Measuring tape helps you mark the exact spot for the anchor. Accurate placement ensures the anchor holds well. It also keeps your installation neat and even.
Preparing The Wall
Preparing the wall is a key step before installing hollow wall anchors. It helps ensure the anchors hold securely. Proper preparation avoids damage and improves the strength of the fixings.
Start by checking the wall surface. It should be clean and dry. Remove any dust, dirt, or loose paint. A smooth surface makes drilling easier and more accurate.
Locating The Stud
Find the stud inside the wall. Studs provide strong support for heavy items. Use a stud finder or tap the wall gently. A solid sound shows a stud’s location.
Mark the stud position with a pencil. Avoid placing anchors directly on studs for hollow wall anchors. These anchors work best in drywall areas between studs.
Marking Drill Points
Measure the height and spacing needed for your anchors. Use a pencil to mark drill points clearly. Double-check the measurements for accuracy.
Mark points slightly larger than anchor size. It helps guide the drill bit and prevents mistakes. Accurate marks ensure the anchors fit well and hold tight.
Drilling The Hole
Drilling the hole is a key step in installing hollow wall anchors. It prepares the wall for the anchor to fit securely. This step ensures the anchor holds well and supports the weight of your item.
Choosing The Right Drill Bit Size
Select a drill bit that matches the anchor’s diameter. The hole must be neither too tight nor too loose. A tight hole can damage the wall or anchor. A loose hole will not hold the anchor firmly. Check the packaging of the anchor for the correct drill bit size. Using the right size bit helps the anchor work properly.
Drilling Technique
Installing The Anchor
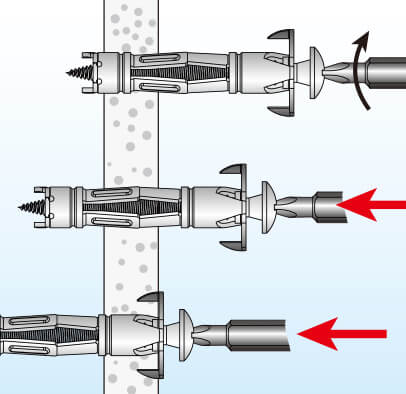
Installing hollow wall anchors is a key step to hang items securely. It requires careful work to ensure strong support in drywall or hollow walls. This section explains how to insert and secure the anchor properly.
Inserting The Anchor
Begin by drilling a hole in the wall. The hole size should match the anchor diameter. Gently push the anchor into the hole until it sits flush with the wall surface. Do not force the anchor too hard. It should fit snugly but not damage the wall.
Securing The Anchor
Next, insert the screw or bolt into the anchor. Turn it slowly to expand the anchor inside the wall cavity. This expansion grips the wall firmly. Stop tightening once the anchor feels secure. Avoid over-tightening to prevent wall damage.
Credit: www.jcyscrews.com
Testing Anchor Strength
Testing anchor strength is a key step after installing hollow wall anchors. It ensures the anchor can hold the weight safely. Without proper testing, the anchor might fail and cause damage. This section explains how to check the strength of your anchors carefully.
Applying Load Gradually
Start by adding weight slowly to the anchor. Use light objects first to avoid sudden pressure. This helps you see how the anchor reacts under small loads. Gradual loading prevents damage and shows the anchor’s true capacity.
Pull gently on the anchor or hang something light. Increase the load step by step. Stop if you notice any movement or looseness. This careful process helps you trust the anchor’s strength.
Checking For Stability
After applying load, check if the anchor stays firm. Push and pull lightly to test its hold. There should be no wiggle or shift in the wall.
Look closely at the wall surface around the anchor. No cracks or holes should appear. Stability means the anchor is secure and ready for use.
Common Mistakes To Avoid
Installing hollow wall anchors sounds simple but can go wrong easily. Mistakes cause weak holds or damage to walls. Avoid common errors to keep anchors strong and safe.
Incorrect Hole Size
Drilling the wrong hole size is a frequent mistake. Too large a hole makes the anchor loose. Too small a hole stops the anchor from fitting.
Use the drill bit size recommended on the anchor package. Check the hole size before inserting the anchor. A perfect fit ensures the anchor grips well inside the wall.
Overtightening Screws
Tightening screws too much can break the anchor. It can also damage the wall around the hole. Turn the screw until it feels snug, not forced.
Stop tightening as soon as the anchor holds firmly. This prevents cracks and keeps the anchor secure for a long time.

Credit: www.youtube.com
Frequently Asked Questions
What Tools Do I Need For Hollow Wall Anchors?
You need a drill, screwdriver, tape measure, pencil, and the correct size hollow wall anchors. These tools help ensure precise installation and secure fixing in hollow walls.
How Do Hollow Wall Anchors Work?
Hollow wall anchors expand behind the wall when inserted and tightened. This expansion grips the wall cavity, providing strong support for hanging items.
Can Hollow Wall Anchors Hold Heavy Items?
Yes, they can hold moderate weights, typically up to 50 pounds. Always check the anchor’s weight rating and wall type before use.
How To Choose The Right Hollow Wall Anchor Size?
Select an anchor size based on the item’s weight and wall thickness. Use larger anchors for heavier items and thicker walls for better stability.
Conclusion
Hollow wall anchors hold items firmly on drywall or plaster. Choose the right anchor size for your project. Drill a hole carefully and insert the anchor straight. Tighten the screw gently to avoid damage. These steps make your installation strong and safe.
Practice a few times to gain confidence. This simple method saves time and effort. Now, you can hang shelves, pictures, or mirrors easily. Keep your walls secure and your items steady.