Are you tired of relying on lamps or floor lights because your room doesn’t have a ceiling light? Adding a ceiling light to a switched outlet might sound tricky, but it’s easier than you think.
Imagine flipping a switch and instantly brightening up your space with overhead lighting. In this guide, you’ll discover simple, step-by-step instructions to make that happen safely and quickly. Keep reading, and by the end, you’ll have the confidence to transform your room with a new ceiling light that works perfectly with your existing switch.
Tools And Materials Needed
Before adding a ceiling light to a switched outlet, gather all necessary tools and materials. Having everything ready makes the job safer and faster. This list covers what you need for a smooth installation.
Basic Electrical Tools
Start with a voltage tester to check power is off. Use wire strippers to remove insulation from wires. A screwdriver set is essential for screws and terminal connections. Needle-nose pliers help bend wires and hold small parts.
Materials For Wiring
Get electrical wire that matches your home’s wiring gauge. Wire nuts secure wire connections safely. Electrical tape adds extra protection around wire nuts. A new ceiling light fixture fits the space you want to light.
Safety Equipment
Wear insulated gloves to protect from electric shocks. Use safety glasses to shield your eyes from dust or sparks. A sturdy ladder helps reach the ceiling safely. Have a flashlight ready in case power is off longer than expected.
Safety Precautions
Turn off the power at the circuit breaker before starting any work. Use a voltage tester to confirm no electricity flows. Wear safety glasses and use insulated tools to protect yourself.
Turn Off Power At The Circuit Breaker
Always start by switching off the power at the circuit breaker. This stops electricity from flowing to the outlet. Do not rely only on the wall switch. Confirm the power is off by using a voltage tester. Safety first. Avoid electric shock risks.
Use Proper Tools And Equipment
Use insulated tools made for electrical work. Avoid metal tools without insulation. Wear rubber-soled shoes to reduce shock risk. Use a sturdy ladder if needed. Keep your workspace clear and dry. This helps prevent accidents and injuries.
Check Wiring And Outlet Condition
Inspect the outlet and wires before starting. Look for cracks, frayed wires, or burn marks. Damaged parts must be replaced before adding a ceiling light. Use wires with the right gauge for your light fixture. Proper wiring ensures safety and good performance.
Follow Electrical Codes And Regulations
Adhere to local electrical codes and rules. These codes protect you and your home. Use materials and methods approved by your area. If unsure, consult a licensed electrician. Correct installation prevents hazards and future problems.
Locate The Switched Outlet
Start by finding the switched outlet on the wall. This outlet controls the light switch and powers the ceiling light. Use a tester to confirm the outlet is switched before beginning work.
Understanding What A Switched Outlet Is
A switched outlet controls power through a wall switch. It allows you to turn on or off devices plugged into it. This feature is helpful for lamps or ceiling lights. Knowing this helps you find the right outlet to add your ceiling light.
Finding The Outlet Controlled By The Switch
Start by turning off all devices plugged into outlets in the room. Flip the wall switch on and off. Watch which outlet loses power when the switch is off. That outlet is your switched outlet.
Checking Both Outlet Sockets
Some outlets have one socket controlled by the switch and one always on. Test each socket separately. Plug a small lamp or tester into each socket. Switch the wall switch to confirm which socket is switched.
Using A Voltage Tester For Accuracy
A voltage tester helps confirm if an outlet is switched. Turn on the tester and place its probe inside the outlet slots. Flip the switch to see if voltage appears or disappears. This method ensures you find the correct outlet safely.
Turn Off Power
Turning off power is the first step when adding a ceiling light. It keeps you safe from electric shocks. Never start any electrical work without cutting the power first. This simple action protects you and your home.
Always double-check that the power is off before touching wires. This step might feel obvious but is very important. Safety must be your top priority during the installation process.
Locate The Circuit Breaker
Find the main electrical panel in your home. Look for the circuit breaker that controls the room’s power. It usually has labels like “Living Room” or “Kitchen.” Flip the switch to the OFF position to cut power.
Use A Voltage Tester
After switching off the breaker, test the outlet with a voltage tester. This tool shows if electricity is still flowing. If the tester shows no power, it is safe to proceed. Never skip this step to avoid accidents.
Inform Others In The House
Tell family members or housemates about the power shutdown. This prevents someone from turning the breaker back on by mistake. Clear communication helps keep everyone safe during the project.
Remove Outlet Cover And Inspect Wiring
Removing the outlet cover and inspecting the wiring is the first step to add a ceiling light to a switched outlet. This step helps you see how the wires connect inside the outlet box. It also lets you check if the wiring is safe and ready for the new light fixture.
Turn off the power at the circuit breaker before starting. Safety is very important. Use a screwdriver to take off the outlet cover carefully. Keep the screws in a safe place for later use.
Check For Power Safety
Use a voltage tester to make sure the power is off. Touch the tester to the wires inside the box. No light or sound from the tester means no power. This step protects you from electric shock.
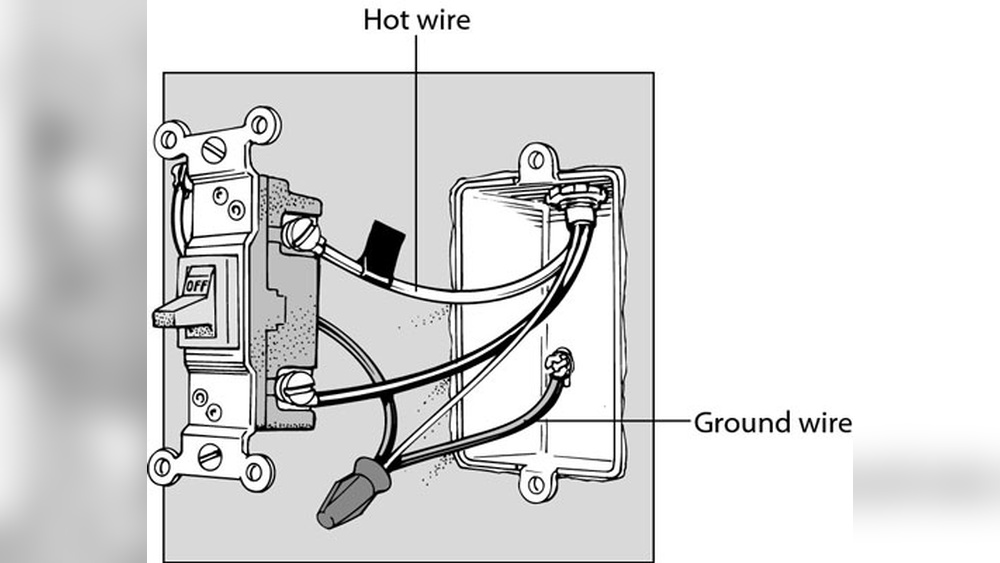
Identify Wire Types
Look at the wires in the outlet box. Usually, black or red wires carry power. White wires are neutral. Bare copper or green wires are ground wires. Knowing these helps you connect the ceiling light correctly.
Look For A Switched Wire
Find the wire controlled by the wall switch. This wire will connect to your ceiling light later. It often is a black or red wire separate from the always-on power wire. Identifying this wire is key to making the light switch work.
Inspect Wiring Condition
Check if wires are damaged or frayed. Look for loose connections or corrosion. Fix or replace any bad wiring before continuing. Good wiring ensures your new ceiling light works safely and well.

Credit: www.do-it-yourself-help.com
Plan The Wiring Route
Planning the wiring route is a key step in adding a ceiling light to a switched outlet. It helps you avoid surprises and keeps the work safe. Proper planning also saves time and materials.
Start by examining the room layout and the location of the switched outlet. Think about the best path for the wires. The route should be as direct as possible to reduce wire length.
Consider obstacles like beams, pipes, or insulation. Avoid drilling through these to prevent damage. Also, plan so the wires stay hidden and tidy.
Locate The Switched Outlet And Ceiling Box
Find the switched outlet on the wall. Mark its exact position. Then, pick where the ceiling light will go. Install the ceiling box there. This box holds the light fixture and wires.
Choose The Shortest And Safest Path
Draw a line between the outlet and ceiling box. This is the wiring route. Keep it short to use less wire. Avoid areas with water pipes or heating ducts. Safety matters most.
Check For Studs And Joists
Use a stud finder to locate wall studs and ceiling joists. Mark their positions clearly. Plan the wiring path to go between these supports. This prevents drilling into them by accident.
Plan Wire Entry And Exit Points
Decide where wires enter and exit the ceiling box and outlet. Make sure holes are big enough but not too large. Seal any gaps to keep the structure strong.
Prepare For Future Access
Think about how to access wires later. Avoid sealing wires permanently behind drywall. Leave a small access panel or use removable covers. This helps with repairs or upgrades.
Run Electrical Cable To Ceiling
Running electrical cable to the ceiling is a key step to add a ceiling light to a switched outlet. This task connects power from the outlet to the new light fixture. Careful planning and safe work make the process easier and safer.
Start by measuring the distance between the switched outlet and the ceiling light location. This helps estimate how much cable you need. Use cable rated for in-wall installation to meet safety rules.
Turn Off Power At The Circuit Breaker
Before starting, switch off power to the room at the breaker box. Test the outlet with a voltage tester to confirm power is off. This prevents electric shock during work.
Drill A Hole In The Ceiling
Mark the spot for the new light. Use a drill or keyhole saw to cut a hole for the ceiling box. The hole should fit the electrical box snugly.
Run Cable Through Walls And Ceiling
Feed the electrical cable from the outlet to the ceiling hole. Use fish tape or a wire puller if needed. Keep the cable clear of sharp edges and nails.
Secure Cable And Install Ceiling Box
Attach the cable inside the wall with staples or clamps every 12 inches. Install the ceiling box into the hole. Make sure it is firmly fixed to a ceiling joist or brace.

Credit: www.diychatroom.com
Install The Ceiling Light Box
Making electrical connections is a key step when adding a ceiling light to a switched outlet. This process ensures power flows safely and the light works with the switch. Careful wiring is important for safety and proper function.
Turn off the power at the circuit breaker before starting. Use a voltage tester to confirm no electricity is running through the wires. Prepare your tools and materials for a smooth connection process.
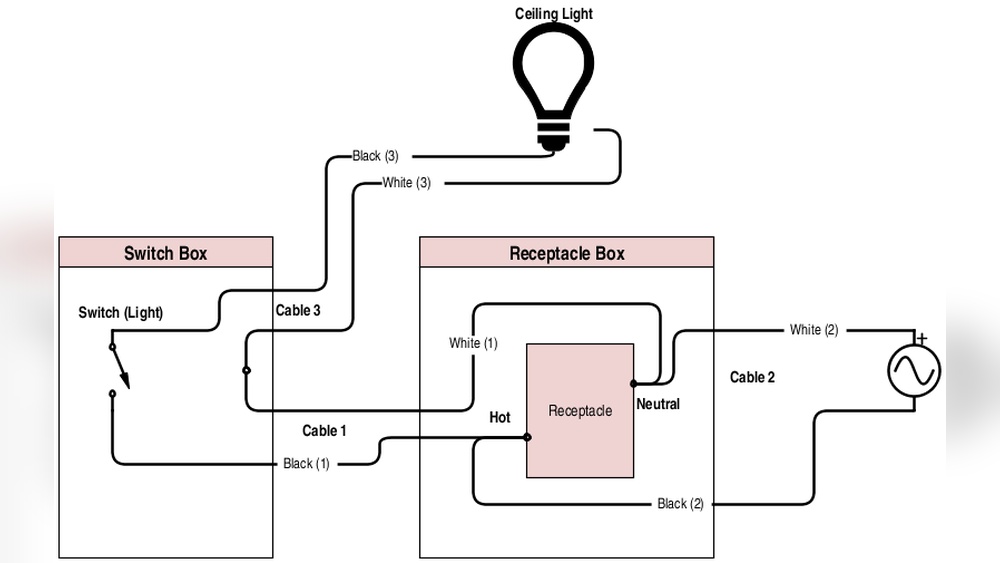
Connect Wires At Outlet
Start by removing the outlet cover and loosening the screws on the outlet terminals. Identify the black (hot), white (neutral), and green or bare copper (ground) wires. Connect the black wire from the ceiling light to the black wire at the outlet using a wire nut. Do the same for the white wires. Attach the ground wire from the light to the outlet’s ground wire or metal box. Tighten all wire nuts securely and push the wires neatly back into the outlet box.
Connect Wires At Ceiling Light
At the ceiling box, find the black, white, and ground wires. Connect the black wire from the ceiling light to the black ceiling wire using a wire nut. Join the white wires in the same way. Connect the ground wire from the light to the ceiling’s ground wire or screw it to the metal box if available. Make sure all connections are tight and no bare wire is exposed. Carefully tuck the wires into the box before mounting the light fixture.
Make Electrical Connections
Securing and mounting the light fixture is a crucial step in adding a ceiling light to a switched outlet. This process ensures the light stays in place and works safely. A properly mounted fixture looks neat and lasts longer.
Follow clear steps to fix the fixture firmly. Use the right tools and parts. Take your time to avoid mistakes.
Prepare The Mounting Bracket
Start by attaching the mounting bracket to the electrical box. Use screws that fit tightly. The bracket holds the fixture steady. Check if it feels secure before moving on.
Connect The Wiring Carefully
Match the wires from the fixture to the wires in the box. Usually, black to black, white to white, and green or bare copper to ground. Twist the wire connectors firmly. Wrap electrical tape around connectors for safety.
Attach The Light Fixture To The Bracket
Lift the fixture and line it up with the bracket. Use screws to secure the fixture. Tighten them gently but firmly. Make sure the fixture does not wobble or move.
Install Bulbs And Test The Light
Put the correct bulbs in the fixture. Screw them in without forcing. Turn the switch on to test the light. Check for proper brightness and no flickering.
Secure And Mount The Light Fixture
Restoring power and testing your new ceiling light is the final step in the installation process. This step ensures everything works safely and correctly. It also helps you identify any issues before finishing the job.
Always take safety seriously. Double-check your wiring before turning the power back on. This avoids any risk of electrical shock or damage.
Turn The Circuit Breaker Back On
Locate your home’s circuit breaker panel. Find the breaker that controls the outlet and light. Flip the switch back to the ON position. This restores electricity to the outlet and the new ceiling light.
Test The Light Switch
Go to the wall switch connected to the outlet. Flip the switch ON and OFF. The ceiling light should turn on and off smoothly. If it does not, there may be a wiring problem.
Check For Loose Connections
If the light does not work, turn off the breaker again. Open the light fixture and outlet box. Look for loose or disconnected wires. Secure any loose wires with wire nuts or electrical tape. Repeat the power and switch test.
Restore Power And Test
Troubleshooting is key when adding a ceiling light to a switched outlet. Problems can occur at many points. Checking each part carefully saves time and effort. This guide shows common issues and easy fixes.
Check The Power Supply
Confirm the circuit breaker is on. A tripped breaker stops power flow. Use a voltage tester to check the outlet’s power. No power means the switch or wiring may have issues.
Inspect The Wiring Connections
Loose or wrong wires cause the light not to work. Turn off power before touching wires. Make sure the black (hot) wire connects to the switch. White (neutral) wires should join together in the box. Ground wires must be connected properly.
Test The Light Bulb And Fixture
A faulty bulb or fixture stops lighting. Try a new bulb first. If still no light, test the fixture with another outlet. Replace the fixture if it does not work elsewhere.
Verify The Switch Function
Check if the switch controls the outlet correctly. Use a multimeter to test switch continuity. Replace the switch if it is broken or worn out. A bad switch prevents current from reaching the light.
Look For Loose Or Damaged Outlet Parts
Damaged outlets can cause poor connections. Inspect the outlet for cracks or burn marks. Replace the outlet if it looks unsafe. Tighten all screws and wiring terminals firmly.
Credit: www.oneprojectcloser.com
Frequently Asked Questions
How Do I Connect A Ceiling Light To A Switched Outlet?
To connect a ceiling light to a switched outlet, turn off power first. Then, run wiring from the switch to the ceiling box. Connect the hot wire to the switch and the light fixture wires accordingly. Secure connections and restore power to test the light.
Can I Add A Ceiling Light To An Existing Switched Outlet?
Yes, you can add a ceiling light to an existing switched outlet by tapping into the switch wiring. Make sure to turn off the power and use proper connectors. This method allows the ceiling light to operate from the same switch controlling the outlet.
What Tools Are Needed To Install A Ceiling Light?
You’ll need a voltage tester, wire stripper, screwdriver, drill, electrical tape, and wire nuts. These tools help ensure safe, secure wiring when adding a ceiling light to a switched outlet.
Is It Safe To Add A Ceiling Light To A Switched Outlet?
Yes, it is safe if you follow electrical codes and turn off power before working. Use proper wiring techniques and test connections. If unsure, consult a licensed electrician to avoid hazards.
Conclusion
Adding a ceiling light to a switched outlet is simple and useful. Follow each step carefully for safety and success. You can brighten any room without rewiring the whole space. This project saves time and adds style to your home.
Take your time and double-check all connections. Soon, your new light will work perfectly with the switch. Enjoy the improved lighting and ease of control every day.