Are you ready to take control of your home’s lighting and create the perfect mood with just a flick of a switch? Installing a dimmable light switch is easier than you might think, and it can instantly transform your space.
Whether you want softer lights for movie nights or brighter settings for work, this simple upgrade puts the power in your hands. In this guide, you’ll learn step-by-step how to install a dimmable light switch safely and quickly—no electrician needed.
Keep reading to discover the easy tricks that will help you brighten up your home exactly how you want.
Tools And Materials Needed
Installing a dimmable light switch is a simple task with the right tools and materials. Preparing everything before you start saves time and avoids frustration. Gather the necessary items to ensure a smooth installation process.
Essential Tools
Start with basic hand tools like a screwdriver set. A voltage tester helps check if the power is off. Wire strippers are needed to prepare wires for connection. Needle-nose pliers assist in bending and holding wires. A drill may be useful if new holes are needed for mounting.
Choosing The Right Dimmer Switch
Select a dimmer switch compatible with your lighting. Check if your bulbs are LED, incandescent, or CFL. Not all dimmers work with every bulb type. Match the dimmer’s wattage rating to your light fixture. Consider single-pole or three-way switches based on your setup.
Safety Gear
Safety is crucial during electrical work. Wear insulated gloves to protect against shocks. Use safety glasses to guard your eyes. Turn off power at the circuit breaker before starting. Keep a flashlight handy in case of power outages.
Credit: www.keepingitsimplecrafts.com
Preparation Before Installation
Preparing before installing a dimmable light switch is essential. It ensures safety and smooth work. Taking time to prepare helps avoid mistakes and damage. Follow these steps carefully to get ready for installation.
Turn Off Power
Safety starts with turning off the power. Locate your home’s circuit breaker panel. Switch off the breaker that controls the light switch you want to replace. Use a voltage tester to confirm the power is off. Never work on live wires. This step protects you from electric shocks.
Remove Existing Switch
Remove the cover plate of the current switch. Unscrew the switch from the electrical box. Gently pull the switch out to see the wiring. Take a photo of the wiring setup for reference. This helps during installation of the new dimmable switch.
Check Wiring Compatibility
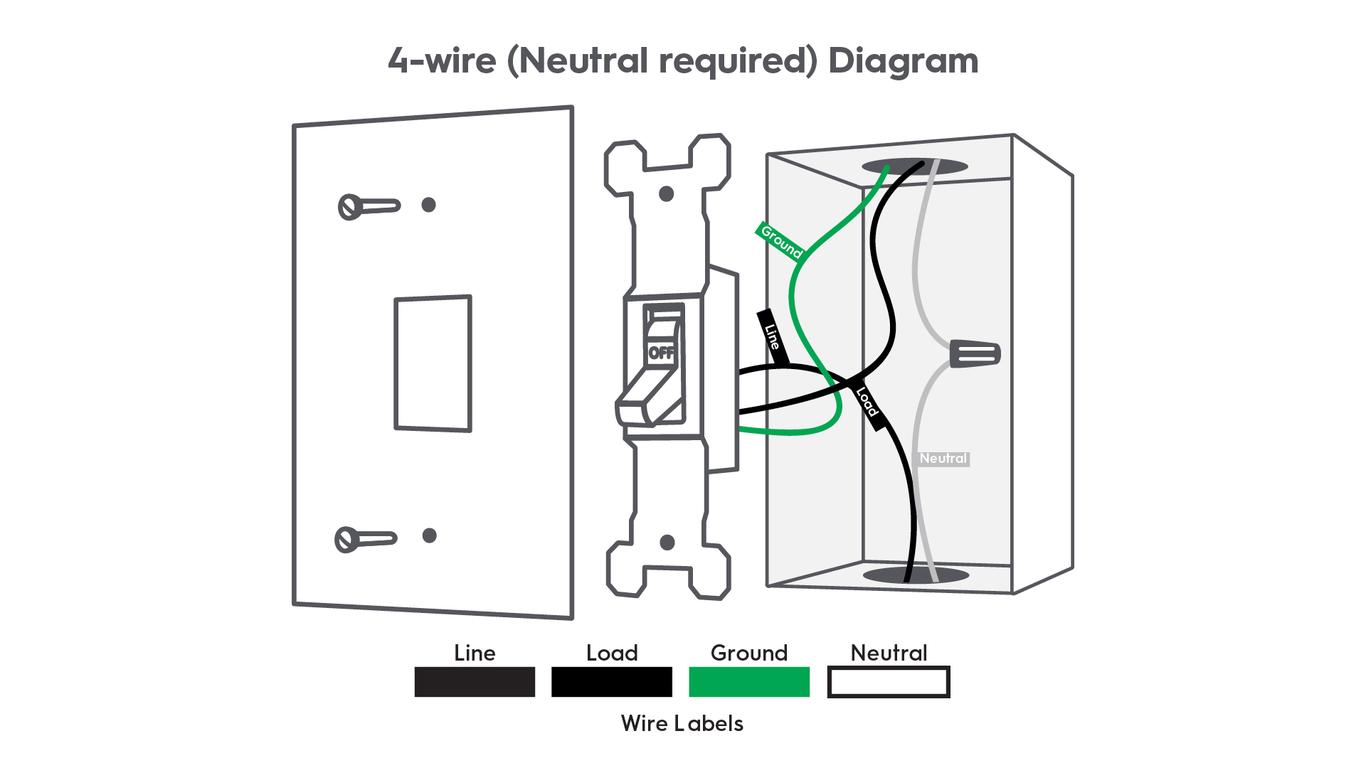
Check if your wiring works with a dimmable switch. Most dimmers need a neutral wire for power. Look for a white neutral wire in the box. If no neutral wire exists, the dimmer may not work. Verify the dimmer matches your bulb type, LED or incandescent. Proper compatibility ensures the dimmer functions well.
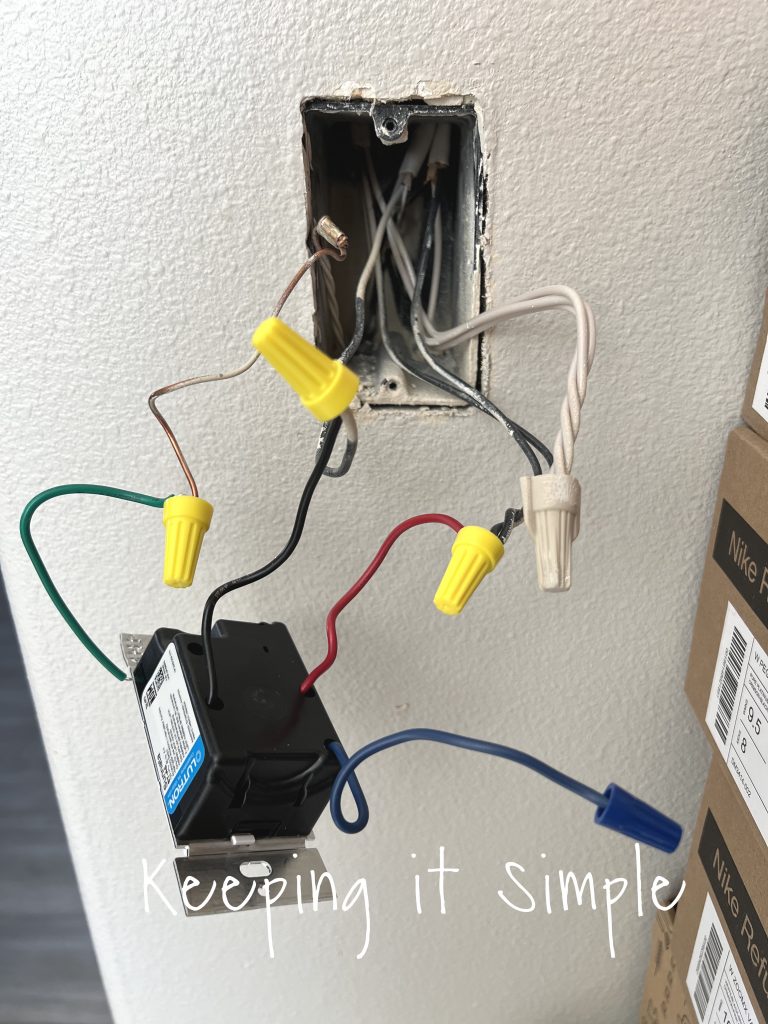
Wiring The Dimmer Switch
Wiring the dimmer switch is a key step in installing a dimmable light switch. This process controls the flow of electricity to your light, allowing you to adjust brightness. Proper wiring ensures safe and smooth operation of your dimmer switch.
Follow each step carefully. Turn off the power at the circuit breaker before you start. Use a voltage tester to confirm no electricity flows to the switch box. Safety first.
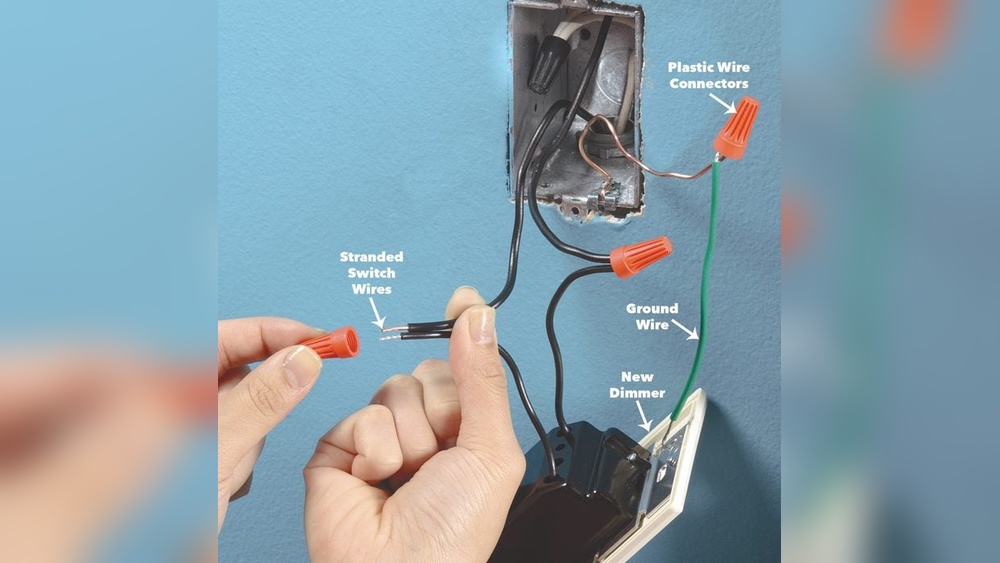
Identify Wires
Look inside the switch box to find the wires. Most boxes have a black (hot) wire, a white (neutral) wire, and a green or bare copper (ground) wire. The black wire carries power to the switch. The white wire returns power to the light. The ground wire protects against electrical faults.
Some dimmer switches need only two wires, but many require all three. Check the dimmer switch instructions. Label each wire with tape for easy identification.
Connect Wires To Dimmer
Match the wires from the dimmer switch to the wires in the switch box. Connect black to black, white to white, and green or bare copper to ground. Twist the ends of the same color wires together clockwise. Use wire nuts to secure the connections. Make sure no copper is exposed outside the wire nuts.
Do not force wires into the dimmer switch terminals. Follow the manufacturer’s guide carefully. Loose connections cause flickering or failure.
Secure Connections
After connecting wires, gently push them back into the switch box. Avoid pinching or bending wires sharply. Attach the dimmer switch to the box with screws. Tighten screws evenly to keep the switch flat.
Attach the switch cover plate. Turn the power back on at the breaker. Test the dimmer switch by adjusting the brightness. The light should respond smoothly without flickering.

Credit: www.gelighting.com
Mounting And Testing
Mounting and testing your dimmable light switch is a crucial step. This ensures the switch works correctly and safely. Careful mounting prevents loose connections and electrical issues. Testing confirms the dimmer adjusts light brightness smoothly. Follow these steps for a secure and functional installation.
Attach Dimmer To Wall
Place the dimmer switch into the electrical box carefully. Align the screw holes with the box. Use a screwdriver to fasten the screws tightly. Make sure the switch sits flush with the wall. Avoid over-tightening, which can damage the switch or wall plate.
Restore Power
Turn the power back on at the circuit breaker. Double-check that the breaker controls the correct circuit. Restore power only after securely mounting the dimmer. This step is essential for safe testing and operation.
Test Dimmer Functionality
Flip the dimmer switch on and off to check power flow. Adjust the dimmer knob or slider slowly. Observe the light brightness changes smoothly without flickering. Ensure the dimmer turns the lights fully off. Confirm the switch feels stable and responsive.
Troubleshooting Common Issues
Troubleshooting common issues with dimmable light switches helps keep your lights working well. Problems can happen even after correct installation. Identifying the cause quickly saves time and stress.
Below are some frequent problems and easy ways to fix them. Follow these tips to enjoy smooth dimmer performance.
Dimmer Not Working
First, check if the dimmer switch is properly connected. Loose wires cause it not to work. Turn off power before inspecting wires.
Also, confirm the dimmer matches your light type. Some dimmers work only with LED or incandescent bulbs. Using the wrong dimmer stops functionality.
Test the circuit breaker. A tripped breaker can cut power to the dimmer switch. Reset it if needed.
Flickering Lights
Flickering often shows a bad connection. Tighten all wire connections inside the switch box. Loose wires cause flicker.
Use compatible bulbs. Dimmers and bulbs must match. Low-quality bulbs flicker more under dimmers.
Check the dimmer’s wattage rating. Exceeding the limit causes flicker. Replace bulbs or dimmer to fix.
Buzzing Sounds
Buzzing comes from electrical noise inside the dimmer. Higher quality dimmers reduce this sound.
Try switching to LED bulbs designed for dimming. Some bulbs buzz less than others.
Ensure the dimmer is not overloaded. Too many bulbs on one dimmer cause buzzing. Spread the load if possible.
Maintenance Tips
Maintaining your dimmable light switch keeps it working well and lasting longer. Simple care helps avoid problems and ensures smooth dimming. Follow these easy tips to keep your switch clean and functional.
Cleaning The Switch
Turn off power before cleaning. Use a soft, dry cloth to wipe the switch. Avoid water or harsh chemicals that can damage it. Clean regularly to remove dust and grime. This keeps the switch looking good and working properly.
When To Replace
Replace the switch if it feels hot or flickers often. Cracks or broken parts also mean it is time for a new one. If dimming becomes uneven or stops working, consider replacement. Old switches may cause electrical issues. Safety first.
Upgrading To Smart Dimmers
Smart dimmers offer more control and convenience. They work with apps and voice commands. Upgrading can save energy and improve lighting. Choose models compatible with your home system. Installation is similar but may require more steps.
Credit: www.gelighting.com
Frequently Asked Questions
What Tools Are Needed To Install A Dimmable Light Switch?
You need a screwdriver, voltage tester, wire stripper, and wire nuts. A drill may help if new holes are required. Always turn off the power before starting the installation to ensure safety.
Can I Install A Dimmable Switch Myself Safely?
Yes, with basic electrical knowledge and safety precautions, you can install it yourself. Always turn off the circuit breaker and use a voltage tester. Follow the manufacturer’s instructions carefully to avoid hazards.
Will A Dimmable Switch Work With All Types Of Bulbs?
No, dimmable switches work best with compatible bulbs like dimmable LEDs or incandescent. Check the bulb packaging to ensure it supports dimming. Using incompatible bulbs can cause flickering or damage.
How Do I Wire A Dimmable Light Switch Correctly?
Connect the dimmer switch’s wires to the corresponding wires in the wall. Usually, black to black (hot), green to ground, and white if required. Follow the wiring diagram in the manual for precise connections.
Conclusion
Installing a dimmable light switch can change how you use light at home. It saves energy and lets you set the mood. Follow the steps carefully to stay safe. Take your time and double-check your work. Soon, you will enjoy soft, adjustable lighting in any room.
This small upgrade can make a big difference. Try it yourself and see how easy it is. Bright or dim, control is now in your hands.