Are you tired of fumbling with two separate switches every time you want to turn on your ceiling fan and light? Imagine controlling both with just one simple switch.
It’s not only convenient but also saves you space and makes your room look neater. If you’ve ever wondered how to put your ceiling fan and light on the same switch, you’re in the right place. You’ll discover easy steps to make this happen, even if you’re not an expert.
Keep reading, and you’ll soon enjoy the perfect blend of comfort and simplicity in your home.
Tools And Materials Needed
Before starting to put a ceiling fan and light on the same switch, gather all tools and materials. Having everything ready helps you work faster and safer. It also avoids trips to the store during the job.
Each tool has a specific role. Each material is important to connect wires properly and secure the fixtures. Use quality tools and materials to ensure a long-lasting setup.
Electrical Tester
This device checks if the power is off. It helps prevent electric shocks. Always test wires before touching them.
Screwdriver Set
You need screwdrivers to remove and attach screws. Flathead and Phillips types are usually required.
Wire Strippers
Wire strippers remove insulation from wires. They prepare wires for connections without damage.
Wire Nuts
Wire nuts connect and secure electrical wires. They keep wires from touching and causing shorts.
Electrical Tape
Use tape to wrap wire nuts and exposed wire ends. This adds extra safety and holds connections tight.
Voltage Detector Pen
This pen detects live wires without contact. It adds an extra safety check before starting work.
Ceiling Fan And Light Fixture
Choose a fan and light designed for single-switch operation. Check the product manual for wiring instructions.
Wire
Use the correct gauge wire for your circuit. Usually, 14 or 12 gauge wire works for ceiling fans and lights.
Credit: www.protoolreviews.com
Safety Precautions
Working with electrical wiring needs care. Safety is the first step when putting a ceiling fan and light on the same switch. Taking the right precautions protects you and your home from harm.
Before starting, turn off the power at the breaker box. This stops electricity from flowing to the wires. Use a voltage tester to make sure the power is off. Never trust the switch alone.
Wear rubber-soled shoes and use insulated tools. These reduce the risk of electric shock. Keep the work area dry and clear of clutter. Good lighting helps you see wires and connections well.
Turn Off Power At The Breaker
Locate the correct circuit breaker for the fan and light. Switch it off to cut power completely. Confirm the power is off with a voltage tester. This simple step saves lives.
Use A Voltage Tester
Test all wires before touching them. A voltage tester shows if wires carry electricity. Test each wire individually. Do not skip this step.
Wear Protective Gear
Wear rubber gloves and shoes for safety. Use tools with insulated handles. This protects you from shocks and accidents. Safety gear is essential for electrical work.
Work In A Safe Environment
Keep the area dry and clean. Remove objects that cause tripping or distractions. Good lighting helps you see wires clearly. A tidy space reduces accidents.
Planning The Wiring Setup
Planning the wiring setup is the first step to control a ceiling fan and light with one switch. Proper planning helps avoid mistakes and ensures safety. It saves time and effort during installation. Understanding the wiring details is important before starting any work.
Identify Existing Wiring
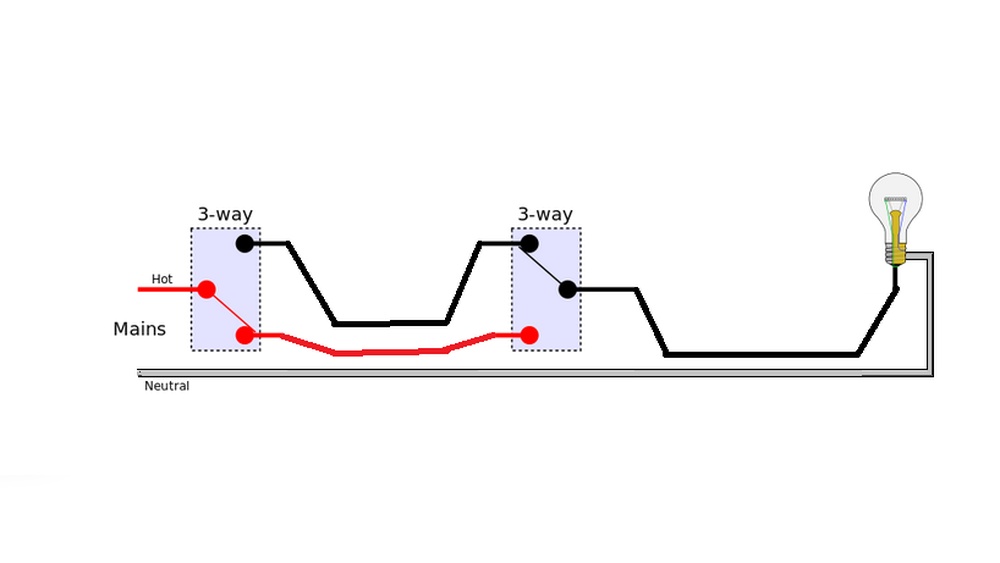
Find the wires coming from your ceiling box. Usually, you will see a black, white, and ground wire. Sometimes, there may be a red wire for the light. Check if the wires are live by using a voltage tester. Note which wire controls the power.
Select The Right Switch
Choose a switch that supports both fan and light control. A single-pole switch works well for simple setups. For more control, use a double switch or a remote control switch. Make sure the switch matches your wiring and fan model.
Understand Fan And Light Connections
The fan usually has separate wires for the motor and light kit. The black wire is for the fan motor. The blue or red wire is for the light. Both wires connect to the switch side. The white wires connect to neutral, and the green or bare wire is for ground.
Credit: www.protoolreviews.com
Turning Off Power Safely
Turning off power safely is the first step before working on any electrical project. It protects you from electric shocks and accidents. Always treat electricity with respect and caution. Never skip this step.
Knowing how to turn off power correctly ensures your safety and the safety of others. It also helps protect your tools and equipment from damage. Follow the right procedures every time.
Locate The Main Circuit Breaker
Find the main circuit breaker in your home. It is usually in the electrical panel. This panel controls all electricity in the house. Switching off the main breaker stops power to all rooms.
Turn Off The Correct Breaker
Look for the breaker that controls the room with the ceiling fan. It might be labeled. If not, switch off breakers one by one and test power. Only turn off the breaker for the fan’s room.
Use A Voltage Tester
After turning off the breaker, test the wires with a voltage tester. This tool shows if power is still flowing. If the tester lights up or beeps, power is still on. Do not touch wires until the tester shows no power.
Inform Others In The Home
Tell family members or roommates about the power being off. This prevents accidental switch-ons while you work. Use a note or a sign on the breaker panel as a reminder.
Wear Safety Gear
Wear insulated gloves and safety glasses. These protect against shocks and sparks. Always use tools with insulated handles. Safety gear reduces risk of injury during electrical work.
Removing Old Switch And Fixtures
Removing the old switch and fixtures is the first step. This process clears the way for installing a new switch that controls both the ceiling fan and light together.
Turn off the power at the circuit breaker. This step keeps you safe while working with wires.
Use a voltage tester to make sure no power is flowing to the switch or fixture. Safety first.
Removing The Old Switch Cover
Use a screwdriver to take off the switch cover plate. Keep the screws safe for later use.
Remove the cover gently to avoid damaging the wall or paint.
Detaching The Old Switch
Unscrew the old switch from the electrical box. Pull it out carefully.
Notice how the wires are connected to the switch terminals. Take a photo for reference.
Disconnecting The Wires
Loosen the terminal screws holding the wires. Disconnect each wire carefully.
Keep the wires separated and straight. This prevents confusion when connecting the new switch.
Removing The Old Ceiling Fan Or Light Fixture
Remove the fixture’s screws or nuts. Support the fixture while loosening it.
Lower the fixture gently. Disconnect the wires by loosening the wire nuts.
Set the old fixture aside safely.
Connecting Fan And Light To One Switch
Connecting a ceiling fan and light to one switch is a smart way to control both with a single flick. This setup saves space on your wall and simplifies your electrical control. It also helps keep your wiring neat and easy to manage.
This process involves combining the wires from the fan and light so they respond to the same switch. Careful attention to wiring and safety is important to make sure everything works well and stays safe.
Wiring The Fan And Light Together
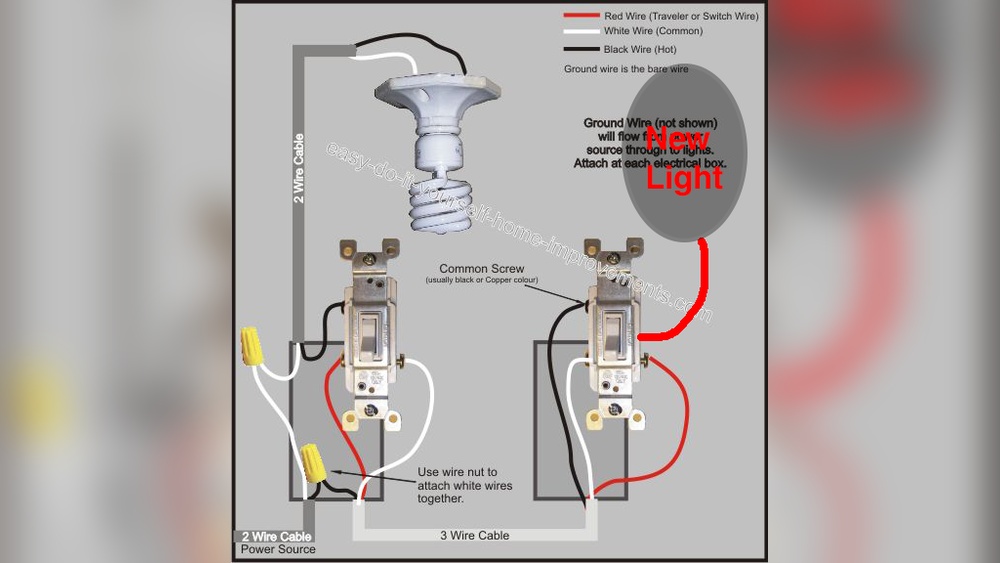
Start by turning off power at the circuit breaker. Identify the wires coming from the ceiling: usually black (hot), white (neutral), and green or bare (ground).
Connect the black wire from the switch to the black wires of both the fan and light. This link lets the switch control power flow to both devices.
Join the white wires from the ceiling, fan, and light. These are neutral wires and must be connected to complete the circuit.
Attach the green or bare copper wires to the fan’s and light’s grounding wires. Grounding is crucial for safety.
Securing Wire Connections
Twist wires tightly together using pliers for a strong bond. Cover each connection with a wire nut. This prevents wires from coming loose.
Check each wire nut by gently pulling on the wires. If any wire slips, retwist and secure again.
Arrange the connected wires neatly inside the electrical box. Avoid cramming to prevent damage or shorts.
Use electrical tape around wire nuts for extra security. This helps keep connections safe and insulated.
Installing The New Switch
Start by turning off the power at the breaker for safety. Connect the fan and light wires to the same switch, following the wiring instructions carefully. Secure all connections and test the switch to ensure both work together smoothly.
Turn Off Power At The Breaker
Safety comes first. Switch off the power at the circuit breaker. This prevents electric shocks. Use a voltage tester to confirm no power flows to the wires.
Remove The Old Switch
Unscrew the switch plate cover. Next, unscrew the old switch from the electrical box. Gently pull it out to expose the wires. Note the wire connections for later.
Connect Wires To The New Switch
Identify the hot, neutral, and ground wires. Attach the hot wire to the common terminal. Connect the neutral and ground wires to their proper terminals. Tighten all screws securely.
Secure The Switch And Replace Cover
Push the wires back into the box carefully. Screw the new switch into place. Attach the switch plate cover. Make sure it fits snugly without pinching wires.
Restore Power And Test
Turn the breaker back on. Test the switch by turning on the fan and light together. Both should work from the same switch. If not, recheck your connections.
Testing The Setup
Testing the setup is a key step after wiring the ceiling fan and light to the same switch. It ensures both parts work properly and safely. This step saves time and prevents any electrical issues later.
Take your time during testing. Check the switch, fan, and light carefully. Make sure everything operates as planned before finalizing the installation.
Turn On The Power
Start by turning the main power back on at the circuit breaker. This powers the switch and the ceiling fan light setup. Never test wiring without power. Safety first.
Flip The Switch
Next, flip the wall switch to the ON position. Watch if the ceiling fan and light both turn on. This confirms your wiring connects to one switch properly.
Check The Fan Operation
Listen to the fan blades. They should spin smoothly and quietly. Test different fan speeds if available. This confirms the fan motor wiring is correct.
Verify The Light Function
Look at the light bulb. It should turn on without flickering. Test the light by turning it on and off several times. This checks the light wiring and switch connection.
Test The Switch Off
Flip the switch to OFF. Both fan and light must stop running. This confirms the switch cuts power as expected. No power means safe wiring.
Inspect For Any Issues
Watch for unusual sounds or flickering lights. These signs show wiring problems. If you see any, turn off the power and recheck connections. Fix all issues before use.
Troubleshooting Common Issues
Putting a ceiling fan and light on the same switch can save space and simplify control. Sometimes, problems come up during or after installation. Knowing common issues helps fix them quickly. Below are frequent problems and how to solve them.
Incorrect Wiring Connections
Wrong wiring is the top cause of failure. Double-check all wire connections. Make sure black wires connect to the switch. White wires should connect to the neutral. Ground wires must be attached to the box or fan. Use a tester to confirm no power before touching wires.
Switch Not Controlling Both Fan And Light
Check if the switch supports both loads. Some switches only handle lights or fans. Replace with a switch made for dual control. Ensure the fan’s black and light’s blue wires join the switch wire. If they are separate, the switch controls only one device.
Fan Or Light Not Working
Look for loose wire connections inside the fan. Tighten all terminal screws. Inspect the bulbs for damage. Replace bulbs if needed. Verify the circuit breaker is on. Reset the breaker if it tripped. Test the switch with a voltage meter to confirm power flow.
Fan Speed Or Light Dimming Issues
Using incompatible switches causes dimming or speed problems. Use a fan-rated switch or dimmer made for ceiling fans and lights. Avoid combining a dimmer with a fan speed control. Check the fan’s manual for switch recommendations. Replace the switch to fix performance.
Switch Feels Hot Or Sparks
A hot switch signals a wiring problem or overload. Turn off power immediately. Inspect wiring for loose connections or damaged wires. Replace the switch with one rated for the fan and light load. Consult an electrician if unsure about safety or repairs.

Credit: diy.stackexchange.com
Frequently Asked Questions
How Do I Wire A Ceiling Fan And Light On One Switch?
To wire both on one switch, connect the fan and light wires to the same hot wire. Use the switch to control power flow. Ensure the neutral and ground wires are properly connected. Always turn off power before wiring for safety.
Can I Control Ceiling Fan And Light Separately On One Switch?
Yes, but it requires a dual switch or remote control. Using a single switch controls both simultaneously. Separate control needs extra wiring or specialized fan units with remote receivers.
What Tools Are Needed To Install Fan And Light On One Switch?
You’ll need a screwdriver, wire stripper, voltage tester, wire nuts, and electrical tape. Turn off power before starting. These tools help connect and secure wiring safely.
Is It Safe To Put Ceiling Fan And Light On One Switch?
Yes, it’s safe if wired correctly. Ensure connections follow electrical codes and power is off during work. Improper wiring may cause hazards or damage.
Conclusion
Putting a ceiling fan and light on the same switch saves space and effort. It makes controlling both easy with one click. Always follow safety steps to avoid problems. Double-check your wiring before turning the power back on. This simple setup works well in many rooms.
Now, you can enjoy cool air and light together. Try it yourself and see how neat it looks. Simple, smart, and useful.