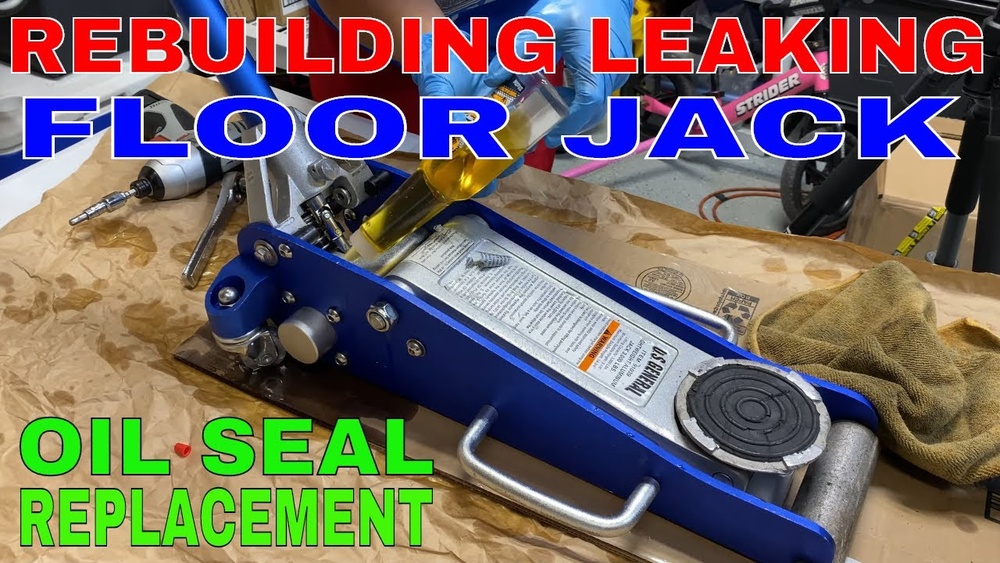
If your US General floor jack isn’t lifting like it used to, don’t rush to buy a new one just yet. You can rebuild it yourself and save time and money.
Imagine getting your jack working smoothly again with just a few simple steps. In this guide, you’ll discover exactly how to bring your floor jack back to life. Ready to take control and fix your tool like a pro? Keep reading, and you’ll learn everything you need to know.
Tools And Materials Needed
Rebuilding a US General floor jack requires the right tools and materials. Having everything ready makes the repair easier and safer. Each item plays a key role in the process.
Gathering all tools and parts before starting saves time and avoids frustration. Safety gear protects you during the rebuild. Prepare well to get the best results.
Essential Tools
- Socket wrench set for bolts and nuts
- Flathead and Phillips screwdrivers
- Adjustable wrench for various sizes
- Hammer to loosen stuck parts
- Needle-nose pliers for small components
- Hydraulic fluid pump for refilling
- Clean rags for wiping parts
- Lubricant spray to ease movement
Replacement Parts
- New hydraulic fluid for smooth operation
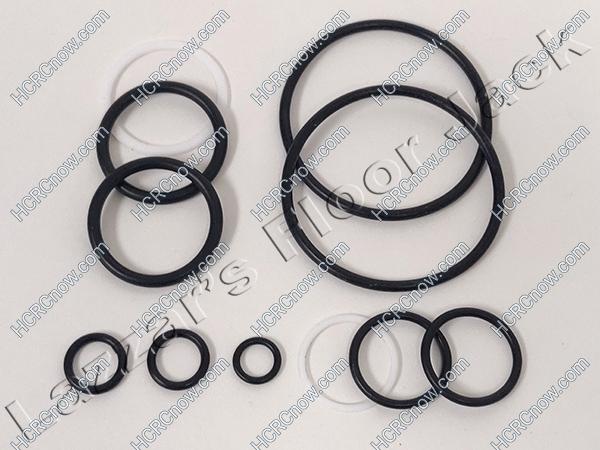
- O-rings and seals to prevent leaks
- Pump piston or ram if worn out
- Release valve parts to control pressure
- Spring replacements for proper tension
- Gaskets for tight seals
Safety Gear
- Safety gloves to protect your hands
- Safety goggles to shield your eyes
- Work apron or clothes to keep clean
- Proper footwear to avoid injury
- Well-ventilated workspace to avoid fumes

Credit: www.hcrcnow.com
Preparing The Floor Jack
Preparing your US General floor jack is the first step in rebuilding it safely and effectively. Proper preparation helps you avoid damage and ensures smooth operation after repair. This phase involves cleaning, draining old fluid, and checking each part carefully.
Cleaning The Jack
Remove dirt and grease from the floor jack’s surface. Use a cloth and mild cleaner to wipe all areas. Clean thoroughly around moving parts and joints. Dirt can cause wear and stop the jack from working well.
Draining Hydraulic Fluid
Open the release valve to drain old hydraulic fluid. Place a container underneath to catch the fluid. Dispose of the used fluid properly. Old fluid can contain dirt and lose its lifting power.
Inspecting Components
Look over all parts for damage or wear. Check the hydraulic cylinder, seals, and release valve. Find cracks, rust, or leaks that need fixing. Replace damaged parts before rebuilding the jack.
Disassembling The Jack
Disassembling a US General floor jack is the first step in rebuilding it. Careful disassembly helps avoid damage and makes reassembly easier. Take your time and organize parts as you go. Clear space and use basic tools to keep things simple.
Removing The Handle
Start by removing the handle. This part controls the jack’s lifting action. Locate the handle pin near the base. Use a hammer and punch to tap out the pin. Pull the handle out gently. Set the handle aside for cleaning or replacement.
Taking Apart The Hydraulic System
Next, focus on the hydraulic system. This system powers the lifting mechanism. Release any pressure by opening the release valve. Remove the hydraulic pump assembly carefully. Check for fluid leaks or worn seals. Keep track of small parts like springs and screws.
Separating The Frame Components
Finally, separate the frame components. Remove bolts holding the frame together. Use a wrench or socket set for this task. Gently pull apart the base and lifting arm. Inspect all metal parts for cracks or wear. Lay parts out in order to ease reassembly.
Inspecting And Replacing Parts
Inspecting and replacing parts is a key step in rebuilding a US General floor jack. This process ensures the jack works safely and smoothly. Careful checks help spot worn or damaged parts early. Replacing these parts keeps the jack strong and reliable.
Checking Seals And O-rings
Seals and O-rings stop oil from leaking. Look for cracks, tears, or hard spots. Old seals lose their flexibility and cause leaks. Replace any damaged seals with new ones. Use the correct size for a tight fit. Clean the area before installing new seals.
Replacing Worn Components
Check the jack’s main parts for wear. Look at the pump, release valve, and wheels. Worn parts may cause poor lifting or leaking oil. Remove broken or damaged parts carefully. Use parts made for your floor jack model. Proper replacement improves safety and performance.
Lubricating Moving Parts
Lubrication keeps the jack parts moving smoothly. Use a light machine oil or grease. Focus on joints, hinges, and the pump piston. Avoid over-lubricating; too much oil attracts dirt. Clean old grease before applying new lubricant. Regular lubrication extends the jack’s life and ease of use.
Reassembling The Floor Jack
Reassembling the floor jack is a key step after cleaning and fixing parts. It brings everything back to working order. Take your time to fit each piece carefully. Proper assembly ensures the jack lifts safely and holds weight well. Follow these steps to rebuild the jack correctly.
Reinstalling The Hydraulic System
Start by placing the hydraulic cylinder back into the frame. Align it with the piston and pump assembly. Insert seals and rings carefully to prevent leaks. Attach the hydraulic hose to the cylinder firmly. Test the piston movement before sealing everything. Add hydraulic fluid as needed to fill the system. Check for smooth operation by pumping the handle slowly.
Reattaching The Handle And Frame
Next, connect the handle to the pump lever. Insert the handle pin and secure it with a clip. Make sure the handle moves freely up and down. Align the main frame parts and fit them together. Attach the wheels to the frame with bolts. Check that the frame parts lock tightly in place. The handle should control the lifting action smoothly.
Tightening Fasteners
Use the correct tools to tighten all screws and bolts. Tighten fasteners evenly to avoid misalignment. Avoid overtightening, which may damage threads or parts. Double-check each fastener to ensure it is secure. Loose fasteners can cause the jack to fail under load. Proper tightening keeps the jack safe and stable. Test the jack’s lifting and lowering before final use.
Refilling And Bleeding The Jack
Refilling and bleeding a US General floor jack is crucial after rebuilding. This process restores the jack’s hydraulic power and removes trapped air. Without it, the jack won’t lift properly or could fail under load. Follow each step carefully to ensure safety and performance.
Adding Hydraulic Fluid
Start by locating the fluid fill port on the jack. Use the recommended hydraulic fluid type for your model. Slowly pour the fluid into the port. Fill until the fluid level reaches just below the fill hole. Avoid overfilling, which can cause leaks or pressure issues.
Removing Air Bubbles
Air trapped inside the hydraulic system reduces lifting power. To remove air, open the release valve slightly. Pump the jack handle several times. This action pushes air out and draws fluid into the system. Close the valve once no more air bubbles appear in the fluid.
Testing For Leaks
Check all seals and connections for fluid leaks. Pump the jack to build pressure and watch for drips. Tighten fittings if you spot any leaks. Wipe off excess fluid and test again. A leak-free jack operates safely and holds weight steadily.
Final Testing And Maintenance Tips
After rebuilding your US General floor jack, final testing and maintenance are vital. They ensure the jack works safely and lasts longer. Proper checks and care keep the jack in top shape for future use.
Operational Checks
Start by pumping the handle to raise the jack. Watch the lifting speed and smoothness. The jack should rise steadily without jerks or leaks.
Next, lower the jack slowly. It must descend evenly and stop without sudden drops. Check for any unusual sounds during operation.
Test the release valve. It should open and close easily. Make sure the jack holds weight firmly without slipping.
Routine Care Advice
Clean the jack regularly to remove dirt and dust. Wipe down moving parts with a dry cloth after each use.
Lubricate all pivot points and wheels with light oil. Avoid over-oiling, which can attract more dirt.
Check hydraulic fluid levels monthly. Refill with the recommended fluid if low.
Store the jack in a dry place to prevent rust. Cover it to protect from moisture and debris.
Credit: www.hcrcnow.com

Credit: www.youtube.com
Frequently Asked Questions
How Do I Rebuild A Us General Floor Jack Safely?
To rebuild safely, first release all pressure and remove hydraulic fluid. Wear gloves and goggles. Follow the manual for disassembly. Clean parts thoroughly and replace damaged seals. Reassemble carefully, checking for leaks and proper function before use.
What Tools Are Needed To Rebuild A Us General Floor Jack?
You need basic hand tools like wrenches, screwdrivers, pliers, and a hammer. Also, get replacement seals and hydraulic fluid. A clean workspace and safety gear like gloves and goggles are essential for a smooth rebuild.
How Often Should I Rebuild My Us General Floor Jack?
Rebuild your floor jack when it shows signs of leaking, loss of pressure, or slow lifting. Regular inspection every 6-12 months helps maintain safety and performance. Frequent use may require more frequent maintenance.
Can I Rebuild A Us General Floor Jack Myself?
Yes, with basic mechanical skills and proper tools, you can rebuild it. Follow a detailed guide or manual carefully. Take your time, stay organized, and prioritize safety during the process.
Conclusion
Rebuilding a US General floor jack takes patience and care. Follow each step slowly and check your work often. Use the right tools and clean parts for best results. This helps keep the jack safe and working well. Regular maintenance can save money and extend the jack’s life.
Keep learning and practicing to feel more confident. Your floor jack will be ready for the next job soon. Simple fixes can make a big difference. Give your jack the attention it deserves.