Are you looking to add an outlet where there’s only a light switch? It might seem tricky at first, but with the right steps, you can do it yourself safely and easily.
Imagine having a convenient spot to plug in your devices without searching for a nearby outlet. This guide will show you exactly how to install an outlet from a light switch, saving you time and money. Keep reading, and you’ll gain the confidence to tackle this simple home upgrade today.
Tools And Materials Needed
Installing an outlet from a light switch needs the right tools and materials. This helps you work safely and finish the job well. Having everything ready saves time and avoids mistakes.
Below is a list of tools and materials needed to install an outlet from a light switch. Each item plays a key role in the process.
Essential Tools
- Screwdriver set (flathead and Phillips)
- Wire strippers
- Voltage tester
- Needle-nose pliers
- Drill with bits
- Measuring tape
- Utility knife
- Electrical tape
Required Materials
- Electrical outlet (receptacle)
- Outlet cover plate
- Electrical box
- Wire nuts
- Romex cable (14/2 or 12/2 gauge)
- Grounding wire
- Wire connectors
Safety Equipment
- Insulated gloves
- Safety goggles
- Dust mask
- Flashlight or headlamp
Safety Precautions
Turning off the power at the circuit breaker is essential before starting. Always use a voltage tester to ensure wires are safe to touch. Wear insulated gloves to protect against shocks.
Turn Off Power At The Circuit Breaker
Always switch off the power before starting any electrical work. Do not rely on the light switch alone. Find the correct circuit breaker and turn it off. Use a voltage tester to confirm no electricity flows. Safety first. No shortcuts.
Use Proper Tools And Equipment
Choose insulated tools designed for electrical work. Avoid metal tools without insulation. Wear rubber-soled shoes and gloves. Use a sturdy ladder if needed. Good tools reduce the risk of shocks and accidents.
Check For Existing Wiring Issues
Inspect the switch box for damaged or loose wires. Old wires may need replacement. Look for signs of wear or burns. Fix any wiring problems before installing the outlet. Safe wiring protects your home and family.
Follow Local Electrical Codes
Each area has rules for electrical installations. Research local codes or ask an expert. Use the correct wire size and outlet type. Proper installation avoids fines and hazards. Respect the rules for a safe job.
Test The Outlet After Installation
After installing, restore power and test the outlet. Use a plug tester to check for proper wiring. Ensure the outlet works and is grounded. Testing confirms safety and function. Do not skip this important step.
Turn Off Power
Turning off the power is the first and most important step. It keeps you safe from electric shocks. Never start any electrical work without cutting the power supply.
Even a small mistake can cause serious injury. Always treat electricity with respect. Safety must be your top priority.
Locate Your Circuit Breaker
Find your home’s main circuit breaker box. It is usually in the basement, garage, or utility room. Look for a metal box with a door.
Open the box carefully. Inside, you will see switches labeled for different rooms or areas.
Identify The Correct Breaker
Look for the breaker that controls the light switch you want to work on. Labels or markings can help. If unclear, turn off the main breaker to cut all power.
Switch Off The Breaker
Flip the breaker switch to the OFF position. This stops the flow of electricity. Double-check by trying the light switch to confirm power is off.
Use A Voltage Tester
Always test the wires with a voltage tester. It confirms no electricity is present. Touch the tester to the wires inside the switch box.
No light or sound means the power is off. If the tester shows power, turn off the correct breaker again.

Credit: www.do-it-yourself-help.com
Remove Light Switch Cover
Removing the light switch cover is the first step to access wiring safely. This allows you to connect a new outlet from the existing switch box. Always turn off power before starting to avoid any risk.
Prepare Your Tools
Start with gathering basic tools. A screwdriver is essential. Usually, a flathead or Phillips screwdriver works.
Have a small container ready to keep screws safe. This prevents losing them during the process.
Safety first. Switch off the power from the circuit breaker. This stops any electric shock risk.
Double-check by flipping the light switch. The light should not turn on.
Unscrew The Cover Plate
Locate the screws holding the cover plate. They are usually on top and bottom of the plate.
Use the screwdriver to remove screws carefully. Keep them in your container.
Remove The Cover Plate
Gently pull the cover plate away from the wall. It should come off easily.
Be cautious not to damage the wall or wiring behind the plate.
Identify Wiring Configuration
Identifying the wiring configuration is the first step before installing an outlet from a light switch. It helps you understand how electricity flows in the circuit. This knowledge prevents mistakes and keeps the work safe.
Electric wiring can differ by home and setup. Some switches control power to a light only. Others may have power passing through them to other parts of the circuit. Knowing the exact setup is essential to connect the new outlet properly.
Locate The Switch Box
Start by removing the switch cover plate. Use a screwdriver to open the box. Look inside to see the wires connected to the switch. Take note of the number of wires and their colors.
Identify Hot, Neutral, And Ground Wires
Hot wires usually have black or red insulation. Neutral wires are typically white. Ground wires are bare copper or green. Use a voltage tester to confirm which wire is live. This step is crucial to avoid shocks.
Check For Constant Power Source
Some switches receive constant power, meaning the outlet can work independently. Test wires with a voltage tester to find if power is always flowing. This helps decide where to connect the outlet wires.
Trace The Wiring Path
Follow wires inside the box to see where they lead. Some may go to the light fixture; others might run to another outlet. Understanding this path clarifies how to tap power safely for the new outlet.
Plan Outlet Location
Planning where to place the new outlet is the first important step. The right location makes the outlet useful and safe. Careful planning avoids future problems and extra work.
Think about what you will plug into the outlet. Choose a spot near that area for easy access. Also, check the wall space and nearby furniture. Make sure the outlet will fit without blocking anything.
Consider the height of the outlet from the floor. Most outlets sit about 12 to 18 inches above the floor. This height works well for most uses. Adjust the height if you need special access, like for a desk or counter.
Look for existing electrical wires and studs inside the wall. Avoid drilling into these. Use a stud finder to locate studs. Mark the area where you will install the outlet box.
Check Wall Space And Furniture Placement
Look around the room where you want the outlet. Notice where furniture sits and how you use the space. Avoid placing the outlet behind large furniture. Keep it reachable and visible.
Determine Outlet Height
Measure from the floor to decide the outlet height. Standard height is between 12 and 18 inches. This height is easy to reach and safe to use. Change it for special needs, like kitchen counters.
Locate Studs And Wiring
Use a stud finder to find wall studs. Mark stud locations clearly. Avoid placing the outlet box on a stud. Check for existing wires to prevent damage. Safety is key during installation.
Plan For Future Use
Think about how the space might change later. Add an outlet where it will still be useful. Consider extra outlets for multiple devices. Plan now to avoid adding outlets later.
Run Electrical Cable
Running electrical cable is a key step when adding an outlet from a light switch. It connects the power source to the new outlet. This process requires care to ensure safety and proper function.
Use the right type of cable for your home’s wiring. Most homes use 14/2 or 12/2 NM cable for outlets. Check your local electrical code to confirm the correct size.
Turn Off The Power
Before running cable, switch off the power at the breaker panel. This step prevents electric shock and injury. Use a voltage tester to verify the power is off.
Measure And Cut The Cable
Measure the distance from the switch box to the new outlet location. Add a few extra feet for flexibility. Cut the cable to the measured length using wire cutters.
Drill Holes For Cable Routing
Drill holes through wall studs or joists to run the cable neatly. Keep holes centered to avoid weakening the structure. Use a drill bit sized for the cable diameter.
Feed The Cable Through Walls
Push the cable through the drilled holes carefully. Avoid sharp bends that can damage the wire. Leave enough cable at both ends for connections.
Secure The Cable
Staple the cable to wall studs every 4-6 feet. Do not tighten staples too much to avoid crushing the cable. Keep cable away from heat sources and sharp edges.
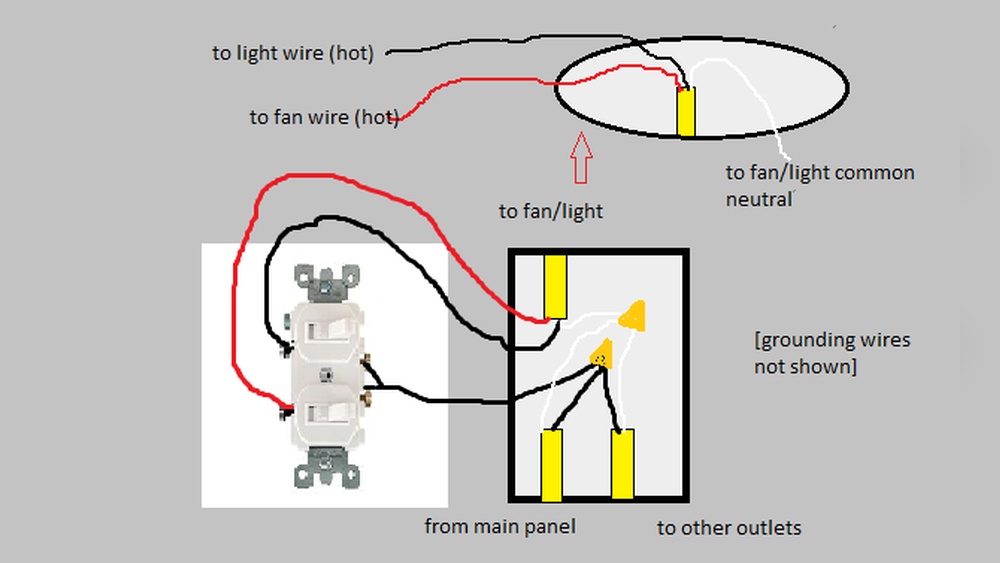
Connect Wires To Outlet
Connecting wires to the outlet is a key step in installing an outlet from a light switch. This task requires care to ensure safety and proper function. Proper wire connections make the outlet work without issues. Follow the steps carefully to connect the wires correctly.
Identify The Wires
First, find the black, white, and ground wires. Black is usually the hot wire. White is the neutral wire. The ground wire is green or bare copper. Confirm each wire before proceeding.
Prepare The Wires
Strip about half an inch of insulation from the wire ends. Use a wire stripper for a clean job. Avoid cutting too much wire. Clean, exposed wire ensures a strong connection.
Attach The Hot Wire
Connect the black (hot) wire to the brass screw on the outlet. Wrap the wire clockwise around the screw. Tighten the screw firmly to hold the wire in place.
Attach The Neutral Wire
Connect the white (neutral) wire to the silver screw. Wrap it clockwise, just like the hot wire. Tighten the screw to secure the wire firmly.
Attach The Ground Wire
Connect the ground wire to the green screw. This wire is crucial for safety. Tighten the screw to keep the wire secure.
Check All Connections
Ensure all wires are tight and secure. Loose wires can cause shorts or shocks. Tug gently on each wire to test the connection.
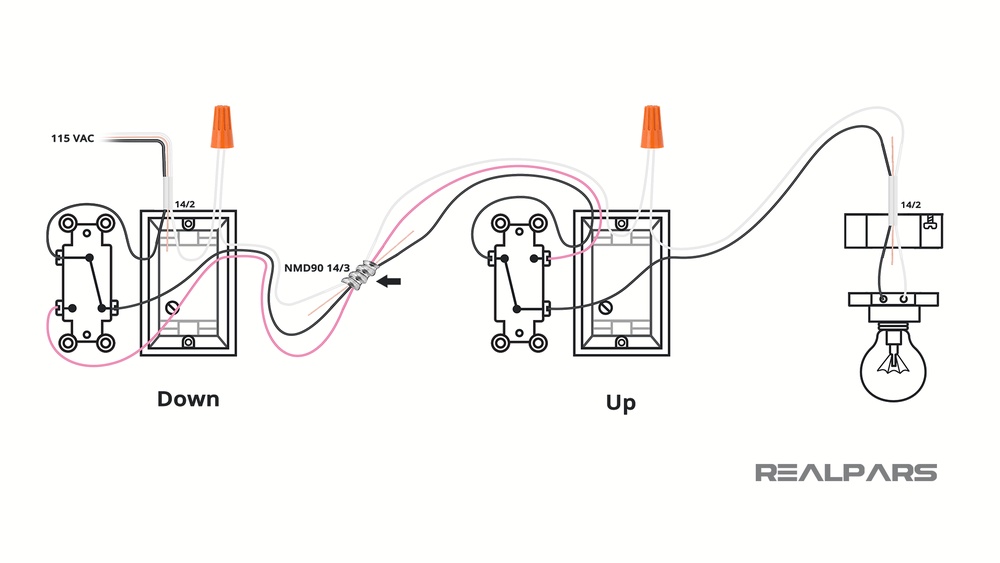
Modify Light Switch Wiring
Changing light switch wiring lets you add a new outlet easily. This guide shows how to connect an outlet using existing switch wires. Step-by-step instructions make the process clear and safe.
Understanding The Existing Light Switch Wiring
Before changing the wiring, turn off the power at the breaker. Use a voltage tester to confirm no electricity flows. Remove the light switch cover and unscrew the switch from the wall. Observe how the wires connect to the switch. Usually, there are two or three wires: black (hot), white (neutral), and green or bare (ground). Knowing which wire does what is important. Take a photo for reference. This helps avoid confusion later.
Disconnecting The Light Switch Safely
Carefully disconnect the wires from the light switch terminals. Use a screwdriver to loosen the screws holding the wires. Do not pull on the wires themselves. Keep the wires separated to prevent accidental contact. Wrap wire nuts on the ends for safety. This stops wires from touching metal or each other. Always handle wires gently and with care.
Adding A Neutral Wire For The Outlet
Most light switch boxes lack a neutral wire. An outlet requires a neutral to work safely. Check if a white neutral wire exists in the box. If not, you may need to run a new neutral wire from the main electrical panel or a nearby outlet. This step is crucial. Without a neutral, the outlet will not function properly. Consult a professional if unsure about this step.
Connecting The Outlet To The Modified Wiring
Attach the black (hot) wire to the outlet’s brass terminal. Connect the white (neutral) wire to the silver terminal. Secure the green or bare ground wire to the green screw. Double-check all connections for tightness and correctness. Push the wires carefully back into the box. Screw the outlet into place. Replace the cover plate once done.

Credit: www.angi.com
Secure Outlet And Switch
Securing the outlet and switch is an important step in the installation process. It ensures safety and proper function. Loose connections can cause sparks or shorts. Tightening everything correctly prevents electrical hazards and keeps your devices working well.
Attach The Outlet To The Electrical Box
First, align the outlet with the electrical box. Use the screws provided to fasten it firmly. Make sure the outlet sits flush against the wall. Do not overtighten screws; this can crack the outlet or box.
Secure The Switch In Place
Next, position the switch inside its box. Insert screws into the mounting holes. Tighten the screws evenly to avoid tilting. The switch should feel stable and not move when pressed.
Check Wire Connections
Ensure all wires stay firmly attached to terminals. Loose wires may cause poor contact or sparks. Tug gently on each wire to test security. Tighten any loose screws holding the wires.
Install Wall Plates
Once both outlet and switch are secure, place the wall plates. Screw them in carefully without forcing. Wall plates protect the wiring and give a clean look. Check that plates fit snugly and cover all openings.
Restore Power And Test
Restoring power and testing the new outlet is the final step in your installation process. This step ensures the outlet works safely and correctly. Taking time to test helps avoid electrical problems later.
Restore Power To The Circuit
Go to your home’s breaker panel. Find the breaker you turned off for this project. Flip the breaker back to the ON position. This restores electricity to the outlet and switch.
Double-check other breakers if power does not return. Sometimes labels can be unclear or switches near each other may be off.
Test The Outlet With A Voltage Tester
Use a voltage tester or a simple outlet tester. Plug it into the new outlet. Check if the tester lights up or shows voltage. This confirms the outlet gets power.
Test both slots of the outlet. Ensure the tester reads the proper voltage for your area. No voltage means wiring might be loose or incorrect.
Verify The Light Switch Operation
Turn the light switch on and off. See if the connected light or fixture works properly. The switch should not affect the outlet’s power.
Make sure the switch does not cause flickering or sparks. If it does, turn off power and check connections again.
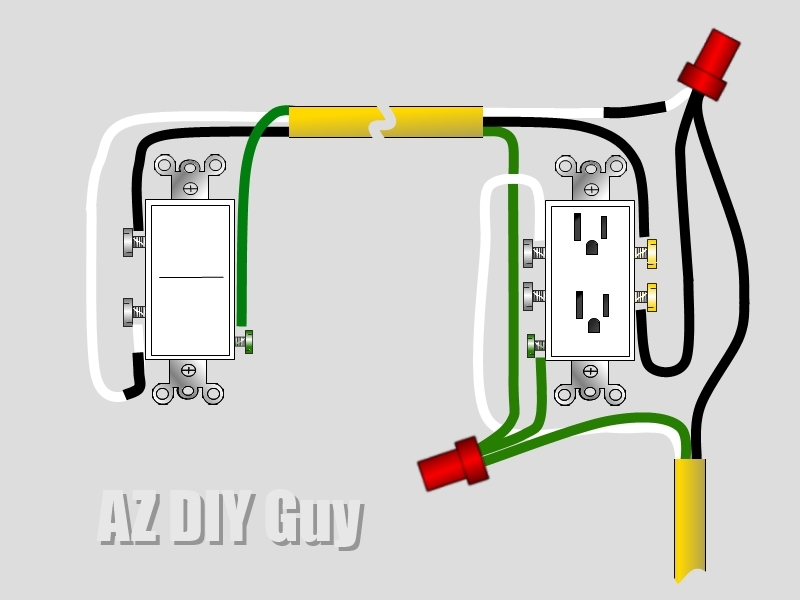
Credit: www.azdiyguy.com
Troubleshooting Tips
Troubleshooting is key when installing an outlet from a light switch. Problems can occur at any step. Knowing common issues helps fix them fast. Here are simple tips to solve common problems.
Check The Power Supply
First, confirm the power is off. Use a voltage tester on the switch and outlet wires. If power is still on, turn off the correct breaker. Safety comes first.
Verify Wiring Connections
Loose or wrong wires cause outlet failure. Match wire colors: black to black, white to white, and ground to ground. Tighten all screws and connections securely.
Inspect The Outlet And Switch
Damaged parts stop working. Look for cracks, burn marks, or corrosion. Replace any faulty outlet or switch with new ones.
Test The Circuit Breaker
A tripped breaker cuts power. Reset the breaker by switching it off and on. If it trips again, a short circuit may exist.
Use A Continuity Tester
Test wires for breaks or faults. A continuity tester shows if electricity flows through wires. Replace wires if no continuity is found.
Confirm Grounding
Proper grounding prevents shocks and damage. Check the ground wire is connected to the outlet and box. Use a tester to verify ground presence.
Check Outlet Placement
Some outlets need a neutral wire. Verify the switch box has a neutral wire available. Without it, the outlet may not work correctly.
Frequently Asked Questions
How Do I Safely Install An Outlet From A Light Switch?
Turn off power at the circuit breaker before starting. Use a voltage tester to confirm no power. Follow wiring codes and connect the outlet using appropriate wire gauges. Secure all connections and mount the outlet properly to ensure safety.
What Tools Are Needed To Install An Outlet From A Switch?
You need a voltage tester, wire stripper, screwdriver, needle-nose pliers, electrical tape, wire nuts, and a new outlet. These tools help you safely cut, strip, and connect wires for a proper installation.
Can I Use The Existing Switch Wiring For The Outlet?
Yes, if the wiring meets electrical codes and can handle the load. Use a shared neutral and proper grounding. Confirm the circuit can safely support both the switch and outlet without overloading.
How Do I Connect Wires From The Switch To The Outlet?
Identify the hot, neutral, and ground wires. Connect the outlet’s hot terminal to the switch’s hot wire. Attach neutral wires together, and connect ground wires to the outlet’s ground terminal. Ensure all connections are tight and secure.
Conclusion
Installing an outlet from a light switch is a useful skill. It adds convenience and saves space in your home. Always turn off the power before starting any work. Follow safety steps carefully to avoid accidents. Use the right tools and materials for the job.
Take your time and check each connection twice. With patience, you can finish this project successfully. This simple upgrade can make daily life easier. Try it yourself and enjoy the benefits of a new outlet.